THE HIGH GROUND: A Guide to the Best Boost Spots in CS:GO
Today, we're gonna look at the best off-angles, and boost spots to use for highest impact on the competitive map pool.
Today, we're gonna look at the best off-angles, and boost spots to use for highest impact on the competitive map pool.
Some would say that CS:GO is fundamentally a game of angle peeking and angle holding. This very important part of the game is reflected directly in your ability to kill your opponents and convert rounds for your team. A very important aspect of winning these aim duels is positioning.
A tactical shooter like CS:GO allows you to win aim duels simple based on the advantages you receive due to your better positioning. Standard map positions are usually pre-aimed by better players, and playing in these angles leads to the opponent having a comparatively easier time killing you. They are already ready for you and all they have to do is press Mouse1 before you do. This is where off-angles come in, and in this article's case, the more extreme boost angles. Off-angles definitely help catch your opponents off-guard, and give you a slight moment more to hit your shot before them, whereas boost angles can give you access to straight up inaccessible areas and positions.
We will be going through a few great positions you can self boost onto, or be boosted onto by a teammate on all the maps in the competitive pool, and how you can make good use of them.
One of the strongest angles most solo-queue and PUG players on Mirage don't use is the boost on Short B boxes. You and a player will reach the box and player 1 will crouch and allow the other player to be boosted on him in the general manner.
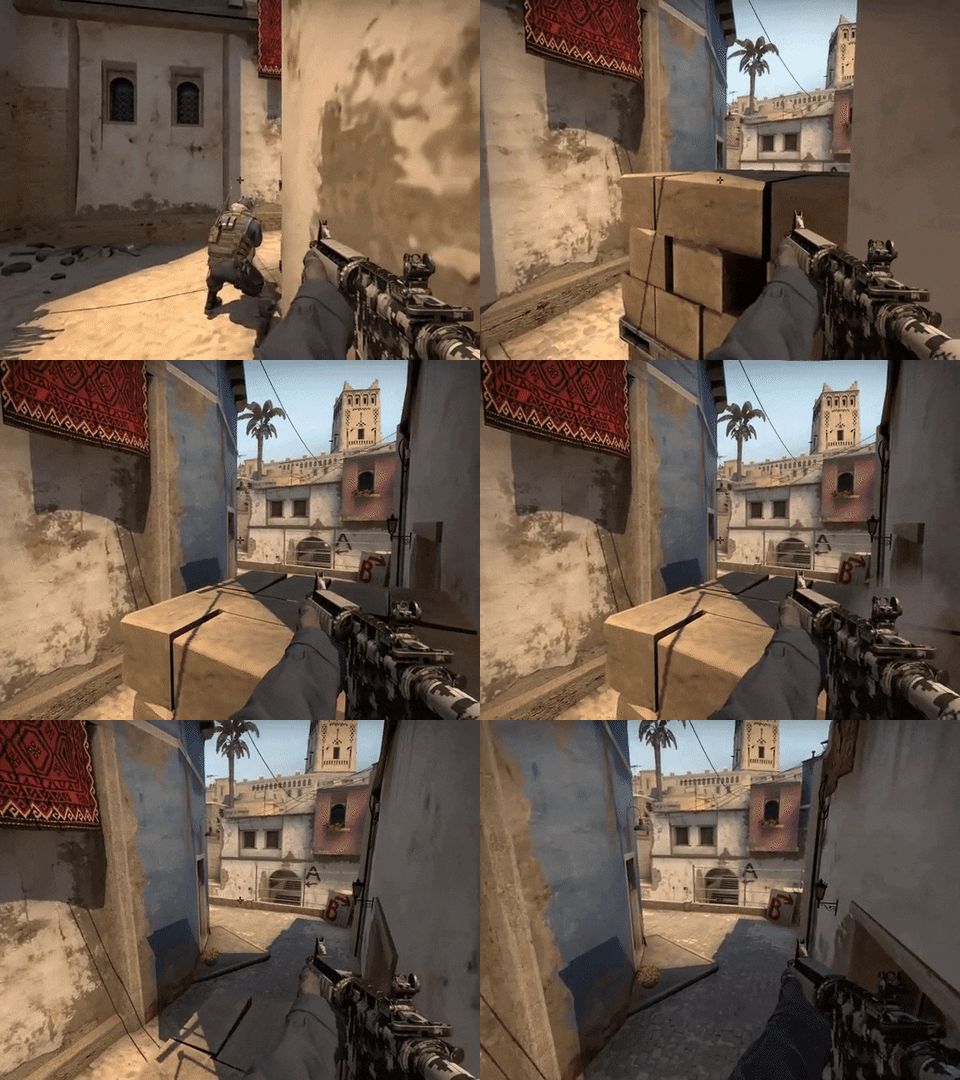
This boost allows you to get a very strong off-angle on the Ts pushing Mid and pushing toward Chair. No Ts expect this angle when peeking Short from Chair, or while pushing Lower Mid. You can fall off after one kill and reposition very easily. This allows you to get a free pick without dying generally. However one of the most important uses of this boost is in retakes where you can boost a player up here and he can clear some of the common angles on site and Apartments from this unexpected vantage point. Other players can push site safely while this player holds a confirmed player position for their peek.
A very important position on Mirage is Nest. It is extremely helpful to gain control of this position as a T. To do that, you can either self boost or get boosted on to this position.
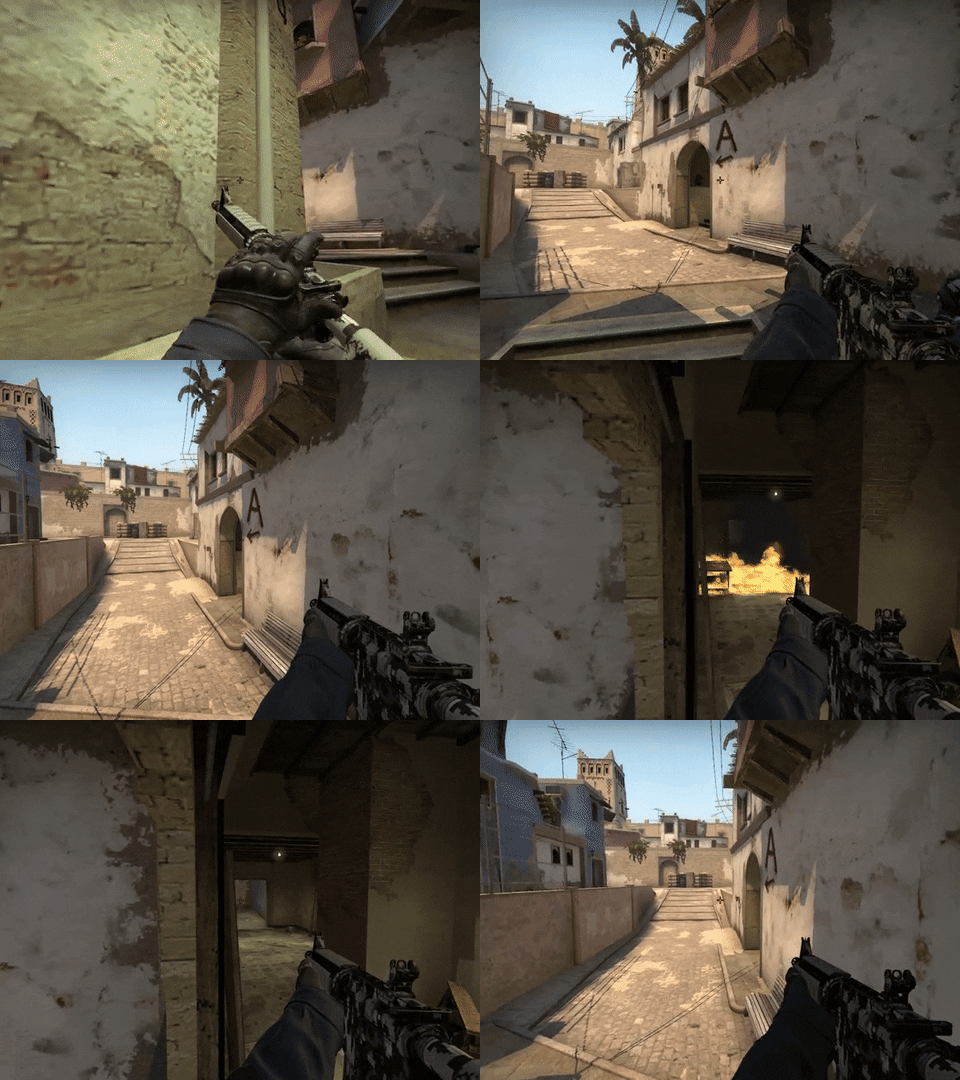
Although you can self-boost into it from the bench, it creates a sound which will let the CTs know you have made this play. What this bench does is give the CTs a sense of security if no sound has been made though, which you can abuse by getting into nest via a boost and catching CTs seriously off-guard.
You can aggressively flank onto B via Market, or into A from CT or Jungle. You can also simply cut off rotations and be a massive thorn for the CT in such an advanced position.
The boost onto hut at Short A/Brackets on Inferno is an interesting boost with a lot of potential for replayability and outplays. Inferno is filled with angles of this sort, where you can definitely play mind games with your opponent
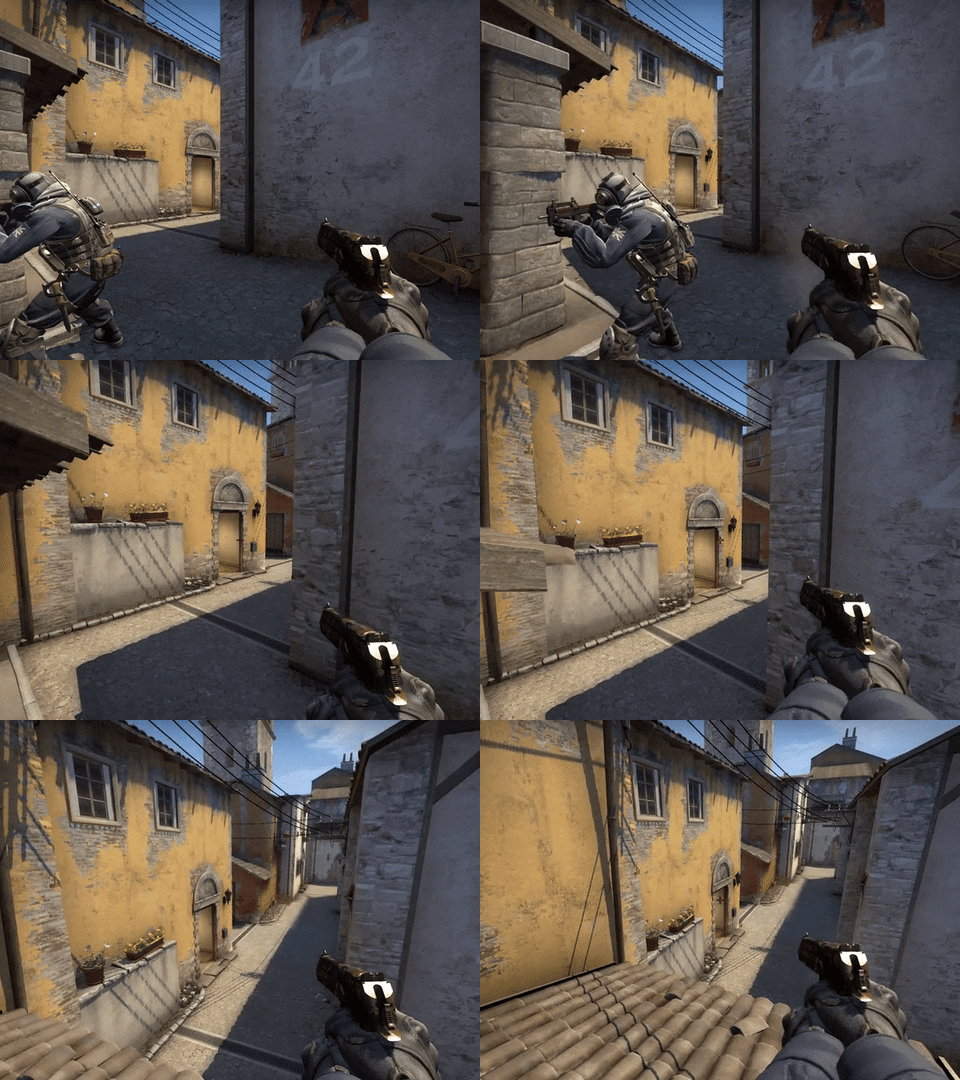
This angle can be used when you have a crossfire setup on Mid, but also can be run when you play a double A Short setup with one player even playing anti-flash under Balcony, or just baiting under Balcony. Another setup could be one player inside Boiler watching for the push, while also being protected from any flashes Mid and swinging Mid off of the boosted players contact. This angle gets stronger as the round progresses, and is a round changer in late rounds.
You can also use this spot as a T, as a different avenue of peeking into site, or to work a pick into the site or Pit. Another smart way you can use this is that you can leave a lurker behind boosted up here if the CTs have been conditioned into playing more passively. This lurker can get at least one kill and fall off and continue to cut off rotations from Arch as well.
One of the most important boosts in the game is the CT-ledge boost on B-site. This is fairly commonly used and is very effective in both defending site and in retakes.
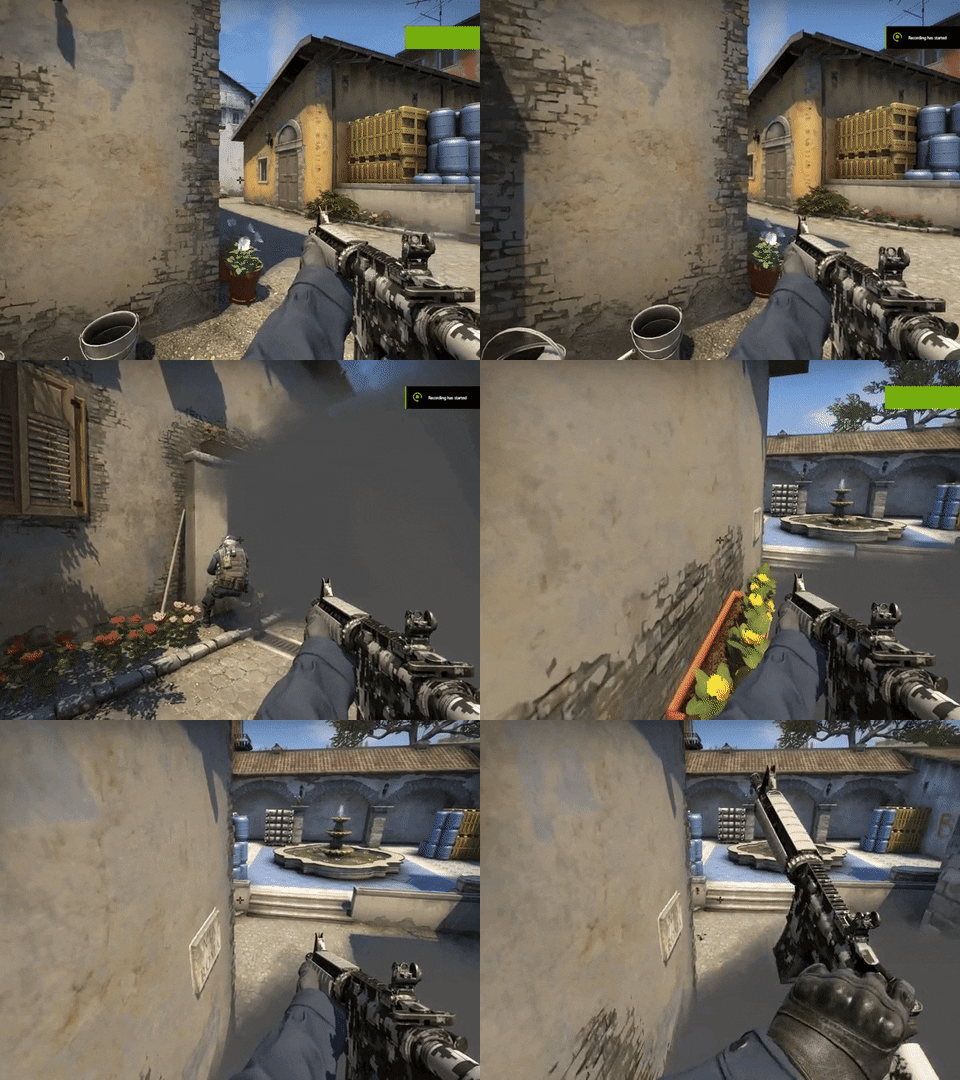
Good players will prefire this position though, so it's important to play it in a less obvious manner. Boosting a player up here at the start of the round is not suggested against good players, as they will instinctively prefire it when they enter site. You can either get spotted on CT, and then get boosted up, or let your teammate bait for you from elsewhere. A Boost - Oranges crossfire is an extremely strong setup you could to deny one of those fast B rounds. Boosting a player up after teams have cleared Boost for the inevitable retake is extremely effective, and the best way to use this angle. You can deny plant and buy time to more or less secure the round.
Overpass is a map with various important positions and angles that you have to use in order to stay unpredictable. However B-Short/Water has a lot of spots that allow for counter-play potential and versatility. One the CT-side you can use these clever boosts to get an early pick at B-Short or even maintain full control of it while giving up site.
The first boost is done as shown:
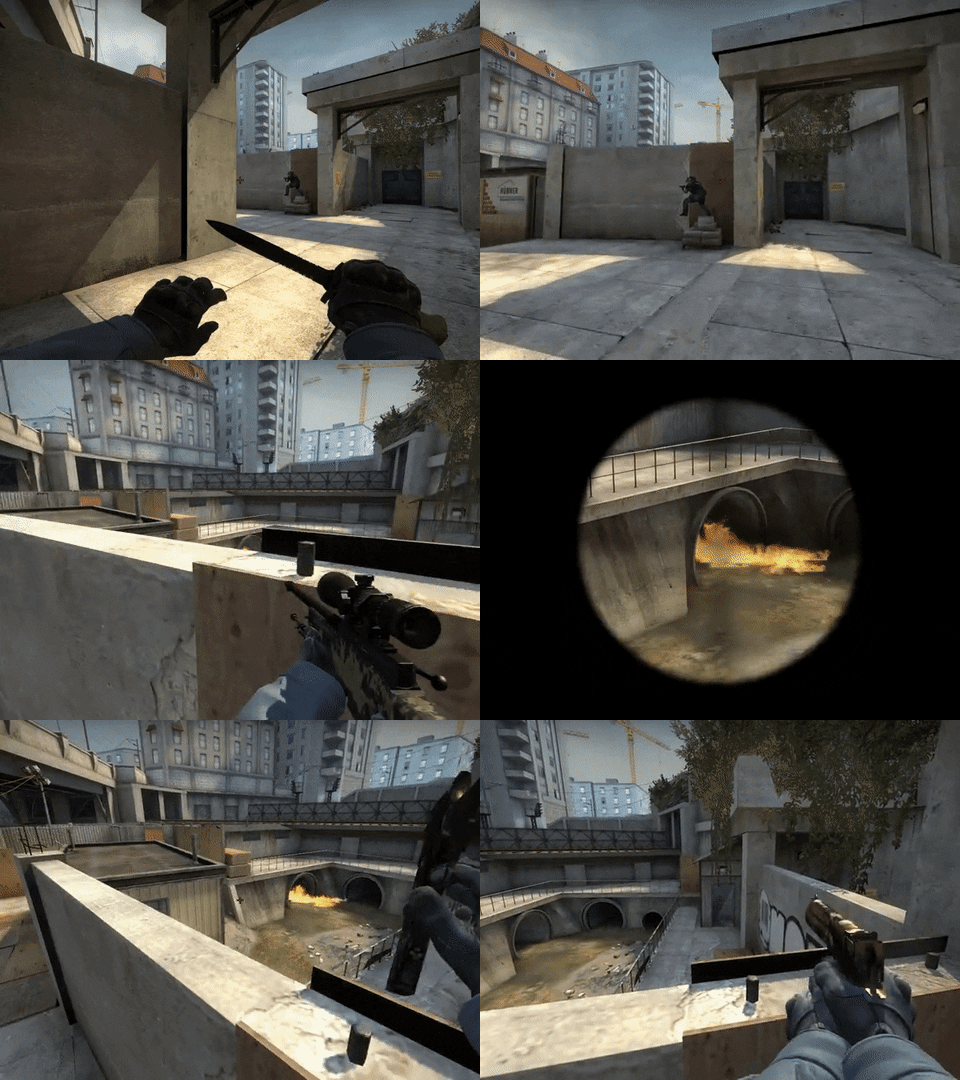
This is effective against teams that like rushing down Short. You can fall off after getting a kill or two. It is important to remember that the spot is completely wall bangable, and opponents can preaim you while pushing out B-Short tunnel.
You can do another boost around the same area to put off the opponents expecting the previous boost:
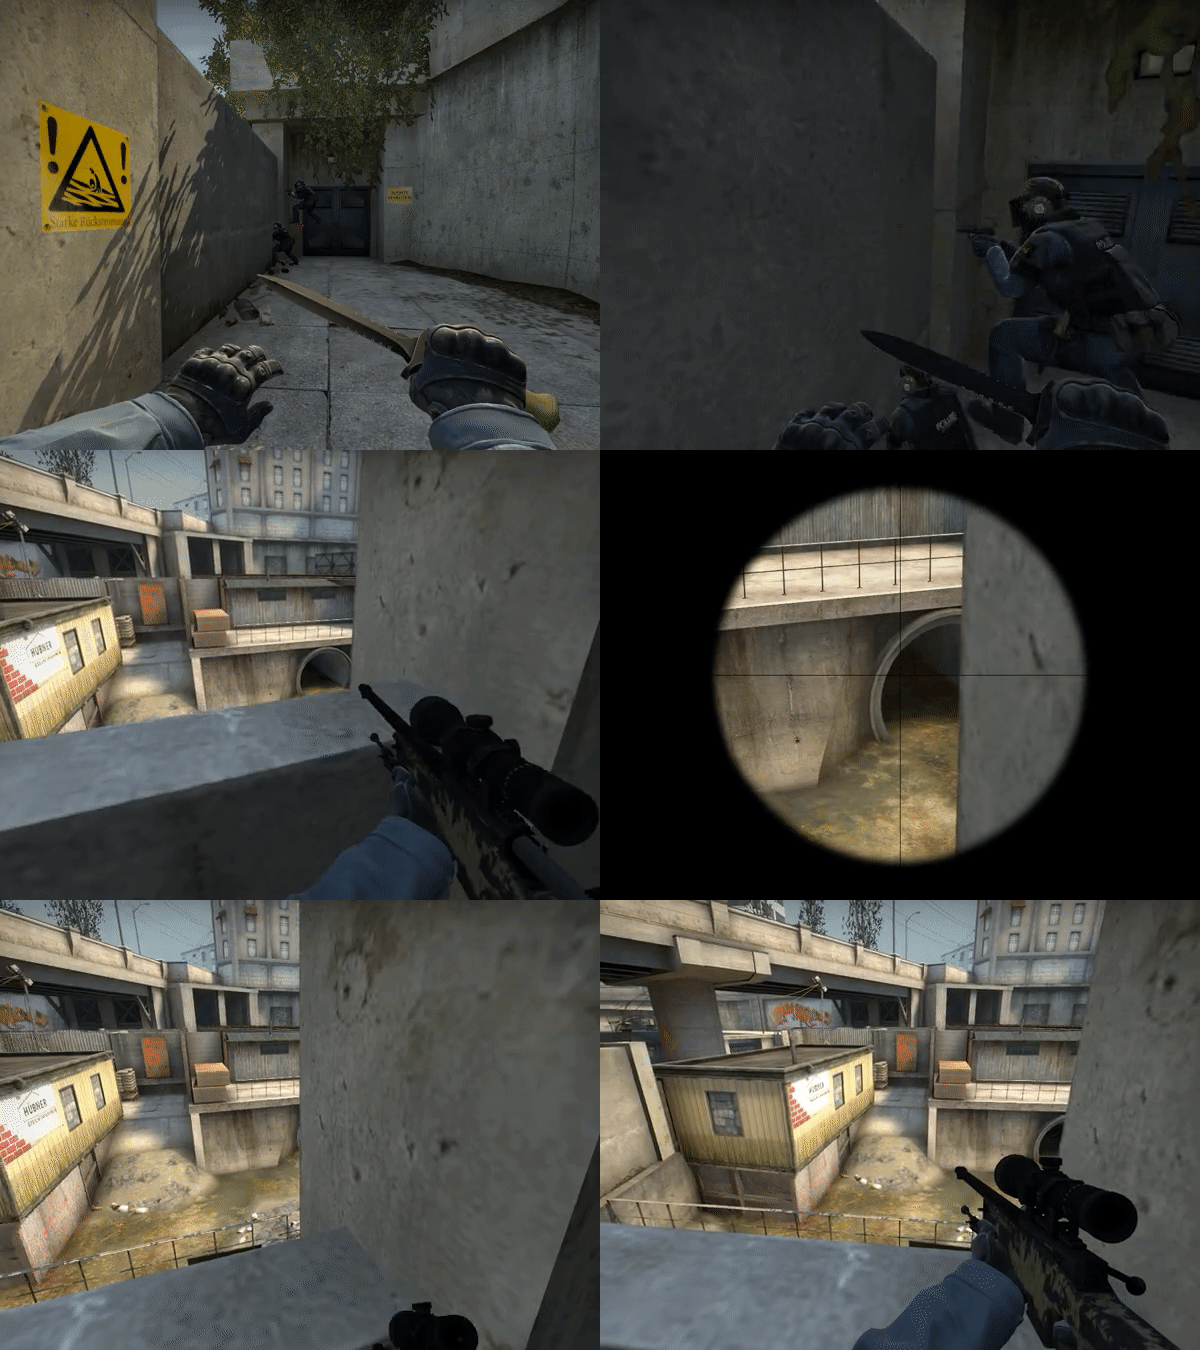
This one can help you look at the whole of the B-Short and Water area, while giving up site if needed. This is a great passive setup to run against the team that goes very B-Short heavy, which can pretty much shutdown their whole B hit.
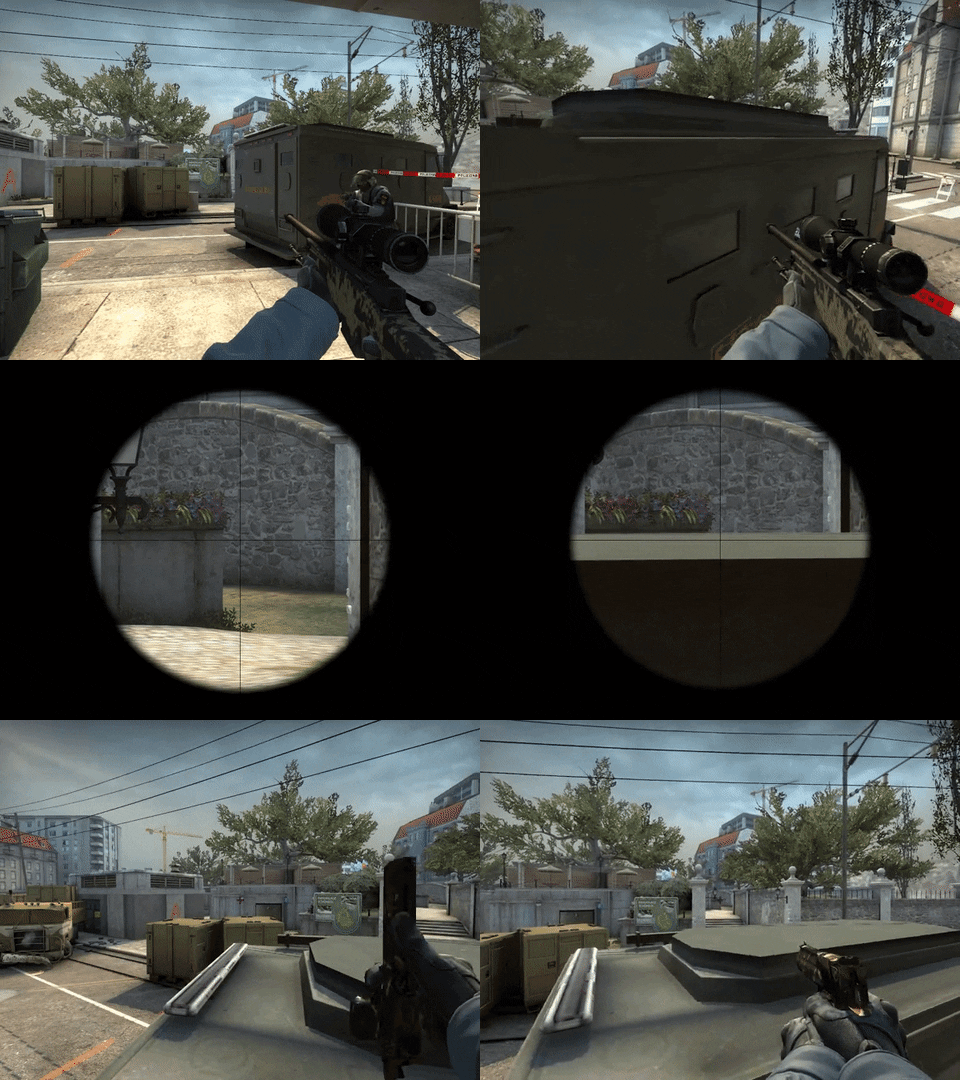
On A-site, you could do this boost behind APC or behind Golden Box. Both are especially effective with the AWP and can help setup a strong postplant if you retreat after getting some initial picks during a site hit.
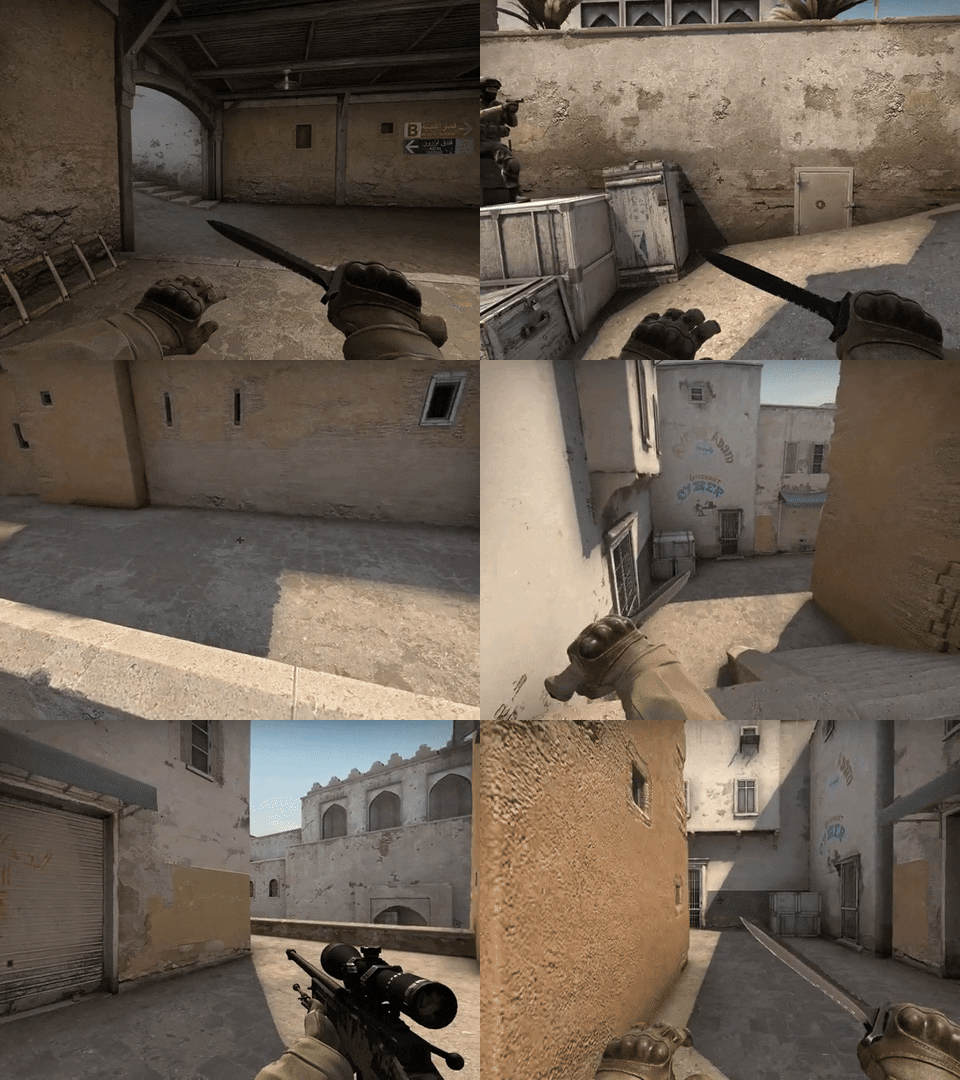
The Short A boost on Dust II helps players get to Short-A considerably quicker and allows for easy map control and quick picks on a pushing T player. If you would rather play slow and maintain Short control, getting 1-2 players on this most rounds will allow for free Short-A control and maybe you can even get a pick down Mid or Lower Tunnels. It is important to make as much use of this as you possibly can as it has no risk and minimal negatives. The quickest way to boost is as shown:
Another important boost to make use of is the Elevator boost on A-site. This boost is extremely important in A-site defenses and retakes. It is done as shown:
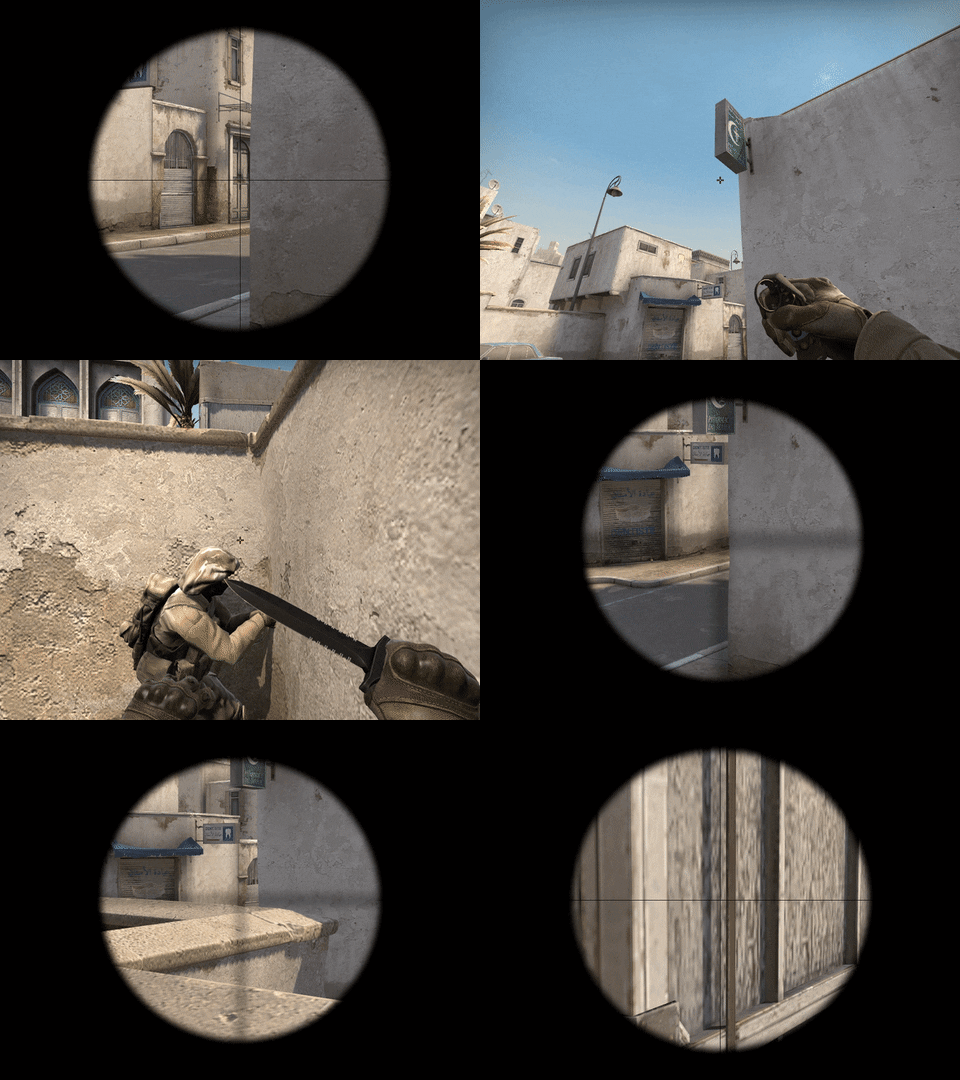
This boost allows you to peek site from a different angle, and maybe even deny a plant. You can also use this after being spotted out and getting smoked off on CT, to catch the Ts off guard, as they won't expect a player on site. It is important to attempt to climb your teammate only from beside them though, because if you try climbing onto him from behind him you will fail the climb, as the plane is inclined, and you will be attempting to jump on him from a lower position.
One of the best angles to use on Train is the connector boost. You can self-boost onto this angle or ask a teammate for a boost as shown:
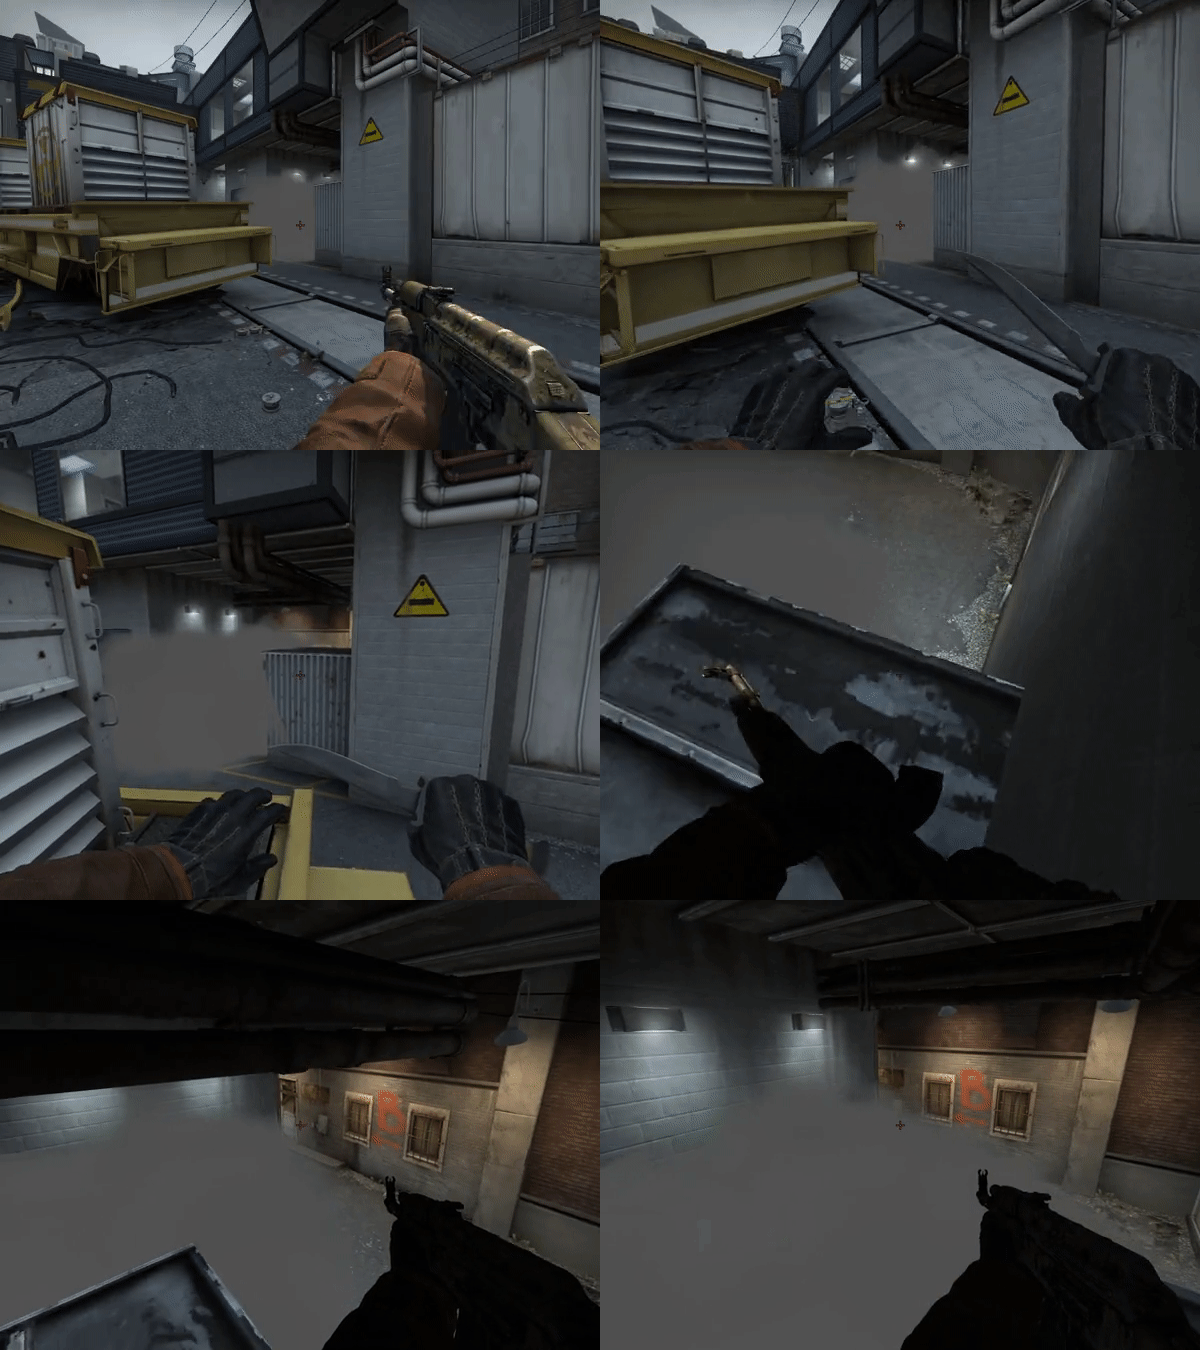
If used as a CT, this boost allows you get an extremely strong off-angle on T-main and pushing Ts. It is extremely strong in post-plants as well on both T and CT-sides, allowing you to get multiple kills on CTs rotating into Connector and a free pick on a CT holding behind the boost box or on a T on site, who isn't expecting anyone to peek above a smoke.
Another strong angle you can use on the T-side is boosting on this box in Ivy:
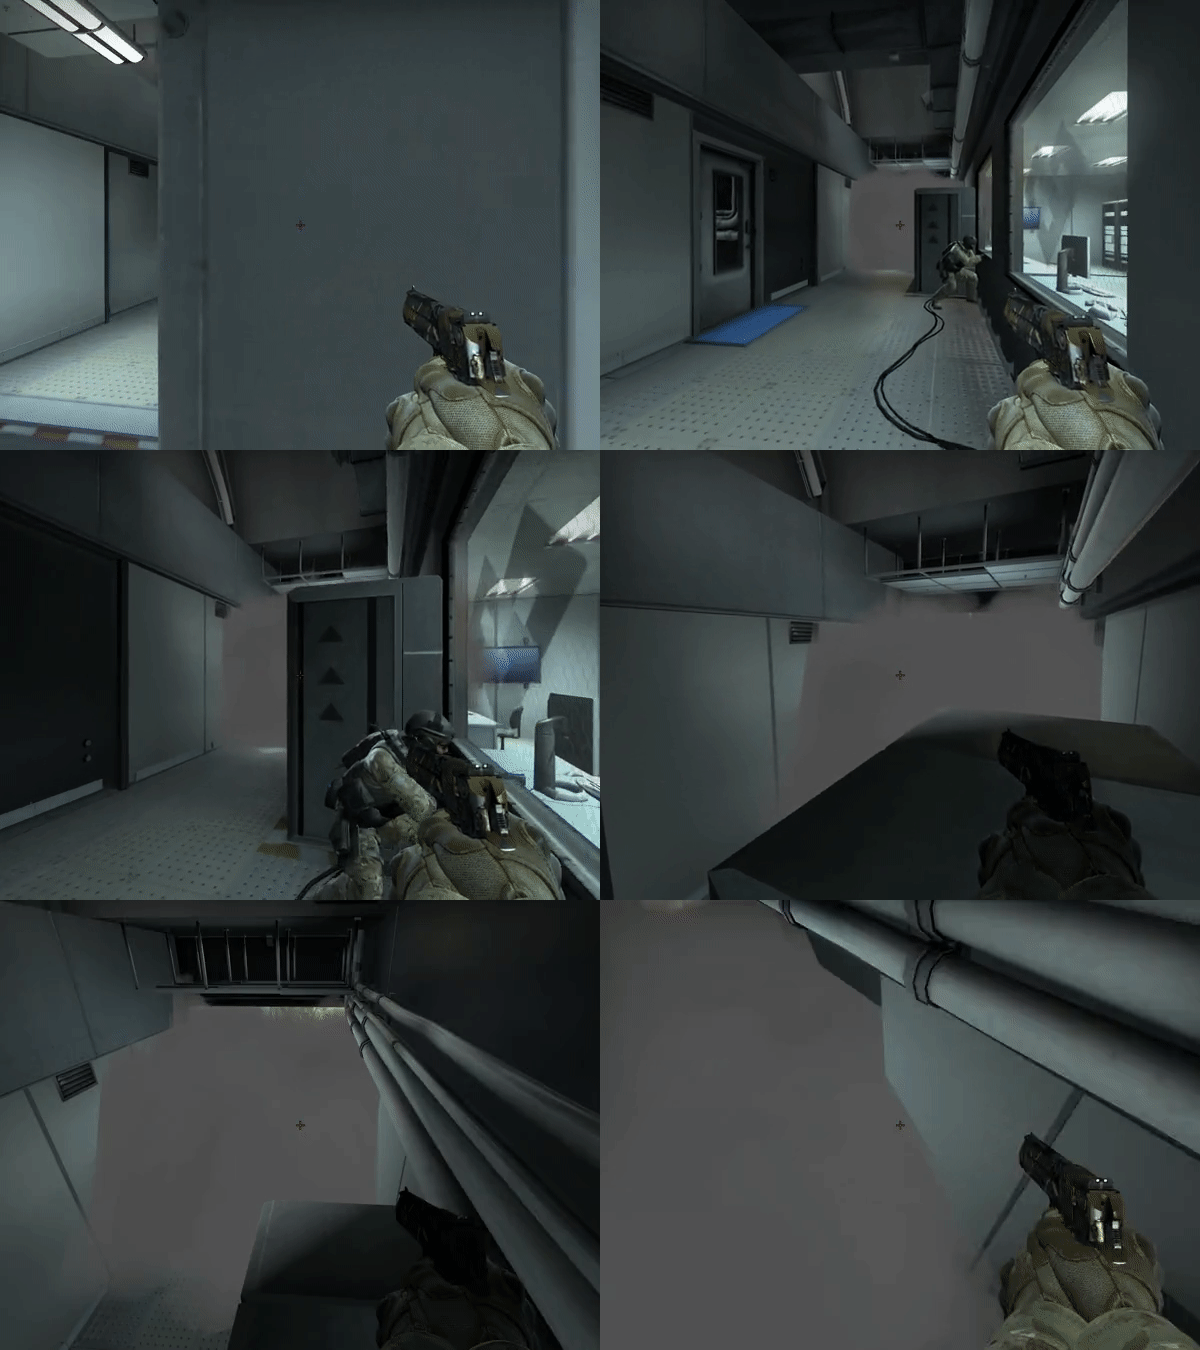
This boost will catch any CT peeking Ivy off-guard and with their pants down. It will also serve as a way to get a pick on the Ivy player even if they smoke Ivy, as you can peek over the smoke with this angle. Depending on the smoke thrown you can even use it as a one way.
This angle is also very strong when used by CTs. You can smoke off Ivy, and boost a player up here to try and get a few frags, and get traded possibly. You could also get a frag and try to fall back using a molly and smoke, but some teams could just push up and ignore your molly and punish you.
Vertigo has a very strong boost on Mid that you can use to get a vertically unexpected angle as both Ts and CTs. It is done as shown:
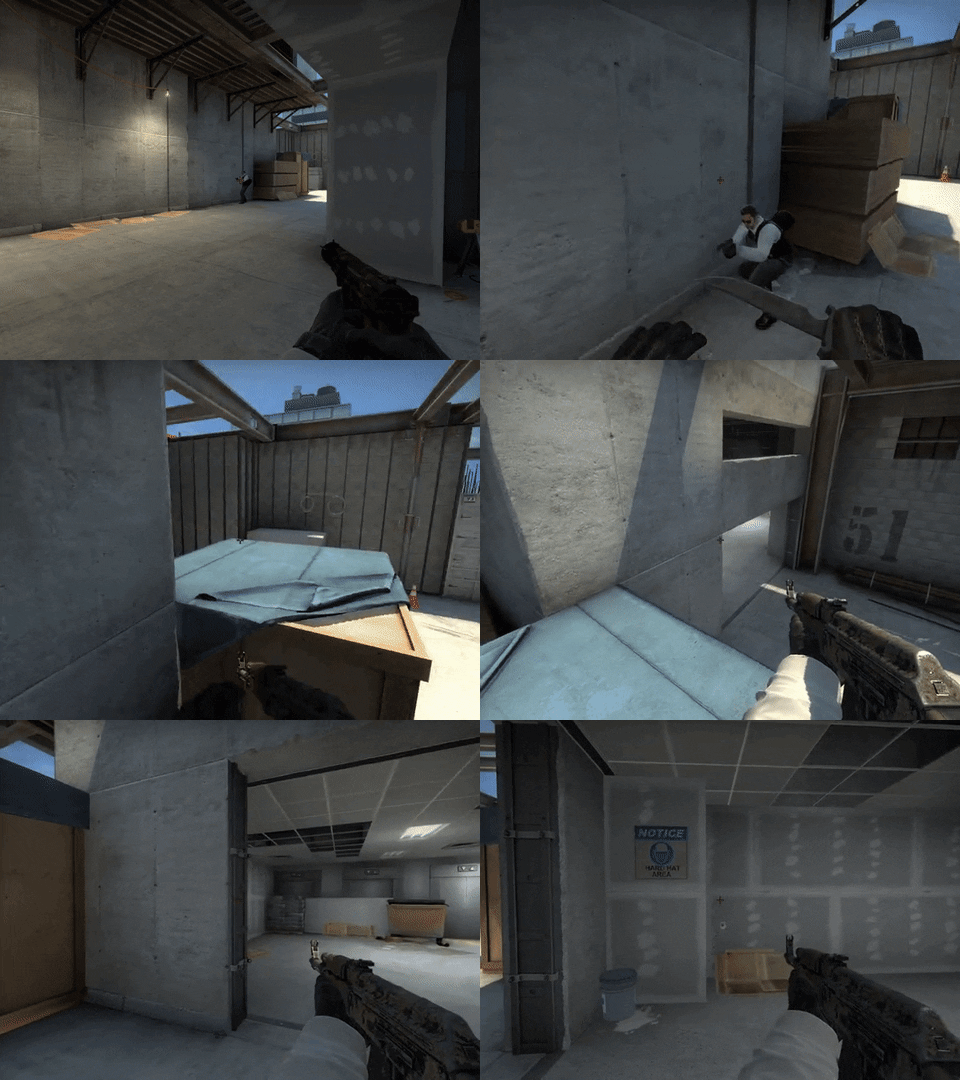
This angle is extremely strong as a CT, and allows you to fall back with a smoke. When used as a T, with a double peek from a teammate below can be devastating on any CTs holding from Heaven or more.
A very strong area for multiple boost plays is A-site on Vertigo. You can do multiple boosts here, but in the following clip, we see a very peculiar boost which can help you control A-ramp pretty much in its entirety. It is important to note that Ts can still go Ivy so it's important to have a player watching Ivy or to condition the Ts to not go there. You can run this against teams that love to push A fast and can pretty much shutdown the whole A-hit.
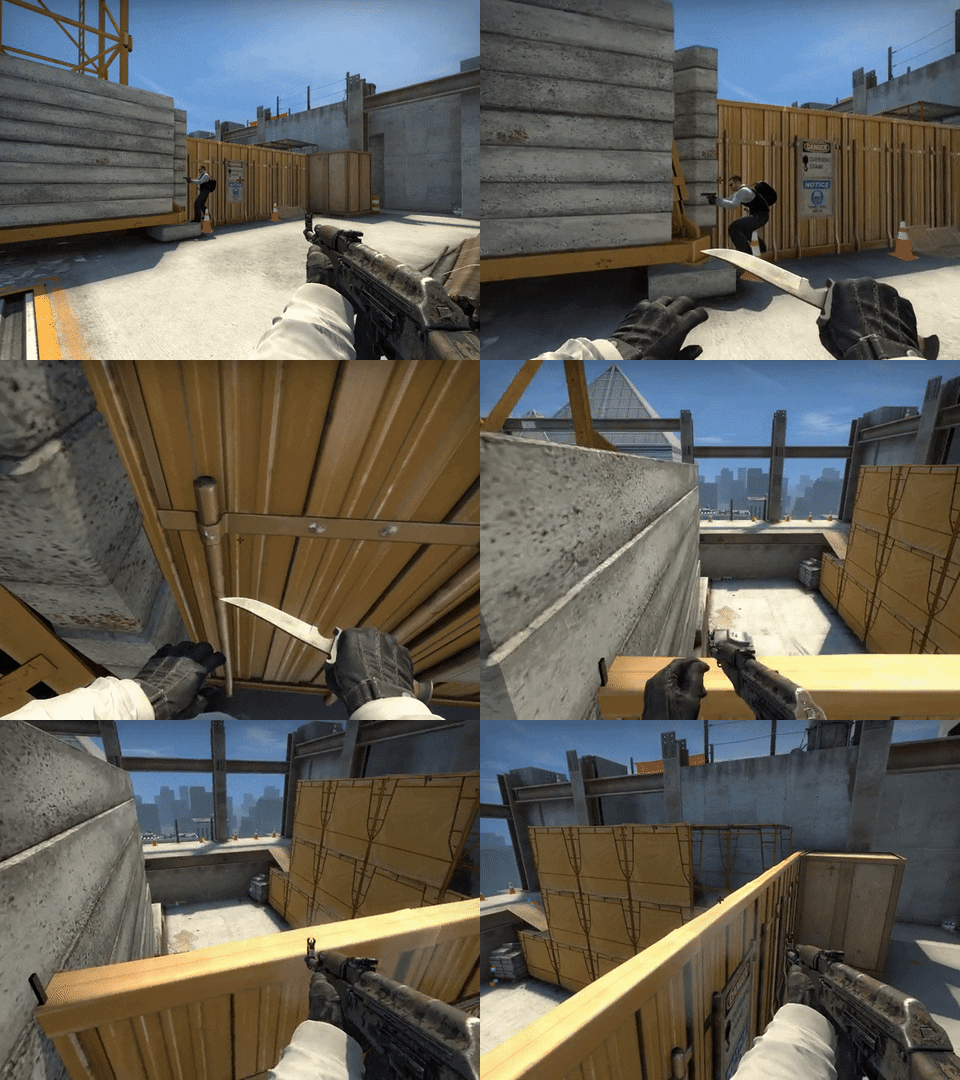
You can also boost on site boxes or toward Heaven on A. All these boosts can be used in various degrees and allow for repeated cheese plays and unpredictability. These boosts are also fairly low risk and allow you to fall back easily without conceding too much map control, and can be used effectively to get a pick to setup a strong retake.
Nuke has a couple on interesting angles that can provide a lot of well-needed verticality. One of the more one-and-done, or all-or-none angles is the boost in the B-ramp room. It is done as shown:
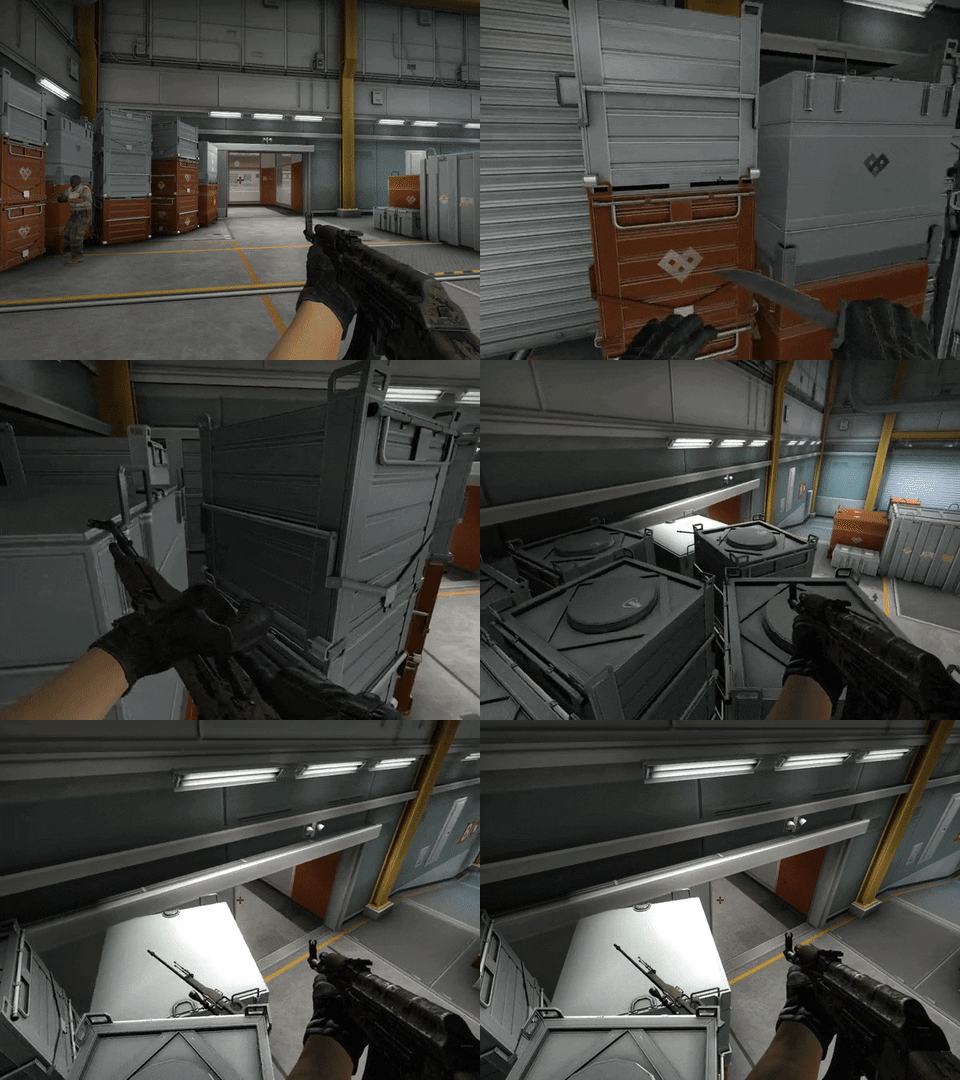
As earlier suggested, the angle is quite risky to use as it's an angle that is in a slightly contested area and that will most likely get you traded after one kill, but, if you're not checked you could definitely get away with multiple kills easily. You will need to smoke off ramp room or molly it off to gain access as a CT though, which will make it easy to read.
You could also use a few other angles, in a common way, as a headshot angle for yourself by boosting on a teammate at spots like the Red Box outside, T-Spawn or on B-site to watch ramp. It can be done as shown:
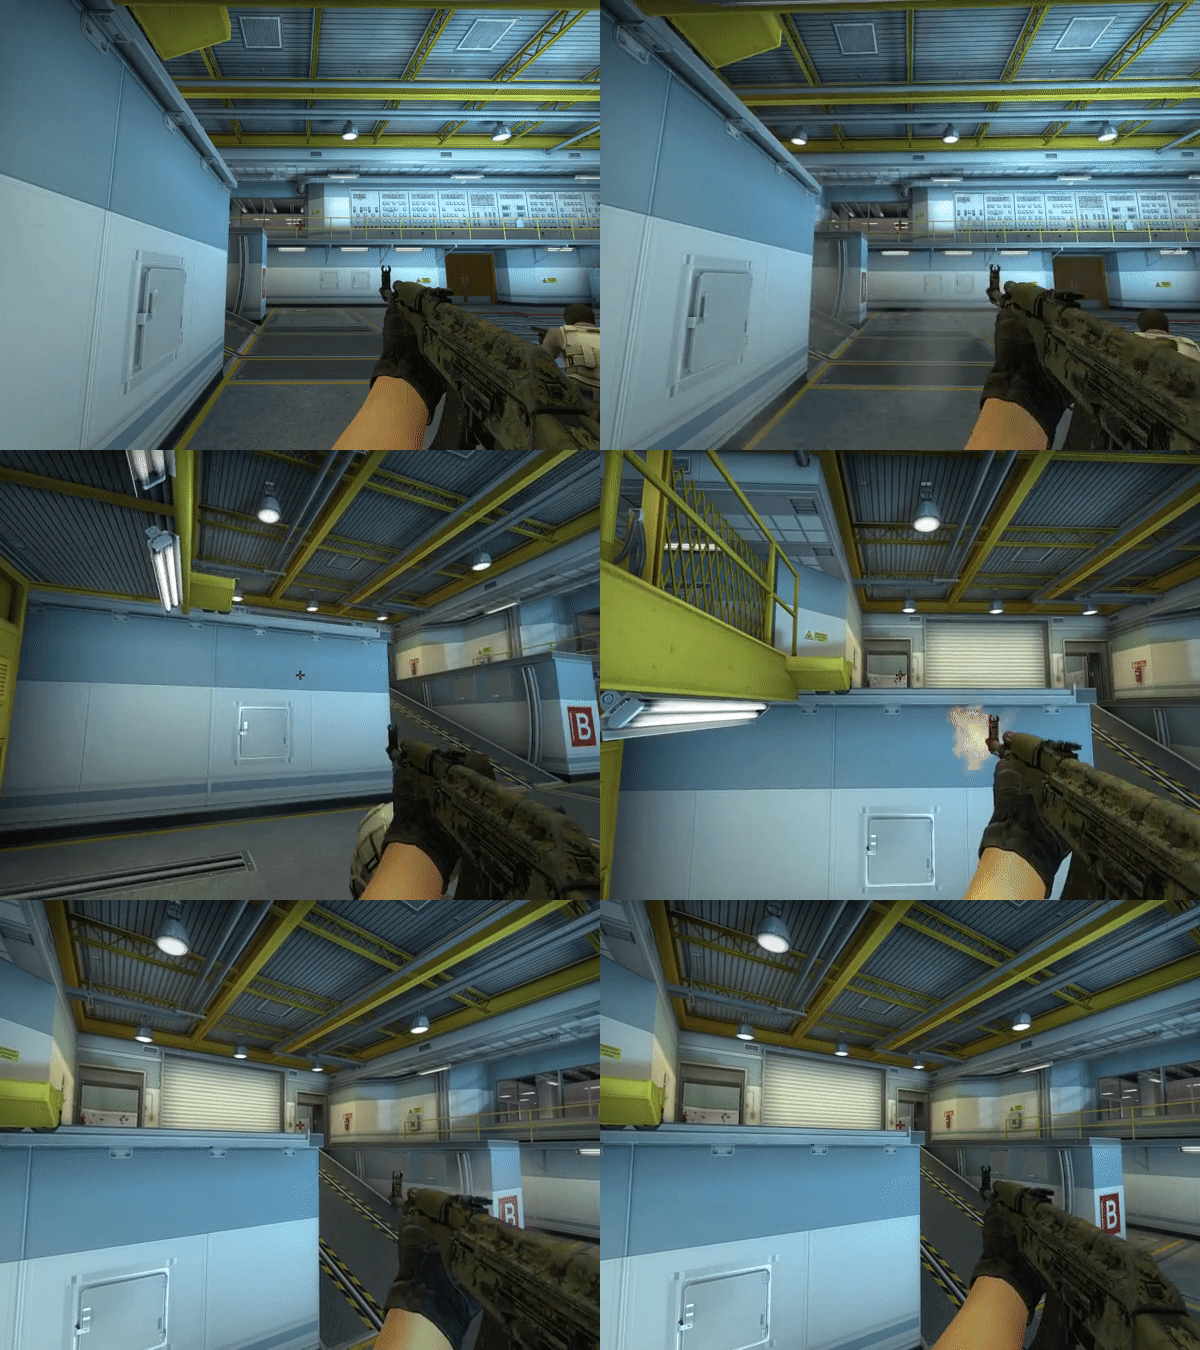
All of these are considerably effective when used right. They must be used only a few times and at the right times, with a degree of unpredictability to get the kills needed.
We just went through loads of great positions that you can access on the map, with a friend, or a little good movement. These positions aren't standard and thus give you massive advantage in winning gun fights. If ever you find yourself mechanically disadvantaged, please make sure to try and attain whatever advantage you can, off-angles, boosts, one-way smokes, and what not to ensure you have the highest chance of winning the gun fight in spite of your comparatively weaker gunplay. This is what makes a good player, but what makes a great player is getting as many advantages you can, even when you have the upper hand mechanically. There is no place for complacency in the mind of a winner. Good luck have fun!
Any feedback is appreciated at my twitter. If you have any ideas for a future article, please shoot a DM!
Visit our partner Vie.gg for the safest market and best customer care in esports betting.
Must be age 18+ and reside in a country where online gambling is legal. Gamble responsibly
