


Seeing is Believing – A Support Warding Guide
Vision wins games. Are you placing wards in the right spots, and clearing the enemy’s best wards?
Vision wins games. Are you placing wards in the right spots, and clearing the enemy’s best wards?
Introduction
Warding is one of the most important and underappreciated aspects of a League of Legends game. Wards allow you to safely make plays that would otherwise be risky, have more knowledge about the Jungler’s whereabouts, and overall more control over the map. This guide will be targeted towards the Support role, since Supports are given their warding item along with being able to buy more Control Wards. It’s important to have a good understand of warding regardless of your position because it still allows you to make safer plays and control the map.
Laning Phase
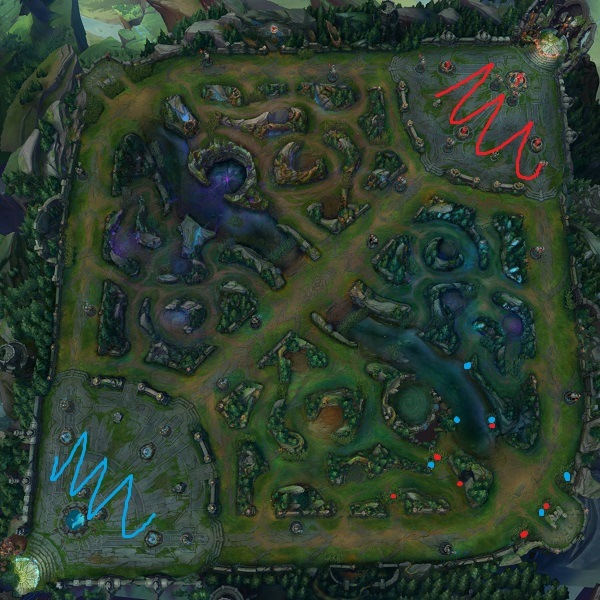
The map shown above shows common warding spots for each side during laning phase. Getting deeper wards during laning phase allows you to prevent ganks from the enemy Jungler, as well as offering a Teleport location for your Top Laner. For Blue side, the ward shown on the map that covers the blue buff entrance is extremely strong and usually never gets swept by the enemy team. Red side has a few less options when it comes to deep wards, but you can ward tri-bush or the bush across from Krugs in order to hopefully gain some information on the Jungler.
Oracle Lens
You’ll want to swap to Oracle Lens once you either have a recall where your Warding Totem is on a near 2-minute cooldown, or when you finish the first quest on your support item. Oracle Lens is the bread and butter of Supports and Junglers once laning phase ends. An Oracle Lens allows you to see and destroy invisible wards that could only ever be found by using the Oracle Lens or placing a Control Ward in the correct spot.
Control Wards
Control Wards are very unique and powerful, leaving them to be bought by everybody in the game regardless of role. You can only have 1 Control Ward placed on the map at a time (per player). Carrying 2 Control Wards is recommended if you are playing Support or Jungle, since vision needs to be moved around often and the ward might be destroyed. During laning phase it’s important to try and keep your control wards alive so that you don’t hand over free gold and vision to the enemy team. Supports usually want to place their control ward in the river bush that is closest to their own tower, which gives a higher chance for it staying alive throughout the rest of the lane. Placing this defensive Control Ward allows you to use your Oracle Lens to make more aggressive deward attempts.
Mid-Late Game Strategy
Warding as a support during laning phase is straight forward. Mid-Late game is where vision and counter-vision win or lose games. The most important tip I've ever received regarding warding during the later portions of the game, was a coach telling me to set up objectives at least 30 seconds before they spawn. Ideally you would want wards up nearly 1 minute before the objective spawns, but if you have vision control you should have a better chance than the enemy team at the objective. Placing wards before objective spawns also allows you to place deep wards which let you spot out the enemy Jungler along with the rest of their team. One simple ward placed 45 seconds before baron spawns can allow your team to collapse on an unsuspecting support, quickly turning the objective fight into a 5v4 instead of a full on 5v5. If the enemy support gets to the objective first and starts placing wards, make sure that they aren’t getting any deep wards on your team by using your Oracle Lens or Control Wards.
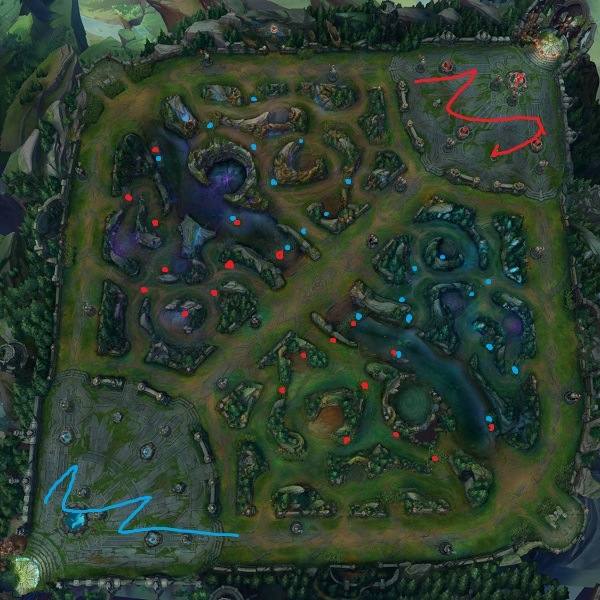
The map above shows a lot of wards that can be placed in order to secure objective control for each side. The main purpose of warding the enemy jungle more than your own, is to increase the amount of pressure you can apply on an objective. Having more pressure and vision means that you can safely take objectives that would otherwise be considered risky, along with being able to pick off enemies that aren’t grouped up like your team (should) be.
Closing Tips
I hope this guide is helpful in increasing your knowledge and skill about warding. My one last piece of advice, and sort of a TLDR to this guide, is to just think about your wards and what they can accomplish. It’s important to realize the strength that wards give to you and your team, allowing you to make plays that otherwise wouldn’t be possible. Make sure to try your best to ward objectives before the inevitable team fight, as it may mean winning or losing the game.


