


Becoming the Best: Solo Duel - A High Level 1v1 Guide
Learn how to break into the highest competitive ranks of Rocket League's infamous Solo Duel playlist.
Learn how to break into the highest competitive ranks of Rocket League's infamous Solo Duel playlist.
Rocket League's Solo Duel playlist is perhaps the most infamous playlist to have ever made its way into the game, challenging both a player's mechanical prowess and mental fortitude relentlessly. Soon after reaching the upper echelons of Solo Duel's competitive ranks, its unforgiving nature quickly separates the smartest, most industrious competitors from the least disciplined and the unprepared. Delve into this high-level Solo Duel guide to become the best, as we break down how to manufacture a goal, right from the get-go.
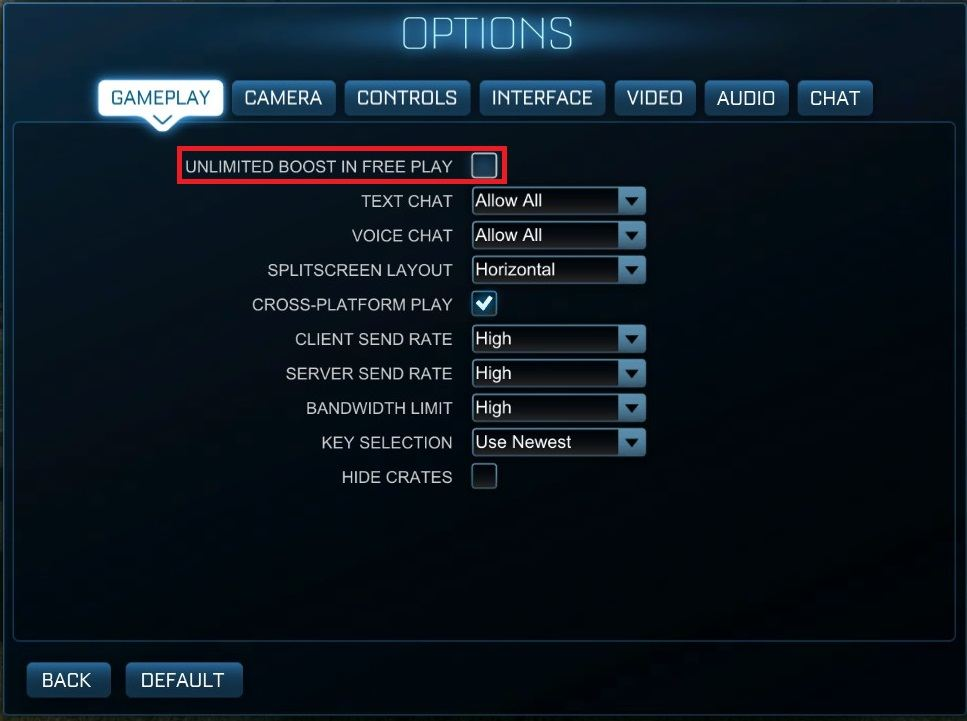
What exactly can you do to warm up for some high-level Solo Duel matches to properly prepare? To put it shortly, make sure you warm up and do not queue without doing so first. It's very important to understand the main purpose of a warm-up session. You should not be practicing skills to perfect them during a warm-up -- save that explicitly for practice sessions. Often the best way to approach a warm up is to use it to enable you to use your already learned skills most effectively, and to minimize the inertia felt from any lack of recent play. Considering this, it's extremely important to try to maximize your Actions Per Minute (APM) during warm up, while also maintaining context to the playlist you intend to queue for. A fantastic way to maximize your APM is a warm up routine I use myself. First, navigate to the 'Gameplay' tab in the options menu and uncheck 'Unlimited Boost in Free Play'.
Following doing this, enter Free Play and, instead of focusing on the ball, try to move around the pitch as fast as possible, using recovery mechanics like the wavedash and half-flips to maintain momentum while avoiding the large boost orbs and only navigating to pick up the small boost pads. Try to spend as little time as possible repositioning and remember to hold powerslide when landing to stay as fast as possible. Recovery tips can be found in this article. This warm up routine helps you get into the routine of managing your boost, avoiding positioning yourself awkwardly, and, most importantly, effectively recovering.
Once you feel you're effectively able to chain wavedashes together without fail and you're navigating to the boost pads easily, then try to do the same while targeting the ball. Remember to really push yourself with how many actions you're attempting to do and maintain focus on getting solid contact on the ball and spacing yourself appropriately with regards to your boost count. After five to ten minutes of this particular warm up routine, once you feel comfortable, feel free to once again check 'Unlimited Boost in Free Play' to practice any particular mechanics.
Another great way to practice maximizing your APM is to spent some time attempting Mariano 'SquishyMuffinz' Arruda's half-flip training shot. This one shot requires very quick movements and is an excellent way to warm up. The training pack code is 766E-FC92-62A4-CC5E.
Often overlooked, your Rocket League configuration is an incredibly important factor with regards to playing well. Given that this is a high-level guide, it will be assumed that you are comfortable with very particular settings such as those pertaining to your camera, deadzones, and sensitivities. Here is a small list of things to make sure you consider:
Ultimately, make sure that you are not distracted and that nothing is particularly putting you off. It is also worth noting that consistency is key and changing configurations often or purely for particular playlists is likely only going to work to your detriment. Use what works for you and stick to them.
Before we delve into breaking down plays themselves, make sure to give credence to your mentality. Any competitive environment can be difficult to thrive in and Rocket League is no exception. In Solo Duel, in particular, it's very easy to be disheartened in lieu of your best performance and to face extreme upsets. Remember that you are the competitor and ultimately your performance is incredibly dependent on your well-being. Here is a selection of tips to help combat any issues you might be facing with mentality:
You might find some of the techniques used in sport psychology useful, as are detailed here.
3 ... 2 ... 1 ... GO! FACE-OFF!

As high-level players and veterans of the Solo Duel playlist, you're likely familiar with the three face-offs above: Diagonal, Off-Centre and Centre, respectively. The Off-Centre face-off is very similar to Centre, however Diagonal is very different, and needs to be approached almost in an entirely separate manner. Ideally, on most face-offs, you need to beat your opponent to the ball and be goal-side (blocking the ball from moving around or through you to your goal). A fantastic break down of Kyle 'Scrub Killa' Robertson's dominant kickoff can be found in the video below, by John 'JohnnyBoi_i' MacDonald. Although the video is old, it provides lots of useful insight into the implicit strategy behind face-offs. JohnnyBoi_i's YouTube channel can be found here.
Before taking a look at how to counter face-offs properly, we should come to terms with one of the most endemic issues plaguing them: flips and boost management. Preserving boost during face-off is incredibly important and cannot be ignored. The amount of boost you use is often the make-or-break factor with regards to being the player to gain possession first. Ideally, in order to preserve as much boost as possible as well as making sure to challenge the ball effectively, one should integrate diagonal flips into their face-offs as much as possible. Many top-level players choose to use a regular flip on the Diagonal face-off, however, since it's the most volatile of the three.
Aside from the three face-off positions, face-offs can be categorically divided into three main types: Hook, Push and Counter. Hook face-offs revolve more around pushing the ball around the opponent and are the most common type used. In the example above, it's clear that on the Off-Centre and Centre approach, I move to one side of the ball then push to the other. The idea behind this is to block as much of opponent's line to your goal as possible. The side you are approaching from needs more of your car behind it initially, since it will be moving aside, while the side you're approaching can benefit from the instantaneous dodge in that direction. This ensures that, after initial contact, that the ball won't be taken around that side, either. At all times, and especially with hook face-offs, it's incredibly important to watch your opponent. If both you and your opponent are hooking in the same direction, the result can be quite unexpected.
Push face-offs work a little differently to their Hook counterpart. During a Push face-off, you are often flipping into the ball earlier and instead of trying to take it around the opponent, the emphasis lies on stopping your opponent from taking it past you. To put it shortly, you are getting in the way of your opponent and hoping that you get more contact than them. Face-offs that seem to stay relatively centre, go over you or behind either player, are often the result of a push face-off. It's useful to understand where the strengths of your car's hitbox lie and to use these to your advantage. Flat cars, such as the Batmobile and the Dominus, can be incredibly effective at pushing the ball, due to the length of the car translating into height during a flip. Consider your opponent's car of choice and plan accordingly. If you are struggling to beat a push face-off, then counter this by hooking more, and vice versa. More information about specific hitboxes and their strengths can be found here.
The third type of face-off, the ambiguously named Counter face-off, essentially concerns anything that isn't a standard face-off and looks to directly counter a play in an unorthodox manner. Examples of these types of face-offs include reverse-half-flip face-offs, fake face-offs, delayed face-offs, and more. Determining whether or not your opponent is looking to use a Counter face-off is a skill that must be learned through experience. To practice this skill effectively, one should watch their opponent at all times (this is where larger name plates are favorable) as well as making use of things such as the swivel-cam. As you breach into the middle Champion ranks and higher, opponents will regularly begin to use Counter face-offs against you at crucial moments. Expect to see them at overtime, when there's little time left, or if you've been dominating face-offs for the majority of the match. Changing up your strategy, even on face-offs, is an amazingly effective tactic when used in moderation. With enough practice, face-offs will begin to look more and more like a regular challenge.
Like anything, too much is too much. Learn to vary your face-off strategy and keep your opponent guessing. Highly skilled opponents will be quick to download your face-off and counter it. Ideally, you want to concede absolutely no direct face-off goals, so that you always have a chance to directly challenge your opponents' plays. Here's a quick checklist to look at to determine how you can improve your face-off:
It's imperative that you're comfortable with face-offs, since it's often the make-or-break aspect for many players trying to push towards the highest ranks.
Following the face-off, the next most critical moment of each round takes place: gaining possession. First, you need to identify who has won the face-off. Generally, this is just a case of whose side the ball is in, how much momentum each player has, and who's closest to the ball. The issue that seems to be overtly apparent, however, is players' inability to determine whether they have enough boost to make a proper challenge. Far too many players prioritize boost over the ball just after the face-off, and in most cases, this is a losing move. Provided that the face-off was relatively neutral, you have many options available to you: bumping, sitting behind the ball, popping the ball, etcetera. A general rule-of-thumb you should follow in Solo Duel is that when you're low on boost, and the ball is traveling slowly, always make sure to be the second person to make contact on a challenge. Flip as few times as possible. Do your best to stay low (if the ball is) and stand your ground. Second to the ball, however, is the objective of securing boost.

As I'm sure you're already aware, the small boost pads dotted around every Rocket League arena provide 12 boost each. Surrounding the ball at the centre of the arena are four pads, and it's vital that you understand exactly where they are relative to your position. Straight after the face-off, on your way to the ball, always try to secure at least one of these pads, and then consider the further out resources. Provided that you're preserving at least 10 boost after the face-off, then securing one to two pads will net you anywhere from 22 to 34 boost. A proper challenge should only require around 8 to 12 boost, and you'll need to use this challenge to secure more boost if an open net hasn't yet presented itself. If things go awry, don't feel afraid to shoot the ball away, giving away possession, to allow you to secure mid-boost. Another very important rule to understand in Solo Duel is that whenever you plan to give away possession, you must make sure you're able to stall, as to not let the opponent have too much time to set up a play while you're away.
Being unconsciously aware of where all the boost pads are is a skill that separates the good from the great, since it allows you to continuously pressure the ball with a comfortable amount of boost in situations where you'd otherwise have to give away possession. If you're struggling to memorize where the boost pads are or to pick them up in your play, then begin with the aforementioned warm up routine described in the WARM UP section. To put yourself to the test, try going into Solo Duel matches (casual or competitive) and limiting yourself to only using the boost pads and intentionally avoiding the boost orbs. It may take a small while, but you'll quickly become accustomed to the layout of the arena and it will become second nature. You'll be able to defy the expectations of your opponent by always having more boost than they think. Francesco 'Kuxir97' Cinquemani is famous for constantly keeping his challengers wondering how much boost he has in Solo Duel, a strategy that still works to this day. Be imperious and surprising by making a strong challenge, controlling where the ball is (and thus where your opponent is!), and use this to get the mid-boost orb and lock down the midfield.
Shown above is an instance that took place during a Grand Champion Solo Duel match, where I lost initial possession against a strong Push face-off, then rectified the issue by applying some of the theory previously mentioned. Firstly, I began to move completely opposite to the ball's trajectory and found that I was isolated (the importance of isolation will be discussed later on). You might notice that I prioritized keeping ball-cam on immediately after the face-off. It's an excellent habit to develop, since it allows you to determine whether or not you can safely secure a boost orb. Immediately after, I'm quick to collect 12 boost from the nearby pad, and then use that 12 boost with a flip (generally this is all you need) to close the distance and prevent isolation, as well as securing another 12 boost along the way. Closing the distance like this prevents my opponent from being able to take the ball down from the wall as they try to make me back off.
After the confrontation, I decide that I'm likely to isolate myself by shadow-defending (see DEFENSE) with such little boost and a challenge from high-to-low prevents both a flick or a low fifty-fifty from making it past my defense. Be certain that when you make a decision in such dire straits, you commit to it fully -- too much of a valuable resource is wasted to simply be left indecisive. With 1 boost remaining, another decision is made to push the ball away (behind my opponent) to buy myself time to collect the corner boost orb, and then consider my now much more preferable options. Many players make the mistake of deciding that following the ball out with such little boost is more favorable than stalling and collecting the boost, which often results in a goal concession. What's failed to be recognized is that when your opponent has all the boost (or is able to get to it), while you don't have enough to make a challenge and recover, then your opponent has all the control and giving into this is a losing play. It's remarkably easy for a skilled player to isolate a defender that has overextended with too few boost points to properly cover all their bases. Knowing when to back down is just as necessary as knowing when to aggress the ball.
The general consensus on what to do following the face-off is to just avoid isolating yourself and to stay close to the play, unless otherwise forced to back off. This is a fairly simple and unremarkable rule, but is often ignored with great consequence. Consider watching some high level Solo Duel matches, yourself, and study how top players deal with gaining possession off of the face-off. A plethora of fantastic matches can be found on JohnnyBoi_i's YouTube channel, as previously mentioned. Next, we'll take a look at how to properly defend against the most skilled Solo Duel competitors.
Being a strong defender in Rocket League is the key to leading a strong offense. The skills used in Solo Duel are applicable in every competitive playlist, and defensive skills are no exception. Often players struggling to properly keep the ball out of their net are suffering from three main things: a lack of proper boost management, an inability to defend against sudden acceleration, or being unable to remain composed in close-quarter situations. Using the skills discussed in Face-Off Possession to great effect should mean that, over time, you'll find yourself isolated less and less while being more and more in control of every situation. First, we're going to evaluate exactly what your opponent is attempting to manufacture during your defensive plays.
In theory, given that you're properly positioned and have enough boost, you should be able to prevent the ball from reaching the insides of your goal at all times. There are, however, instances where no matter what, there are questions asked by your opponent that you're simply unable to answer. The vast majority of times where you find yourself unable to stop a concession will be where you are isolated. Isolation is a term I like to use to describe a situation in which you are too far from the play to properly make any kind of impact, whether that's to challenge the ball or to prevent a goal. Isolations can happen for many reasons: you have too little boost to reach an accelerated ball (and can't react in time), you mispositioned by trying to secure boost when you shouldn't have, you made a poor clear and you can't contest the incoming shot,... and the list goes on. The best players are able to prevent isolating themselves through expeditious decision-making and clinical mechanical execution. The most deadly and venomous opponents, on the other hand, will break down even the most involved competitors, given enough time. It is your job to make that time count.
Going through our list of the three main things that sunder the defenses of many purple-ranked duelists, we're going to start with boost management. Although there's not an incredible amount to say about boost management on defense, there are definitely things you need to keep in mind. Studying the playstyle of top Solo Duel leaders, such as Victor 'Fairy Peak' Locquet, it's quite evident that they always try to maintain at least 10 to 12 boost on defense. This boost amount is around the exact number most players would consider you need to be able to fully boost through a challenge, and while it's possible to cover the entire height of your goal with a double jump, 12 boost allows you to reach the top and send the ball to safety with a well-timed dodge. Like many things, it cannot be overstated how important it is to be able to differentiate between situations where a double jump pop is better and using your dodge is better. Most of you are likely aware that using your backboard as a surface to deflect the ball off of -- again with a dodge -- is a strategy which can yield brilliant results and can buy you enough time to secure a few pads around your goal or a boost orb.

Similarly to what I did in the previous section, here's a birds-eye-view image of the defensive portion of the arena, with the boost pads and orbs conveniently color-coded with regard to the danger in procuring them when isolated. The boost pads in the green section are mainly the pads you'll come to love the most. With all pads taking approximately 4 to 5 seconds to respawn, as opposed to the boost orb's whopping 10 seconds, coming from either side to rotate into your goal can net you anywhere from 12 to 36 boost, which is enough to properly challenge the ball in most circumstances.
The pads in the orange section are generally picked up in a fairly unorthodox manner. When isolated, you should only have time to collect these pads safely if your opponent is attempting to draw you away from your goal line to inevitably try to take it past you. The main uses for these pads are for when you're returning to defense, as you can transition from the orange area to the green quite comfortably and collect 50 boost, or to recover on a counter-attack. If your opponent gives you time to collect these pads, be wary of just how far off of your line you wander.
In the red section, the main culprit is the coveted boost orb which lures many defenders, eager to maintain their momentum, to frustration. The pads within the red sections as well as the pads not color-coded will mainly be taken by the aggressor as they rotate in and out of your corner in an attempt to construct a goal. The corner boost orb is particularly dangerous to grab since it's very obvious to any talented player that you'll be moving towards that area, and so fails to succeed at threatening a fake challenge or asserting confidence of any kind as well as signing yourself up for a demolition. It's recommended that, when isolated, you learn the respawn pattern of the boost orb and consciously keep in mind when it's going to respawn. If you're particularly clever, you can move over the orb just as it respawns so your opponent is left deciding whether or not you actually managed to secure it. Although, in theory, this doesn't sound particularly effective, you'd be surprised at just how few people take note of their opponent's boost count and thus how powerful betraying their intuition can be.
Finally, to finish up this sub-section, I'd like to make mention of how incredibly destructive recovery mechanics can be when not used in moderation in defense. For many high-level players, it's second nature to wavedash on every landing, inverse half-flip on certain challenges, rotate unnecessarily, and more. Doing this while being completely isolated often works to your detriment more than it does your benefit, since every car-length matters in these situations and you're unlikely to make up for lost ground without much boost. Remember: discipline is key.
What makes maneuvers like flicks and and power-shots so troublesome to deal with is not the speed at which the ball travels, but the time it takes to react to the ball reaching that speed. This sub-section will be relatively short considering how important it is, since many people have covered this effortlessly, and learning one skill flawlessly can just about ameliorate most players' issues with defending.
Provided you're not isolating yourself, as previously mentioned, and staying close to the play, you should often find yourself able to approach the ball from the side and safely neutralize a situation. Sometimes, however, you'll find yourself isolated, whether this is near your goal or in the midfield. Inexperienced players tend to default to the far post of their goal to try to cover all bases, which, at higher ranks, would be seen as a very punishable mistake to make. The key to maintaining a strong defensive presence while being unable to directly challenge the ball is shadow defending.
Shadow defending quite literally refers to acting like your opponent's shadow: mimicking their line of approach in an attempt to defend whatever they have planned for you. The effectiveness of shadow defending comes from the fact that if you can determine that you will be going upwards to save the shot, being directly under the predicted trajectory of the ball allows you reach the ball as quickly as humanly possible, whereas being to the side of the ball does not. In the clip above, you can see that my opponent fakes a challenge, then moves to shadow defend. However, they fail to properly align themselves under the ball and are ultimately unable to react in time to save the shot. It must be stressed that you do not need to be directly at your far post when shadow defending to cover the entirety of the goal. To begin with, when properly shadow defending, you should be able to see exactly where the ball is going to be going before the shot is taken, and if you've given your opponent enough space to take it anywhere else, you're probably too far away.
There are direct counters to shadow defending that will be mentioned in OFFENSE. However, for most intents and purposes, if you're able to shadow defend at a very high level, you shouldn't face too many issues until you compete against the best competitors. Watch the video below by King Ranny for an immaculate explanation and demonstration of shadow defending. He will be able to explain the nuances of the strategy far better in a video than words likely can. Ranny's YouTube channel can be found here and his Twitch channel (full of top-level Solo Duel gameplay) here.
Furthermore, it's also recommended that you become comfortable with staying close to the opponent while shadow defending without risking being demolished or being too close. Backflips, half-flip challenges, and nerves of steel are required to keep the ball close, but your opponents closer. Coming from somebody who is regularly present on the Top 100 Solo Duel leaderboard: beating a strong shadow defense can be incredibly difficult and requires a lot of effort to do. Make sure to master this skill if you want to be dominant in the Solo Duel arena.
Keeping composed while defending is a skill that's underappreciated across all competitive playlists. In Solo Duel, you do not have any teammates eagerly awaiting your next move or the worry of causing a fuss. You seemingly have all the time in the world, but none to appreciate how wonderful that can be. Since we've already covered lots of things pertaining to this subject in MENTALITY, I'll avoid talking about being in the right frame of mind or being focused. What I'm really referring to, when talking about keeping composure, is properly standing your ground in defense while not making yourself susceptible to bumps and demolitions and being taken by surprise.
As of an update some time earlier this year, bumps and demolitions became incredibly effective to many peoples' delight. Like it or not, demolitions are effective and avoiding them successfully can be just as frustrating for your opponent. Initially, this change in the game sort of broke me. I'd always taken my time during games, happily baiting other players into challenges they'd without a doubt lose, endorsing my counter-punch playstyle. As players became more and more familiar with the changes, some players built up a strange affinity for being a bumping bully, such as Connor 'Jessie' Lansink, who seemed to annihilate the leaderboards with their aggressive, and quite frankly scary, approach to Rocket League.
Humor aside, it can be quite frustrating to be bumped about and feel like you have no control over the situation at hand. You're especially prone to this kind of abuse against aggressive players when you're isolated and boost starved. Some of the best advice I can give for handling these kinds of players is to use the walls to your advantage. Sticking to the walls in defense and maneuvering around in the corner (always moving) is a fantastic way to bait in aggressors, after which you can use low fifty-fifties (see OFFENSE) to maintain a strong presence in your corner. It's not recommended that you directly try to dodge demolition attempts, since the room for error is rather generous and you're likely to suffer as a result anyway. To avoid being bumped through a challenge, try to stay low and be second to touch the ball to ensure that your dodge keeps you above your opponent.
Another very personal change I made which I found was very welcome was lowering my swivel-cam speed to around 2.80 (not applicable for non-controller players), which allowed me to use both the swivel-cam and steer simultaneously, massively improving my awareness of where my opponents were when ball-cam nearly had me blind-sided. The change to a slower swivel-cam speed was inspired by none other than Team Dignitas' own Alexandre 'Kaydop' Courant who is known for his fantastic situational awareness in Rocket League. Dealing with very aggressive and physical players becomes more natural as you begin to understand when they're most effective. So, before you throw your hands up in the air in vexation, take solace in the fact that one day you might be on the other side of the play.
Before we move onto the final section of this holistic guide to Solo Duel, I'd like to touch on a small, relatively unknown game mechanic that revolutionized my experience in Solo Duel after implementing it into my play. A tactic I often like to use is luring aggressors into my corners thinking that they can steal the corner boost orb quite safely and that I'll have used all my boost to try to secure it, weakening my defense. Generally, I have more boost than they think and I'm able to nab the boost quite safely and they're left boostless with too few options available to them to make staying worthwhile. Sometimes, the boost will be stolen from me, when I was very clearly closest to the boost orb, and then often this results in conceding a goal. This can be lip-bitingly frustrating and it seems as if the game personally has something against you. As shown in the video below, courtesy of Rocket Science, the boost orb's hitbox is off the ground a considerable distance, and flipping into the orb, since you gain height from the jump, often puts you closer to it, and you're able to snatch it against all odds. If you keep this in mind, you can steal boost from your opponents with some quite remarkable results.
We've faced the face-off and denied on defense and we're finally ready to move onto offense. Being a strong offensive player is perhaps the most important skill in any duelist's repertoire. As the old adage says, "The best defense is a good offense." You needn't defend if you're able to keep your opponent in their own half. There's likely nothing I can say that will help you with your mechanical prowess and it's assumed that you're mechanically capable if you're looking to achieve the highest competitive Solo Duel ranks. Without further ado, let's figure out exactly what our main objective should be in offense, aside from scoring a goal.
As previously mentioned, the literal objective to consider when being on offense in Solo Duel -- or any playlist, really -- is to score a goal. Against very mechanically skilled players, who seem confident in almost any situation, this is a lot easier said than done. The difference maker then, especially as you approach the middle divisions of the Champion II rank and higher, is your approach. It's very easy for even the most confident players to forfeit many of their matchmaking points due to simply lacking discipline. The point I'm trying to make is that if you can reach the middle Champion ranks, then you are perfectly capable of achieving much more, provided you make the necessary changes to your play.
The beauty in the simplicity of the literal objective of Rocket League (scoring) lies in the fact that no matter what, one cannot ignore the ball moving towards their goal, at any speed. The ball can be moving incredibly slowly or can be projected as a result of the most disgraceful shot to have ever been conceived, but the end result will always be the same unless someone is there to defend it. This is something that is fundamental to maintaining offense in Rocket League, especially against competitors who are unflinching, even in the most dangerous of situations. Being able to control whether or not the ball is heading towards the goal is being able to control the positioning and actions of your opposition, and so against strong opponents, the emphasis lies on not your opponent but yourself. Having such control over the entire situation, unlike other competitive playlists like Doubles and Standard, means that if you're able to really master your approach, then no matter whom you're playing, you should be able to maintain dominance (this is particularly apparent if you look at the Solo Duel leaderboards). So what practical approach can you take to become as unrelenting an adversary as possible? Let's find out.
As previously explained, isolation refers to a situation in which one is too far from the play to properly control the situation and it's possibly the worst defensive situation you can find yourself in. Isolating your opponent, properly, can reduce the most mechanically skilled and composed players to easy pickings. Far too often you see duelists taking every opportunity possible to outplay their opponent through flicks and low fifty-fifties while failing to first isolate them.
Demonstrated above is a quick isolation of a player I faced in Solo Duel. Notice that when my opponent found themselves too far from the play, I had a surfeit of options available to me and their fake challenge was all but useless since it was very clear which one of us had control of the situation. Instead of focusing on the vast expanse of the goal presented to me, I considered where my opponent was not. A power-shot directly behind them, threatening both a top corner goal or another shot from the rebound, created a panic and I'd managed to isolate them further. Following putting the ball behind them, they were unable to face the ball from anywhere but directly. This forks the defender and leaves them at your mercy. After Gxld Plxyxr moved out to contest the ball, there was so many things that could go so wrong for them, but so right for me. It wasn't a valid strategy, either, to not contest the ball, and it simply becomes a matter of conceding a goal becoming unavoidable.
If you treat every situation like this, considering every bit of solid possession you get to be a puzzle, you'll find yourself tearing through the defenses of your rivals, even right through the Champion ranks. The principal behind maintaining this offensive onslaught is being disciplined, focused, and correctly choosing how you wish to apply offensive pressure. Rulers of the Solo Duel leaderboard, such as the aforementioned Scrub Killa, are famous for seemingly melting through just about anybody's strategy given enough time, and this is through being a skilled isolator. Take a look at the video below where SquishyMuffinz plays a series against Scrub Killa. JohnnyBoi_i makes the wise evaluation that the difference between the strategies of the two is that the former looks to have as much boost as possible, whilst the latter denies it and isolates. As has been shown, time and time again, the boost denial strategy will always triumph. Consciously think about how you can deny boost in your games through proper aggression and follow in the footsteps of the best.
Creating an instance of isolation can feel quite unintuitive to many, especially in the fast-moving, flick-focused meta currently taking Rocket League by storm. Being successful requires a lot of practice and conscious implementation of the strategy until it becomes natural. Think about your next move every game if you plan to become the best. To make this simple, I'm going to divide plays one can make into two categories: Scoring and Disruptive. The former refers to any kind of play you might make to score an opportunity, whereas the latter refers to something you might do to try to isolate your foe from initial possession. I'll sort the plays into two non-exhaustive lists below.
As mentioned before: this list is non-exhaustive. There are so many ways to score in Rocket League and the world is your oyster whenever you have possession. What you should really take from this is that scoring plays should be used with prudence in mind. It's incredibly important that you vary your offense, and keep your opponent guessing. Better players will rapidly adapt to your modus operandi, even within the short duration of a game.
Once again, this non-exhaustive list is just a general guideline for any players looking to become stronger on offense. Ultimately, it comes down to your boost management, decision-making, and discipline. Remain calm and collected, and keep a mental note of how much boost your opponent has at any given time.
Fifty-Fifties, Mind-Games and More
To finish the OFFENSE section, I'd like to include a video by AMustyCow, otherwise known as 'Musty'. Since challenges, mind-games, and low fifty-fifties are a huge part of my personal playstyle, I figured that a video would demonstrate this better. All three techniques fall into both the Disruptive and Scoring categories, entirely depending on the context they're used in. Knowing when and when not to commit to a challenge on offense is an incredibly sensitive skill that requires an amazing awareness of your opponent, as opposed to yourself.
There's really very little I can say that will improve your mind-game and challenging ability besides apply what you know about face-offs to each situation, and practice more and more. The players best known for their mind-game ability are the most composed ones, and those willing to forgo their speed in favor of denying their opponents'.
There are so many nuances and idiosyncrasies to be found within the Solo Duel playlist that this guide could really go on forever. I hope, if you read all of this, that you're able to apply yourself and what you've learned to become the best. Really, the difference maker is, and always will be, you. The degree to which you're able to break bad habits, welcome new ones, and remain focused will be the catalyst for climbing the ranks as quickly as possible.
If you have any personal questions, or you'd like to play some Solo Duel matches to better understand the playlist, then please don't hesitate to contact me via Discord (Pasadena#1384 - case sensitive!) or my Steam profile. I hope to see you all in the Solo Duel arena, and until then, I wish you the best of luck on your journey to become the best.


