


A Detailed Map Guide for Ascent - Attacking
Let's learn where you need to use utility and where defenders are hiding on Ascent.
Let's learn where you need to use utility and where defenders are hiding on Ascent.
This map guide is meant to show the best places to smoke and where potential enemies usually are on Valorant's Ascent. Most of the time, if you smoke these areas, you will likely not get shot when peeking. Ascent is one of the maps many people struggle on when attacking. The purpose of this guide is to give tips and make the attacking side a bit easier. I also gave a team comp that I think works really well on this map, which I will go into detail about later.
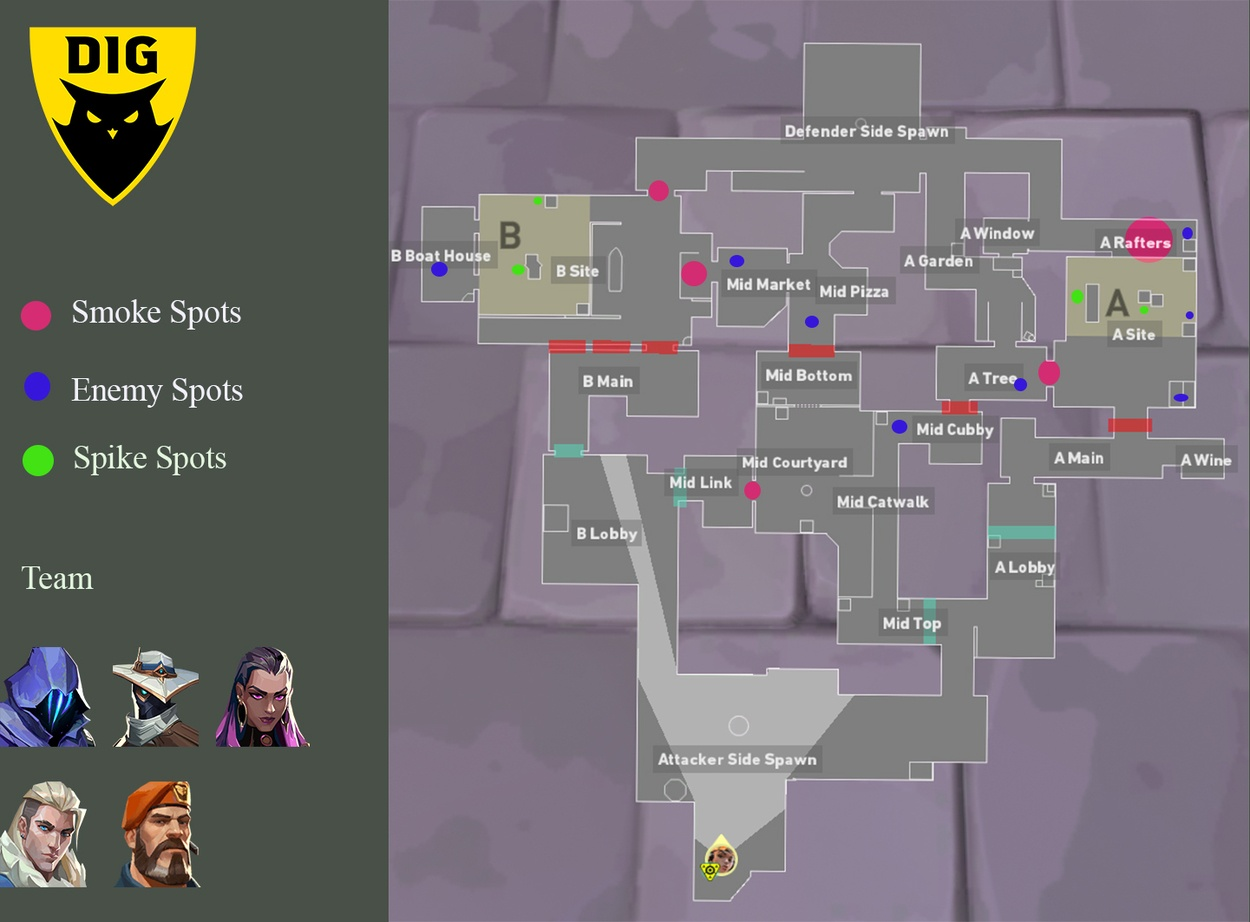
When planting or pushing A site, you need to leave one player behind to make sure no one comes through Catwalk or your flank. Many times when people five man push A site, the enemy team at B rotates through your flank and gets some kills. That is why you need someone to watch both Catwalk and your spawn area. Usually there is always someone in Heaven peeking with an Operator or rifle, so it always needs to be smoked. It's only safe to peek heaven in the first round, because pistols are not that good at long range. Once you smoke off their peek angles, I would suggest going in as a team and committing to the play. Going in one by one will just make it so that everyone gets picked off. Once it is smoked and you and your team pushes in, make sure to check every corner and make sure the enemy is not sitting in the smokes or waiting outside. Your main objective is to take control over the site as quickly as possible. I would suggest smoking the door on A site then closing it, forcing the enemy to push in or be pushed out of the A site. Always be careful of people hiding in the smoke, and you can also use blinds when pushing in to be safe.
Once you planted and have the area secured, the most common place where the enemy team comes from is either your flank, which is your spawn area, or they will try coming from their own spawn and try taking control over Heaven again. Depending on how many agents are alive on your team, you should try to have one in Heaven and one on your flank. Since the door will be closed if they try pushing from there, you will hear the gun shots to break it and can prepare. Another cue is if they break the glass in gardens to get up to Heaven. These are both dead giveaways of their locations. Your main objective once you planted is to play for time. So, this means you do not have to peek any enemies. Let them come to you so you get the first shot. If they try defusing the spike, you will hear it unless they are super far away.
Always communicate with your team. Let them know if you hear footsteps near you, what abilities they used, last seen locations and how much health they have left. The more information your team knows, the easier it will be late in the round. For example, if your team knows Phoenix has no Hot Hands or Blazes left and is low on health, they will know he won’t be able to heal at all and your team can play aggressive or push him.
Many players like to go for B site especially in earlier rounds since it is easier to take control compared so A site. Before pushing in through B main, be careful that no one is peeking through B site. In later rounds especially, many people will buy Operators or Vandals and peek B Main or throw in flashes. If you plan on planting on B, you do need smokes to cover Mid Market and defender side spawn. Always check Boat House! Sometimes players stay there and do not move or peek until they hear the spike being planted. B site has many corners and hiding spots so be sure to check them all. Once you push in, try to have someone close the door on Mid Market so the enemy team will have a harder time pushing in. The sooner this is done the better it is, because it stops the enemy from getting potential peek kills and it forces them to rotate or break the door down.
Once planted, ideally you want to have one person near spike, usually near Boat House, while the other two agents cover the entrance points to the site. One agent should be on B main hugging a corner and listening for sounds to give call outs, while the other agent can hold Mid Market or defender spawn doing the same. Again, once you plant the spike the goal is to play time. The less time the enemy has, the more likely they will play recklessly. If you planted the spike and you are the last one alive on your team, your best choice would be to stay on B site. When the enemy pushes into B site, they cannot check every corner. So, you have a chance of shooting them before they see you. If you have any abilities left, I suggest using them especially if they are traps or give you vision.
Firstly, I want to say there is many other team comps you can choose, there is no one team comp that is superior to others, they all have pros and cons. I will explain why I think this team works well together. I believe Omen is very good on this map because of his smokes and his ability to teleport from corner to corner without being seen. His ability Paranoia is also very useful for pushing sites. You can use it right before you push where you predict the enemy will be. His kit is very useful, and you cannot go wrong with choosing Omen.
Cypher is very useful for covering flanks with his traps, ensuring the enemy team will not come up behind you. He is even more useful when you take control of a site. He can set his traps and camera and safely peek and tag enemies or give callouts to the rest of the team. If they destroy his traps or cameras, the enemy will still be giving away their positions.
Reyna is a good duelist who can take care of herself and push solo due to her kit. You can always swap the duelist to one you are more comfortable with. However, most other duelist cannot self-sustain like Reyna. She is able to heal herself and blind enemies, making her very powerful compared to other duelists.
Sova is very useful for revealing enemy location with his arrow and his drone. This is very useful when pushing into a site, his drone can go first and make sure it's safe or see where the enemies are hiding. His Shock Arrow allows him to protect the spike from a long distance, especially if you know how to do across the map arrow shots.
Finally, Brimstone provides a lot of damage and smokes. His smokes will make the map easier by allowing you to smoke out the vision of the enemy so they cannot peek you. However, his ultimate is the best part of his kit. Allows him to protect the spike from any distance if he knows where the enemy is and if they are defusing. His ultimate could also be used to waste time so the enemy cannot defuse. It buys your team time and can make it so the enemy has to back off and save rather than defusing the spike.


