Alongside the mouse, the keyboard is what connects the gamer to the game. It’s what you use to control your avatar and, with dozens of keys to use and even more actions to perform, there are a lot of combinations to choose from. That said, some keys are better bound to some actions than others. There are many things you can do in Counter-Strike and all need a key bound to them, so let’s go through a complete list of some of the best keybinds for CS2.
Basic Keybinds
A keybind is a setting that determines what action your avatar does when you press a certain key. Different keys can perform one action, but one key cannot perform different actions, so keep that in mind when editing your settings. While there are default settings, you can customize the combinations of actions and keys so the game plays how you want it to. The full collection of every key and action combination you have are your keybinds.
You can change the keybinds in the settings menu or the console. Both work fine but the console takes some more experience to use, so go for settings as it has a more visual representation of every keybind needed. To access settings, click the gear icon on the top left of the main menu then “Keyboard/Mouse” for keybinds. The console is better for more advanced settings. Now we’re ready to get started. (Actions that do not need a bind are left blank)
Basic Movement Keybinds
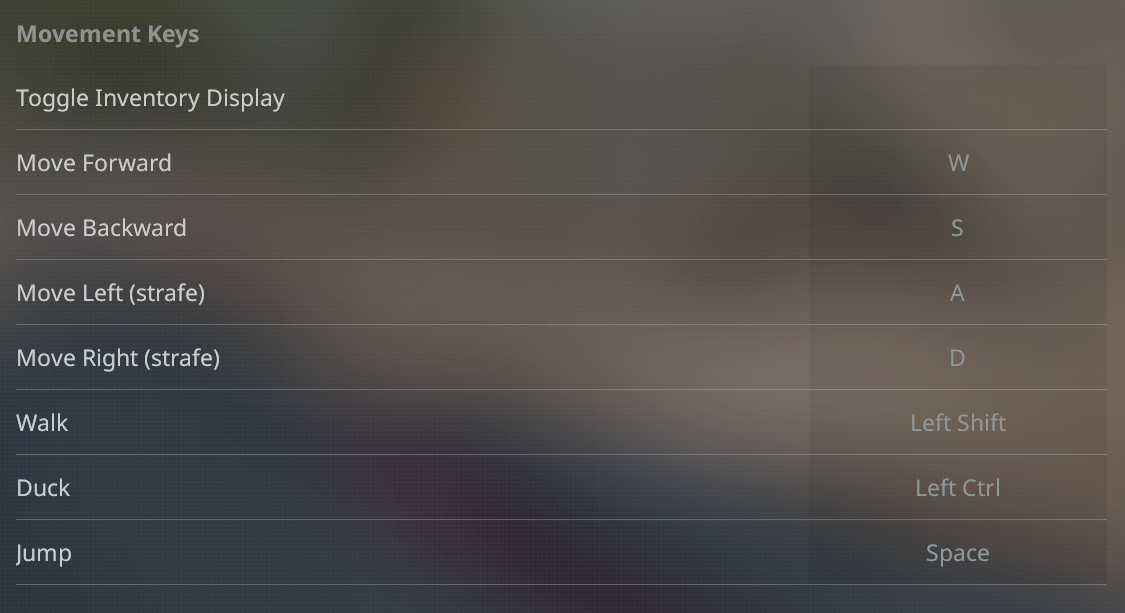
The first set of actions to assign are those for how you move around the map AKA movement. These are all pretty simple with nothing to explain, but it’s important to get the fundamentals down.
Basic Weapon Keybinds
Here is where things get more complicated. The weapon keys involve everything you can use in-game like guns, utility, and more. Some of these are standard but some need adjusting. After making the scroll wheel jump, “Select Previous Weapon” and “Select Next Weapon” should stay unbound as only the number keys should be used for choosing a weapon. It takes some time to get used to, but it is more precise and less prone to accidental switches.
For grenades, you should designate one key for each grenade type instead of pressing one button over and over again. This will make hectic situations easier to manage in-game because you can press a key and get the grenade you want instantly. Below is an example, but you can adjust grenade keys to your preference. Finally, the bomb should be bound to “4” so you can bring it out quickly.
Basic UI/Communication Keybinds
These are the keys designated for accessing menus and communicating with others in your lobby. There are not too many keybinds needed for these sections, but a few are still important. Be sure to be a good teammate by using these keys often!
Advanced Keybinds
The previous settings should have you covered for the basics, but there are still a handful of extra binds you can add to your console to up your game even more. These are more situational, but it’s always great to have more options when playing so give these binds a try! To use these settings, input the text after the colon into your console.
Radar Zoom Bind
bind o "incrementvar cl_radar_scale 0 1 0.25”
If you need to adjust the zoom of your radar on the fly, you can bind a key to toggle your view from almost the entire map down to just super close to you. This is great for seeing all teammates or finding the bomb in smoke.
Bomb Drop Bind
bind h "use weapon_knife; use weapon_c4; drop; slot1”
If you’re ever running somewhere and need to drop the bomb to a teammate quickly instead of going through your equipment, this is a great keybind for you. Using this will instantly switch to the bomb and drop it when the button is pressed.
Bunny Hopping
bind mwheelup +jump
bind mwheeldown +jump
In addition to using “Space” for jump, you can also use your mouse scroll to make bunny hopping easier.
Mute All Bind
bind j “toggle voice_modenable 1 0”
If you are ever in an unfortunate spot where you need silence, but teammates are talking, this bind will let you disable all communication temporarily so you can focus and then enable it again later.
Toggle Equipment Bind
bind k “toggle cl_teamid_overhead_mode 2 0”
If your screen is ever cluttered by all the utility hovering around, you might want to try out this bind that lets you toggle whether you see that or not. In a chaotic fight where visibility is key, this is a great tool to have at your disposal.
Conclusion
Keybinds are so fundamental to playing a game that you won’t notice them when they’re good but can’t think about anything else when they’re not. It’s important to get your keybinds ironed out when you start playing so you can get the muscle memory down but it’s never too late to try some new combinations!
Changing your keybinds from default to unique is a great way to get more options in the game and reinforce good habits. Add more movement options, switch up your grenade keys, and throw in a few advanced binds for unusual situations. Every bind from basic to complex is important and worth thinking about so open up settings, go into your keybinds, and try something new.
Good luck and have fun!