Conquest Warding - A Smite Guide
We know that warding is super important.. so if you don't know how to do it, or just want extra information, YOU CAME TO THE RIGHT PLACE!
We know that warding is super important.. so if you don't know how to do it, or just want extra information, YOU CAME TO THE RIGHT PLACE!
Aren't you sick of getting ganked? Do you have lazy teammates that never tell you an enemy is missing and that he is coming to kill you? Are you constantly being targeted by a jungler?
If your answer to any of these questions is yes... you came to the right place!
Map awareness is one of the main components of a good player, and it can greatly improve your chances of winning lanes and the match. You may not think that knowing where your enemy is can be helpful, but when you see a jungler come up behind you and get first blood... you will think differently. Ward placement can give you an exact or approximate location of the enemy team, and this will aid you to go for an objective, clear a jungle camp, rotate to a certain lane, and much more! So you need to know how to place wards, when to do it, and how to do it.
Let's start with the basics of warding, the three methods of having vision on a map besides the usual minions and towers.
First of all, you have your regular ward, the one that costs 50 GP and gives you the regular vision (specifically 45 units) that everyone should have. Use it as much as possible in every game, doesn’t matter if it’s a casual game or a ranked.

The second type of ward is the Sentry Ward. The main difference between the two wards is that the Sentry allows you to see other Wards, so you can counterward, which means taking the vision away from the other team. They are a little more pricey than the regular wards, 125 GP, but the possibility to see where is a ward or to see what kind of vision the other team has can be crucial when you want to gank or get objectives.
The third type of vision are the Gold Fury Oracles. These are two minions positioned in front of the Gold Fury and provide an unkillable Sentry Ward in the Gold Fury area when slain. If you kill them, your team gains an advantage to have complete vision over this important objective and they can also help duo lane see incoming gods that may gank them.
Having this in mind, we know that Wards can be positioned in any part of the map, but it’s up to you and your team where you place them in order to have a greater control over the vision of the map and gain a tactical advantage. There are millions of possibilities, but you only have 10 wards (remember that only 2 can be placed at any time) plus the Gold Oracles, and you need to make the most out of them.
In this part of the article, I am going to show you where should you ward accordingly to your role and to the stage of the game, to present the optimal conquest warding that a team can have.
As a mid laner, your lane is in the center of the map. Due to its structure, you have four possible entrances/exits to the jungle, so you need to be very careful with what you do and how do you position yourself. The warding for your lane depends mainly in the jungler that you are up against, and also the playstyle that they have, and the mobility that your god has.
A god without an escape ability can be an easy target if the jungler comes from behind, so getting out of position (let's say that past the middle of the lane) will be very dangerous. This also increases if that jungler is an Assassin with great mobility or if they can get very close to you rapidly.
Basically, you can have two types of warding, aggressive warding or defensive warding. And this is how they look:
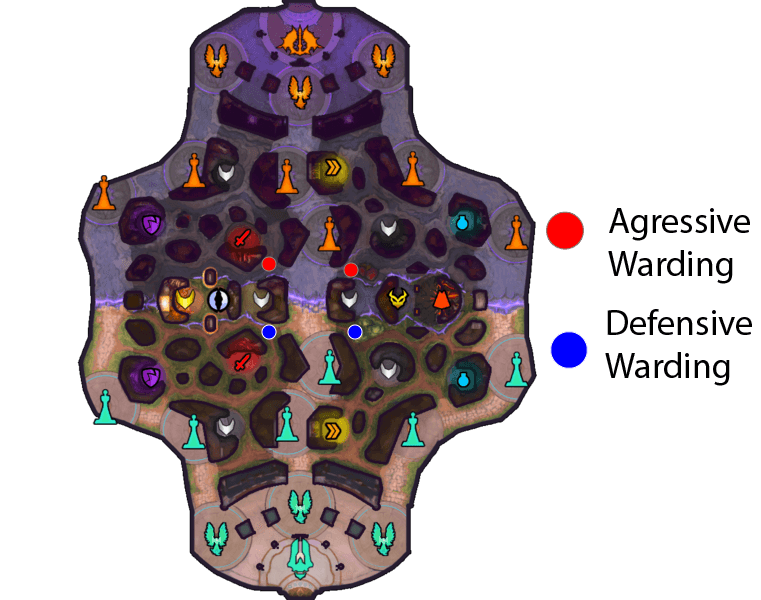
As you can see, this can inform you when an enemy is coming to your lane and give you a better chance to survive. Aggressive warding will give you an idea of when an enemy is approaching the lane, while a defensive ward is there to tell you if the opponent is trying to get behind you. This is why it was previously mentioned that positioning in lane is key. Try not to be caught in the middle of the lane with a god in front of you and another one behind! This will most likely end in your death.
As a duo lane, you have the peculiarity of having four possible wards. If you are an ADC, please never, ever, say, “But I’m the ADC, I don’t need to buy wards”. NO. NO. NO. You must also buy wards. Always.
It’s important for you to get a full build and be effective at dealing consistent damage, but if you are the one that thinks that you are wasting your money buying Wards and insult your support if you get ganked and get killed, please leave the game. You have the same responsibility in getting map vision for your lane, although you don’t need to do it all the time. Maybe a third ward (two from the support and one from the ADC) can spot an enemy and save the both of you.
Having control of the Gold Fury Oracles is vital because they can give the lane an early notice about an incoming enemies from mid.
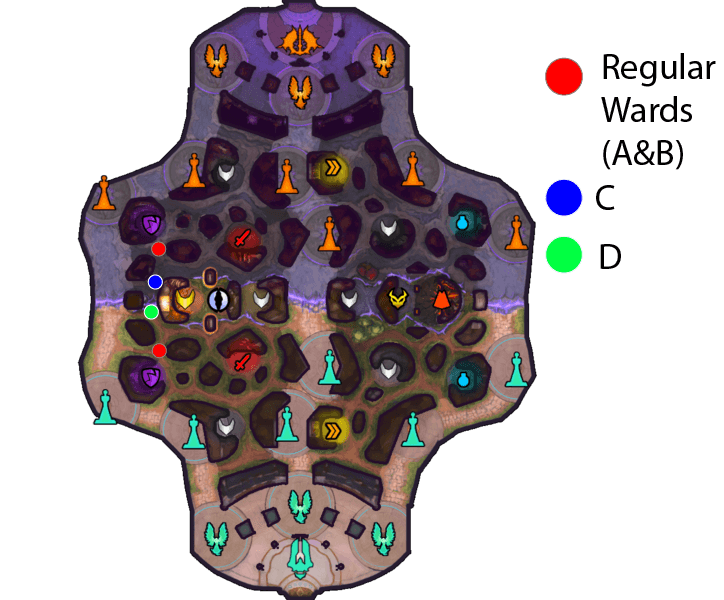
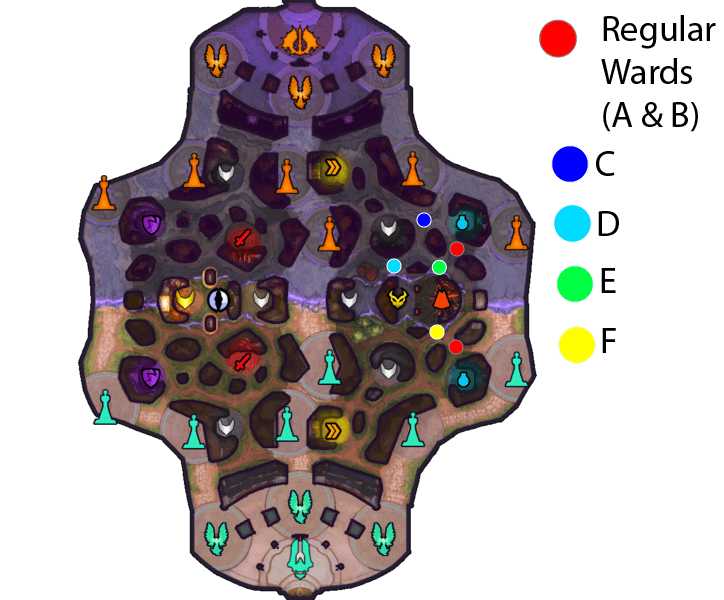
As you can see in this graph, these are the main points where an enemy can appear to gank your jungle. Bear in mind that there are gods that can ult from another place (such as Thor or Ratatoskr) and get to you, but that doesn't happen all the time and this can be sudden but expected. Wards A and B are the usual wards that a lane should use, because they show you the usual paths from the enemies to you, but C and D can be very helpful due to the distance and blank spots that A and B cannot cover.
The Solo lane is the lane with the most physical confrontation, where you are always fighting your opponent, but it is also under constant threat from the enemy jungler, so warding is very important. In the same way as the duo lane, you have 4 different openings in your lane, so it’s very important to have a great vision to avoid being killed all the time.
You usually put the wards where an opponent enters the lane, but due to the amount of options, you need to adapt your vision accordingly to the behavior of the enemy jungler. As you can see in the map below, we can have a few options for you:
The regular wards that you can have if you are dealing with a regular jungler are A and B, that can give you a heads up about the incoming player. Looking at the distribution of the map, we can also have points C, D, E and F as possible routes to get in the lane, or at least have an early notice. As you can see, E is very close to the Harpies camp and the Fire Giant, which is one of the most used enemy routes.
Remember that every jungler has its own playstyle, so it’s crucial to see where you can spot him the most and what routes or rotation he/she has. Remember that putting wards in certain points, such as D and E can also help the mid laner acting as an early alarm.
Being straight and clear, you have the most variable warding in the entire game. Many people will tell you that it’s not usual that a jungler uses different wards throughout the map, but they are wrong. You are a team member, and to have the best possible vision, you should also use them actively and gain map vision.
Due to your role, you have two options: A) use your wards to help mid lane (let’s face it, they have too many possibilities to get ganked from both sides) and to cover the aggressive warding spots, or B) ward key spots that reveal rotations, like near the Gold Fury, the Fire Giant or the enemy camps.
This is a very flexible role, so it’s important to have your wards help your team and give an overall advantage throughout the map. The map for the jungle warding is very big, but the most common spots for this are the following:
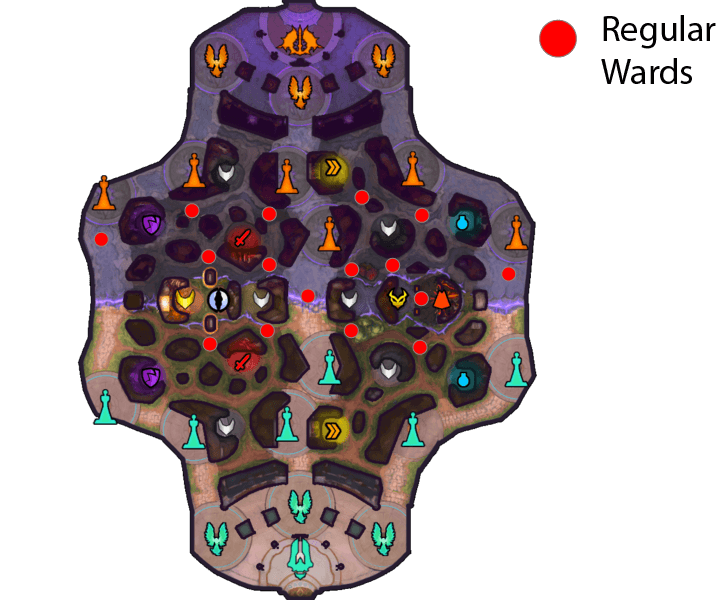
As you can see, there are numerous warding places, but as mentioned before, you can give a hand to your mid or to the basic rotation paths, this is totally up to you, but know that this decision will greatly impact the game of your team as a whole or the lane that you choose to help.
Now that everyone knows where they should place wards, I am going yo give you the most optimal places for your wards, in order to have the greatest vision of the map, while maintaining the usual vision for each one of the lanes.
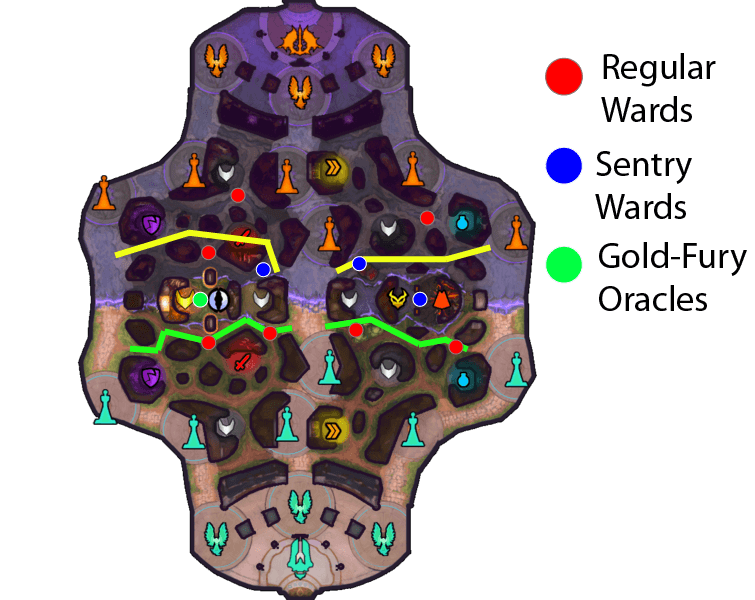
As you can see, this is done to spot early rotations and ganks and to have a slight idea of where is the enemy team. The highlighted paths are the ones that the lanes usually use to rotate, so you need to take then into account in the laning phase, and due to the vision, you can assume that they are incoming or that are on the way on their rotation. Know that there are gods that have an ability considered a global ultimate, like Thor, Janus, Chernoborg, Athena, etc, and that they can surpass the physical properties of the map and allow an instant or incredibly fast rotation.
Depending on your lane abilities, you can either lose your first tower or destroy the enemy tower, so this will change up the landscape for your wards. That is why I had the extra warding positions, so you can see what would be better for your current situation. Take into account that these positions will not be optimal for your team unless you work in coordination with them and have a common warding strategy.
Finally, there are two places that you should have regular vision in any stage of the game, this can give you a certain team view of the map, so they're the best places to ward and counter-ward on the entire map. The first one if the Fire Giant/Pyromancer area, and the second one is the Gold Fury/Oracles. This may seem obvious, but you won’t believe the number of players that lack this information and never ward the main objectives, giving the opposing team the vision and relative control of them.
I hope that this guide could help you with the vision in the game and improve your map awareness. Use this information wisely and WIN SOME GAMES!
Like our content? Support us by getting our merchandise in our shop