


Overwatch's Mercy: Settings, Mechanics, and Techniques
Need tips for playing your guardian angel? Konduit dives deep into the mechanical execution of Overwatch's Mercy.
Need tips for playing your guardian angel? Konduit dives deep into the mechanical execution of Overwatch's Mercy.
Greetings y'all, Konduit here. Today we'll be discussing some of the finer points of Mercy's gameplay: going over details of her kit's mechanics and some techniques/strategies to optimize your execution in high-pressure situations. This is fourth entry in my Mercy series, you can find the previous articles listed below:
1. A Conceptual Primer
2. Positioning/Evasion Notes and Tips
3. A Resurrect Primer
First things first, let's get into Mercy's unique settings. Unlike most heroes, Mercy's settings have a significant effect on her gameplay and capabilities in combat. More specifically, 'Guardian Angel Prefers Beam Target' has massive ramifications on your evasion, playmaking, and general mobility capabilities (We'll get into this in-depth soon).
Below you'll find my own hero-specific settings for Mercy (which also happen to be the defaults I believe):

1. Before getting into Mercy's unique settings, I'll quickly touch on Mouse Sensitivity. Mercy's notable in this respect because she spends a significant amount of time not 'aiming' with her Caduceus Staff. Don't get me wrong, targeting allies and whatnot with your staff certainly does require precision, but it's not near the level of accuracy you'll need on McCree, for example. Thus, the capacity to turn quickly is a little more useful on her. However, she has two 'modes', and can use her pistol in combat, which DOES require more accurate aiming (which implies a generally lower sensitivity, depending on your comfort zone of course). My recommendation would be to stick with whatever sensitivity you would normally use on other heroes (dedicated DPS, etc.), or whatever you feel comfortable aiming your pistol with. You will need to effectively use your pistol as Mercy, and switching to a higher sensitivity to add a little bit of power to her staff mode isn't worth throwing off your aim with your pistol, or with the other heroes you may play. You can accomplish fast turns the same way you would on a DPS hero, no problem.
2. Alrighty, let's dive into the meat and potatoes. This first one's easy - Allied Health Bars, always ON. Seeing your teammates' health statuses is critical when deciding who to heal, or to heal at all.
3. I have Toggle Beam Connection, OFF. What this means is that your Caduceus Staff's beam is only active if you're holding the mouse button down (this goes for both healing and damage amplification). If Toggle Beam Connection is ON, all you'll have to do is tap a mouse button once and you'll be tethered to your target. The beam will continue indefinitely without you having to hold the button down. You can probably do everything you need with this setting on, but when I tried it out I felt it was a little clunky when it came to connecting/disconnecting the beam to dash to targets I wasn't looking at (it requires an additional tap to disconnect the beam, whereas with the setting off I can simply let go of the mouse button). I haven't played for an extended duration with this setting, so feel free to try it out and see if it works for you. As a side note, if you do elect to keep this setting OFF, I encourage you to take breaks and do wrist stretches/hand exercises! Mercy's fairly unique among the Overwatch roster in that you'll be holding down your primary/secondary fire button often and for extended durations of time - this can get a little tiring and may strain your hands (I can tell you this from experience). Take breaks, do stretches/exercises, and keep yourself healthy.
4. Time for the big stuff - Guardian Angel Prefers Beam Target, ON. This setting enables so many strong mobility options for Mercy that having it off will probably make things much harder for you. Sure, it's got a couple downsides, but those pale in comparison to the breadth of benefits that the setting provides. I strongly encourage you to keep it on! This is one of those in-game settings that really has strong implications for your gameplay - it's not just a comfort/preference thing. The basic functionality is that using Guardian Angel while tethered to an ally will dash you towards that ally, no matter where you're looking/targeting. I've got the highlights listed below:
- Perhaps the most apparent case where having this setting on is a major benefit is when terrain/buildings/etc. block your line of sight to your beam target. With the setting on, you can still dash to your target even though you cannot see them; Mercy will hug the terrain and 'slide' towards your target, but you'll get there most the time (you'll quickly learn the types of walls, angles, terrain where you can or can't 'slide' and let the game auto-path you to your ally). If you do not have this setting enabled, this mobility option is not available to you. Without 'Guardian Angel Prefers Beam Target', you cannot dash to a tethered ally unless you have line of sight.
- There's innumerable situations where I simply need to be able to dash to my teammates without being able to see them. Sometimes I'm minding my own business, healing my teammate, when the enemy Pharah shoots a Concussive Blast at me and knocks me off the map, or Winston in Primal Rage bops me over the edge; normally, you'd be out of luck unless an ally very quickly comes to the edge in order to give you a jump to get back on the map. However, with 'Guardian Angel Prefers Beam Target' enabled, if you're still got your tether going (which you often will), you can simply hit Shift and GA back to your ally. Even the average case, wherein you get displaced and knocked out of position, can be remedied by just GAing back to your tethered ally. Simple as that.
- Your teammates can sometimes get too far ahead of you (or move behind terrain, etc.) with their own mobility skills and you'll lose sight of them. With the setting enabled, you'll be able to easily catch up by using GA. Because the beam tether doesn't break immediately when you lose line of sight (it takes a second or two), you can simply GA, and the game will attempt to pull you towards your teammate. At a fundamental level, you can even can look/scout around the area, while always having a very quick and easy repositioning tool if you need it. You don't even need to turn around, you can simply press shift!
- The notable downside of enabling this setting is that you cannot dash to another ally while you're tethered to another ally. This comes up in the scenarios where you want to heal a low-health teammate, but you're getting attention from a diver or flanker. The play here would be to dash to another ally while still maintaining your tether to the first ally to get in healing as you escape. While this isn't possible if you have 'GA Prefers Beam Target' enabled, you can work around this small disadvantage with tight mechanical play - I discuss this specific situation below in the mechanics section.
5. Toggle Guardian Angel is an interesting setting - I've got it ON. We'll get into this in depth in the mechanics/techniques section, but you have the ability to stop yourself mid-flight after you use GA. With 'Toggle GA' on, pressing the button once initiates your flight, and pressing it again stops it. With this setting OFF, you press the button, and as long as you have the button held down you will continue your flight - releasing the GA key will stop you. This setting, similar to 'GA Prefers Beam Target', has some implications on your capabilities during gameplay. With the setting OFF, if you hold down the GA button and then move your mouse over a target, you'll automatically begin your dash to that target. This can be extremely helpful, particularly in scenarios where you're scrambling for a GA target to get in range/become visible and are spamming the shift key. If you're hitting the shift key multiple times, you might start and stop your flight immediately, which can be absolutely backbreaking (you'll have to wait for the ability to come off of CD, potentially spelling your doom). If you've got the setting OFF, holding down the GA key will take you to the first available target you look at, making these high-pressure situations much more manageable.
- Personally, I started the game with 'Toggle GA' on and it's what I've gotten used to and have continued using. It feels very intuitive for me to double tap when I need to stop mid-dash, and I've sort of built myself a rhythm. I've managed to build a bit stronger control over myself and can often resist spamming Shift when I need to dash out, instead being a little more patient and calmly waiting for when I can actually use the ability. Full disclosure, this is definitely a little suboptimal! I've missed escapes because I've spammed shift and because I didn't react fast enough to the short window of opportunity and waited too long (though I've certainly gotten better about this over time). Having 'Toggle GA' OFF may indeed be the way to go. I encourage you, the reader, to check out both and use whichever you feel works best for your hands and gameplay. Who knows, I may even come around to turning this setting off. I learned recently that even the renowned Animetic has switched to having 'Toggle GA' OFF!
Credits/Resources: NapTime's video on settings and mechanics for Mercy
- Mercy's Guardian Angel can be canceled mid-fight by pressing Shift once more (or releasing it, depending on whether or not you've enabled or disabled 'Toggle Guardian Angel'). This is critical to Mercy's gameplay and facilitates juking, precise movement, and can even enable you to travel farther distances over a span of time, as you're starting the cooldown on the ability earlier.
- It's important to note that, during the tail end of your Guardian Angel flight, you start to slow down and sort of float in the air a bit. It looks kinda cool, but this time period/set of frames is dangerous and can leave you vulnerable to enemy fire. As a general guideline, get in the habit of consistently stopping Guardian Angel just a bit early. Of course, if you want to reach the natural endpoint of the dash (e.g. meeting an ally on a higher plane of elevation, etc.), go ahead and go where you need to go. However, for many of your standard GAs, consider canceling the ability in advance. Stopping your dash early shaves a half-second or so off of the cooldown and keeps you moving quickly towards your destination.
- Again, over time, you will actually travel farther if you stop Guardian Angel early! The objective here is to minimize the amount of walking and 'floating' time and maximize the amount of time you're actually in the air flying ('floating' here refers to the hangtime towards the end of your dashes). Mercy's travel plans often involve jumping from one ally to the other. Once you get close enough/in a suitable position to dash to your second target, you should be looking to cancel Guardian Angel early. If extra distance traveled from the first jump won't help you get in range of the second jump, canceling early simply saves you time (the ability will come off of cooldown faster). Look to move in position to your second target even before you arrive at the first. And in the case where you're simply trying to get in range of an ally to heal/damage amp, canceling the dash early keeps you spaced out from your ally (which is in most cases where you want to position) and sets your GA on cooldown so you'll have it up sooner, if you need it. Be efficient! If nothing else, canceling GA early will shave precious time off of the CD for your next use.
- Perhaps the best example of the above principle arises when attempting to reach an ally on the other side of a corner. Here's a diagram:
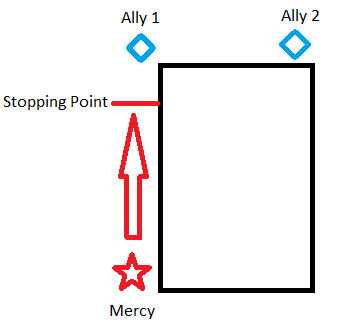
The situation is as follows: You want to reach Ally 2 from your current location as quickly as you can (everyone's engaged in battle, so let's consider everyone stationary and unable to make things easier for you for the purposes of this example). Seems pretty straightforward, right? Just dash to Ally 1, then dash to Ally 2. While this is technically correct, you can save time and reach a higher degree of efficiency by stopping your Guardian Angel early (about where I've indicated on the diagram), walking the remaining distance to the corner while your Guardian Angel is on cooldown, and then dashing to Ally 2 (your GA should be ready basically when you turn the corner). By stopping GA early, you're overlapping the walking time with your GA's cooldown timer (and thus not burning time waiting for your GA to come off of CD to move to Ally 2) and constantly staying in motion towards your target. If you travel the entire distance to Ally 1 via GA, you'll be left with 1.5 seconds of 'dead air', so to speak, where you'll be out in the open, relatively stationary and potentially exposed to danger. While traveling, stay as mobile as you can, keep moving, be efficient. It doesn't sound like much, but those precious seconds can make all the difference.
- As a corollary, you generally don't want to walk for appreciable distances, particularly across contested areas or spaces without cover. Really take advantage of GA's short cooldown here! Instead of walking past a sightline against the enemy team, let your allies (tanks, DPS, etc.) go through the crossfire first and then dash to meet up with them. Think about this in terms of playing against Widowmaker: let's say you're with a Solider 76, and both of you are looking to cross the enemy Widowmaker's sightline. The Solider manages to sprint through quickly, and Widow isn't able to take him out. The correct play here is to wait until he crosses the sightline into cover, and then GA to meet up with him. It'll almost look like a bungie cord, you'll let the tether extend pretty far, then dash to shorten it. Following behind on foot leaves you too vulnerable - you become a relatively easy target. This principle has applications in a wide variety of circumstances - try applying this movement paradigm to various situations in combat, using GA frequently (almost exclusively, even) to move around between cover. You'll notice that the odds of getting picked or taking stray damage decrease. In short, you've got one of, if not the, most powerful mobility skills in the game - walking is overrated, look to use GA to traverse distances whenever you can to avoid danger in battle.
- One critical property of Guardian Angel is that you always travel to the location of your target at the time that you started the dash. If your target is moving forward or backward as you start your dash, you'll end up behind/in front of him or her, respectively. In the latter case, it's even more important that you cancel your dash early so as not to travel too far forward and expose yourself to enemy fire. Be extremely mindful of this property, as it can put you into some sticky situations if you're not conscious of how far/where you'll be traveling; however, you should also understand the mechanics so you can use them efficiently and to your benefit. Sometimes you may want to dash towards an ally that is running towards you - you'll sort of end up trading places! This move is useful for dropping aggro and letting your teammate occupy the enemy's attention for a moment (with your support, of course).
- I briefly touched on this before, but to reiterate: as Mercy, you don't want to be too close to your allies, as this limits your mobility options and doesn't allow you to effectively create space between incoming divers (check out my article on positioning and evasion for more details). Stopping your Guardian Angel at the appropriate time still puts you in range to heal/damage boost your target, but also preserves your spacing such that you have mobility options, and are not attracting focus by being out in the open with your allies.
- One of few downsides I mentioned earlier when discussing 'Guardian Angel Prefers Beam Target' was that you cannot jump to a different ally to escape danger while continuing to heal your initial target. This disadvantage is mitigated by one of my favorite techniques - you can release the beam on your target (the one you're intending to heal), dash to your 'escape' target (as you've disconnected the tether and can now select other allies for Guardian Angel), and then immediately turn around while you're mid-dash to resume/reconnect the beam tether to your initial target. This takes some practice and precision (who said Mercy players don't need mechanical skill?), but the end result is basically the same as if you had the setting OFF - almost continuous healing on your main target while still moving to a new location. You give up a fraction of a second of healing on your initial target, but this is a small price to pay compared to the wealth of benefits keeping the setting on gives you.
- One of Mercy's weaknesses is that the bright, glowing beam that connects her to her ally often gives away her location to divers/flankers/opponents who want to disrupt you. Because of the tether, you're not a ninja healer! However, you can take steps towards hiding your presence by stopping your beam when you feel you're about to get jumped on. Release the beam if your allies don't need healing/nobody's in combat to damage amp. I sometimes get stuck in the habit of always having the beam active while I Guardian Angel, even. There are occasions when you might need to move across a battle 'stealthily', and disconnecting your beam may make you stand out less as you dash. As a caveat, you might feel the need to indicate that you're still around in case of an upcoming play (damage boosting an ultimate, etc.). If you want to conceal your presence but also indicate that you're ready to amp an ultimate, you can try 'pinging' your ally with a damage amp by flickering it on and off. Hopefully your ally will get the message! (You should use voice comms when possible though)
- Be efficient with your time and healing. In high-pressure situations where multiple, separated allies need healing, you can be moving to your next healing target as you're finishing with the current one. Depending on how much healing is needed, you can start moving away from one teammate to the next (readying yourself to reposition) as soon as you arrive.
- You don't need to dash directly to an ally in order to be able to heal them. Check out the following diagram:
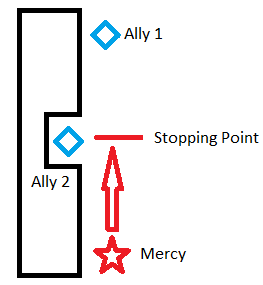
Here, the goal is the same: reach Ally 2 in the shortest time possible. Ally 2 is in cover, so there's no way to directly dash to him/her. The only apparent option is to walk up; however, given the additional information of Ally 1's position, the correct play becomes clear. You can dash towards Ally 1, then cancel GA when you're near Ally 2 to stop your momentum and get to healing your intended target. This is a relatively straightforward example, but the point is to get you thinking about ways you can use the teammates around you in order to creatively reach other targets (or just cover/locations in general) when you don't have a direct route or don't want to take the direct route. Using GA in this manner, even if your path to your teammate or location is indirect, will often be much faster than just walking. Get to thinking about that simple geometry! All kidding aside, these kinds of movements become clearer with experience and practice. You'll begin to pick up these non-linear (outside of their normal function, so to say) ability uses/lines of play and more quickly recognize when they're applicable as you play more and more Mercy.
-I'll go into this more in-depth in a future article covering hero 'matchups', but in general the best way to avoid a diver is to exhaust their mobility skills. Mercy has the most mobility potential of any hero in the game - let a diver jump on you, then GA away. It's scary to let Winston zap you for a bit, but the key is letting him come to you. Preemptively using GA will just allow him to jump to your current location and get off a longer spurt of DPS. Wait until he jumps first, then jump away - you'll be safe until his Jump pack comes off of cooldown. When that time comes, you'll have already been ready and waiting with GA to escape to another location.
- One of my favorite methods to avoid divers and certain types of enemy fire is to jump off the edge of the map and hover for a bit. You can stay out there for some time, and then dash to a nearby ally or 'soul marker' before you're in real danger of an environmental death. This strategy is many times more effective if you're coordinating with your team, as you can really drop aggro/make enemies preoccupied with you by flying super far off, and still get back later when a teammate peeps out to give you a jump target (more on this later in a future article on team communication).
- When using your pistol, there's often no need to reload. You can switch to your Caduceus Staff, and as long as you have your Staff equipped for the duration it would have taken your pistol to reload (1 second), your gun will reload on its own (it'll be at full ammo the next time you switch to it). Reloading normally is of course slightly faster (as there's no weapon switch time/animation), but in situations where you're out of direct combat with an opponent and are just offering some supportive fire with your pistol, switching to your staff and letting your pistol auto-reload is often a more efficient application of your kit and increases your overall output in the battle.
- Activating Mercy's Ultimate resets the cooldown on Guardian Angel (this was patched in a few months ago). This opens up wide number of mobility options - double GA is super awesome. The most common and straightforward application is to dash in, use Resurrect, then dash out to a target that you've rezzed or is skirting around the battle (for some reason my computer sometimes 'lags' a little bit when I do this - it looks like I'm traveling in segmented increments during the second GA. I still end up at my targeted location at the right time, but it was a little confusing at first. Let me know if you've had the same experience when you're doing this technique! It could be a bug.). In any case, if at all possible, plan your escape route before/as you're going in to Rez in order to make the getaway cleaner. You can sometimes scan around to find an escape path after you've rezzed, but you're in danger of getting collapsed on by the enemy team.
- The other use I've found for the Rez-into-GA reset mechanic is to, erm, simply Rez to reset my GA. It's a little unorthodox, but if you REALLY need to get away and dash to an ally (while your GA is down), and a teammate has gone down nearby, you can Rez just to get the GA reset. It might be a little selfish at first glance, but if you're solo healing, sometimes keeping yourself alive can be worth suboptimally using your ultimate.
Credits/Resources: Terioth's playlist of Mercy 'Tech' videos
So, there you have it - a compilation of many mechanics and techniques I use when playing Mercy. This is by no means a comprehensive list (I'm sure more will come to mind later on), but hopefully it'll get you thinking about the ways that you can use Mercy's kit in unexpected, 'non-linear' ways, as I like to say. Guardian Angel is a simple ability, but the ways it can be used for travel and evasion go far beyond simply moving towards an ally, and even in that case can be refined for even greater effectiveness. Mercy in general is straightforward to play and learn, but there's a depth of decision-making as well as mechanical skill and opportunities to demonstrate mastery of the hero lying within those straightforward mechanics. I'm honing my Mercy skills every day (mechanics, decision-making etc.), and every day I learn something new. Keep practicing!
That's all for today, I hope you enjoyed the article. If you'd like to discuss anything Mercy, have comments/feedback on this article, or just want to say hi, feel free to tweet me @k0nduit (with a zero instead of an 'o') and I'll get back to you.
Like our content? Support us by getting our merchandise in our shop


