


Seeing is Believing - A Guide to Different Types of Wards in League of Legends
Come and see the ways in which you can better understand warding and vision in League of Legends!
Come and see the ways in which you can better understand warding and vision in League of Legends!
In League of Legends, there is perhaps no tool more powerful than the ward. While other items directly empower your champion or help enable your teammates, wards provide something much more important: knowledge and vision. By knowing where your opponent is and is not, you can set up plays, make movements around the map, and avoid dying an untimely death from a sneaky enemy. That being said, wards and warding are often underexplained to newer players, leaving a lot of confusion regarding how they operate. The goal of this guide is to help remedy this by exploring the life and death of wards, hopefully offering some insight into this oft confusing aspect of League of Legends.
Let’s start by answering a relatively simple question: what is a ward and what does it do? In short, wards provide vision of the area around them. Part of what makes this useful, beyond the obvious fact that it allows you and your teammates to see an area of the map without being there, is that wards offer vision inside of bushes that they are placed in. Overall, wards vary in a lot of ways, including lifespan, health, vision radius, and how many of them can be placed by your champion at a single instance. However, with one exception, all wards provide gold and/or experience when destroyed, providing an incentive to seek them out and slay them beyond denying the enemy team vision. That being said, it is important to understand what makes each type of ward different.
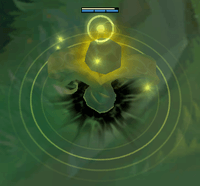
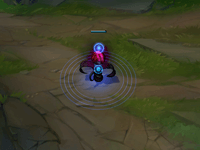
What makes Totem Wards notable is how common they are. Since this is the default ward type that all champions (except for Fiddlesticks) start with, it is omnipresent in the early stages of any League of Legends game. Beyond that, it also sets a baseline from which all wards after it differ. It provides vision of the surrounding 900 units (think about 9 Teemos in any direction around the ward) while remaining unseeable by enemies unless they reveal it using special means. In terms of longevity, Totem Wards are the only type of ward which last for a longer time based on how far you are into the game. When all champions are level 1, a Totem Ward lasts for 90 seconds; as champions level up, this increases to 120 seconds by the end of the game. They each only have three ‘health’, which means that they take three basic attacks to destroy. Furthermore, any given champion can only have three of them on the map at any time. When destroyed, it grants 10 gold to whoever destroyed it, along with 37.2 experience if slayed by one champion or 46.4 experience shared amongst multiple champions if multiple champions joined forces to destroy it.
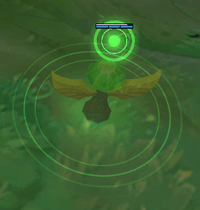
In many ways, Stealth Wards are indistinguishable from Totem Wards; in fact, the game even refers to Totem Wards as Stealth Wards! However, Stealth Wards that are generated by upgraded support items do have some unique properties. For example, they have a standardized, unchanging lifespan of 150 seconds, regardless of what point in the game they are placed. They also grant 30 gold when destroyed, although they grant the same amount of experience as a Totem Ward. In this vein, they also provide vision of 900 units around the ward, have the same health at three, are also invisible until revealed by special means, and they even share the limit of three being on the map at the same time with Totem Wards since they are so alike. In short, the two key differences of this ward are that it provides more gold when slain and lasts for longer than a Totem Ward ever could.
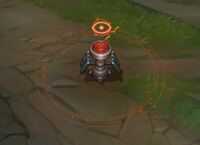
Produced by Farsight Alteration, Farsight Wards are the alternate ward type that champions can gain access to by swapping their wards around in the store. Unlike the previous two ward types, which were remarkably similar to one another, a Farsight Ward is significantly different from any other ward. For example, it only grants vision of the 500 units surrounding it, and it cannot be targeted by allies. The latter of these points is relevant for champions like Jax or Lee Sin, both of whom can use abilities to dash to wards. However, the most important difference is that a farsight ward can be placed at 4000 units away from whoever is placing it, much longer than the other placeable wards which can only be placed relatively close to the champion placing them.
At a simpler level, this ward is also fully visible to enemies who could see it if it were otherwise a unit (as in, if it is not in a bush, it is fully visible if an enemy has vision in that area, and if it is in a bush, enemies can see it if they have vision in that bush), which is much different than the stealthier wards mentioned previously. Delving further into these differences, a Farsight Ward only has one health point, meaning that it can be destroyed with one basic attack, but it also will live until such an event occurs. There is also no limit as to how many farsight wards one champion could have placed at a time, although the cooldown on Farsight Alteration does limit this to one every 198 seconds early in the game and one every 99 seconds late into the game. When slain, these wards grant 15 gold and either 18.6 experience for a single champion or 23.2 shared experience among several champions. No other ward is even remotely similar to a Farsight Ward, so knowing how it is different from other wards is crucial to using and countering it.
The first of the wards that are spawned by the middle of the Domination rune tree, Ghost Poros appear whenever another type of ward that can expire via time ultimately does so. This ward is significantly weaker than whatever ward came before it, as it only grants vision of 450 units around itself. While both allies and enemies alike cannot target this ward, that does not mean that it is invulnerable; if an enemy moves within the radius of vision that it grants, it will stop producing vision and run away. It is also fully visible to anyone who could otherwise see it if it were a unit, meaning that it is incredibly vulnerable atop its existing weaknesses.
That being said, the only limiting factor to how many of these poros could be on the map is the limit of how many wards that you can place. Further, this type of ward is the only exception to the gold and experience rule, meaning that it does not grant anything to an enemy who destroys it. Thus, while this ward is weaker than many of its counterparts, it only exists as something that empowers otherwise strong wards, making it more of an auxiliary assistant than anything else.
As the second type of ward that can be spawned by the middle of the Domination rune tree, this type of ward can only be chosen if Ghost Poro is not. In many ways, this ward is the offensive counterpart of Ghost Poro; where Ghost Poro extends the lifespan of wards that you place which naturally expire, Zombie Wards place a fragile ward whenever you participate in destroying an enemy’s ward. While this ward does only have one health, it lasts for 120 seconds at all points in the game, meaning that it can replace an enemy’s Totem Ward in the early game and potentially last longer than it. It also grants vision of everything within 900 units of it, making it just as potent as a Stealth or Totem Ward. However, it is visible to enemies as if it were a unit, so it is not nearly as able to avoid taking damage as stealth and totem wards are.
Furthermore, allies cannot target a Zombie Ward, meaning that those who could jump to a Stealth or Totem Ward cannot do the same here. Finally, while not an exception to the gold and experience rule, slaying a Zombie Ward only grants the slayer one gold, meaning that there are only marginal benefits to destroying this type of ward beyond the elimination of enemy vision. In short, this type of ward is useful if you are clearing out the enemy’s vision, providing potent vision where your enemy once had it and only handing over a trivial amount of gold when slain.
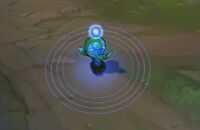
Last but certainly not least, Control Wards fundamentally counter every other type of ward at one cost: they have to be purchased from the shop for 75 gold per ward. However, Control Wards are able to both reveal and disable any non-control ward around them, including stealthy wards that would otherwise be invisible. They also reveal any traps placed around them, along with unveiling any camouflaged enemies who walk within their vision radius of 900 units. Furthermore, these wards are the most durable of any type of ward, having four health which regenerates if it does not lose any health after six seconds of being struck. On top of this, Control Wards have an unlimited lifespan if not destroyed, meaning that they’ll reveal other wards indefinitely until they are destroyed.
However, all of this is not to say that Control Wards are unequivocally the best type of ward in the game. For example, Control Wards also reveal themselves to the enemy team when revealing their wards, so it cannot do its primary job without alerting the enemy of its presence. Furthermore, it provides the same amount of gold and experience when slain as a Stealth Ward, making it tied for the most of each provided when slain. Overall, these wards serve to directly counter other types of wards, being durable for the price and limitations that come with doing so.
With all of this said, it is also important to consider the ways in which wards can be destroyed. As was stated above, wards that are not visible can only be revealed using special means, and beyond the already mentioned control wards, this section will go over the key ways in which this can occur.
The third counterpart of the Totem Ward and the Farsight Ward, the Oracle Lens is the final tool that can take up a champion’s ‘ward’ slot in their inventory. Activating this tool creates a circular area around your champion which reveals and disables any nearby wards and traps. This area follows you around as you move and lasts for 10 seconds. It also becomes usable more frequently as the game progresses, having a cooldown of 90 seconds at the start of the game and only 60 seconds at the end of it. Since every champion can viably interchange their ‘ward’ slot with this tool, and it is the most reliable of ward removal options, it is often regarded as the best way to counter enemy vision.
This assassin-oriented item is a relatively niche way to counter enemy vision, but is worth mentioning nevertheless. In short, this item has a passive which activates when the champion who wields it is noticed by an enemy ward or trap. When it activates, it disables any nearby wards, along with revealing any wards and traps around your champion for eight seconds. Furthermore, basic attacks from champions who wield an Umbral Glaive instantly kill revealed traps when they strike them, and they deal triple damage when attacking wards. While this option is only truly viable on assassins, it is one of the most consistent ways for an assassin to deal with enemy vision.
The last and certainly most inconsistent way of removing enemy vision is by attacking a Scryer’s Bloom. When attacked, these jungle plants reveal any wards in a cone opposite from the attacker for 12 seconds. While this is a potent and convenient way to check for vision around an objective such as a Drake or the Baron Nashor, it is definitely not something that you should be relying on if you hope to reliably counter enemy vision.
From the above, it should be clear that the term ‘ward’ covers a wide variety of vastly different tools which only have the common point of providing vision. That being said, this guide has hopefully made it clear that it isn’t terribly difficult to learn and remember what each type of ward does, along with how to counter wards and eliminate enemy vision. As such, if there is one key takeaway from this guide, it is that mastering wards is perhaps not as daunting as it might immediately seem. While there is obviously more nuance to ward placement and countering enemy vision than this guide has covered, the very basics of warding are accessible knowledge for all League of Legends players. Through bolstering your vision score, placing more wards, and leaving the enemy in the dark, you’ll be able to outmaneuver and outplay your enemies, hopefully winning games in the process.


