CS:GO: The Ultimate AWP Guide
The Arctic Warfare Police, or AWP for short, has been the key weapon to many of the legendary plays that will be remembered for years.
The Arctic Warfare Police, or AWP for short, has been the key weapon to many of the legendary plays that will be remembered for years.
Whether it's one of s1mple's many insane flick shots, coldzera's unbelievable jump shot on Mirage, or f0rest's legendary clutches, the AWP has proven to be a round winning weapon in CSGO. It should come as no surprise then that many players take it upon themselves to be the dedicated AWPer, in the hope of gaining renown through their flashy plays. While the AWP is the ultimate weapon to wreak havoc on the battlefield, it also introduces an enormous risk. One missed shot and you'll be swarmed by enemies desperate to take down the man wielding this godly weapon. Consequently, mastering the AWP involves a lot more than simply learning to aim ridiculously fast. Since the AWP leaves you in a vulnerable state after every single shot, survival will just as well come down to positioning, utility usage, and smart plays. In this guide, we will explore all of these aspects.
Improving Your Aim
While every aforementioned aspect is a crucial step towards mastery of the AWP, accuracy will undeniably be the most fundamental one. In principle, the AWP is the most straightforward gun in the game: simply put the crosshair of your scope on the enemy and unleash your devastating shot. Sounds easy, right? Well, enemies often won't be standing around like a deer caught in the headlights for you to set up for a kill. Consequently, you must be able to consistently hit your targets at a faster speed than they move. In some cases, you might also be able to get the kill by pre-aiming an enemy's expected position. This means you're better off aiming for an enemy's chest rather than their heads, the latter of which will be very hard to consistently hit and is unnecessary to get the kill in any case.
It's also important to learn the time it takes for your aim accuracy to reset in two situations: after you stop moving and after pulling the trigger. While the recoil reset takes only a split second, firing your gun too quickly after coming to a stop will cause it to miss the mark by a long shot and force you to stand still for even longer. Finally, keep in mind that an enemy will not be killed if you hit him in the legs. However, in that case, he will at least be down to 15 HP and can easily be finished off with a single bullet of a pistol or a well-aimed grenade. If the enemy you're hunting is hiding behind a wall, you can also try to secure the kill by shooting him through it, as the AWP's penetrative abilities are unrivaled.
The best way to practice your scoping skills is to jump into a custom workshop map such as the CSGOHUB.COM Skills Training Map. This map scatters bots all over an open field and leaves you with ample space to manoeuvre between them. Running between the bots, pretend some of them are enemies you just spotted and try to kill them as fast as possible. As you start hitting your shots, challenge yourself by flicking towards the bots that are more difficult to hit and switching between bots at different distances. Keep this up and you'll be able to flick towards an enemy even before your brain has registered the action in no time.
Once you can consistently hit these shots, switch to the 'shuffle' gamemode so you can practice shooting moving enemies. Don't be frustrated if you miss your shots because the bot decided to strafe in the opposite direction or come to a full stop. This is a very difficult and near impossible thing to predict. However, actions such as counter-strafing are valid strategies that will undoubtedly be employed by your opponents, so it's better to get used to it.
Once you feel confident in your abilities, you can put your skill to the test by going into an FFA deathmatch server of your choice. Sadly, many of them have limited AWP slots or reserve them for paying members, so you might have to resort to Valve's team deathmatch mode to practice the AWP. Here is a good AWP training routine to train these skills:
AWP Training Routine:
1. Get 100 kills on the scattered bots of the CSGOHUB.COM Skills Training Map.
2. Get 50 kills with flickshots.
3. In the 'shuffle' gamemode, get 50 kills.
4. Do 10 minutes of (FFA) DM.
No-Scoping
Sometimes enemies forget even the most basic of manners and boorishly invade your personal space by running up to you. AWP in hand, you'd rather not have to scope and zoom in on the ugly details of their face. Instead, you might want to fire a shot without scoping at all, also called a 'noscope' in the CS:GO community. While a lot of people assume you have to get lucky to land a noscope, depending on the distance it is actually a skill you can acquire, as has been proven by many professional AWP users.
To understand the way noscope spread works, you must imagine a cone that starts at the player's head and moves in the direction of your crosshair. All of your bullets will land on random spots inside this cone. Naturally, the spread of the AWP increases in size as you stand farther away from your target. I have visualized the spread in 2D and 3D at three different distances.

This makes noscoping a valid choice only at short to mid range encounters and even then, a kill is not guaranteed. Luckily, there are other things you can do to decrease the spread. As your bullet will always land in a cone around the middle of the screen, you must try to fire when the enemy is exactly in the middle of the screen. Normally there is a crosshair that shows you when this happens, but when using the AWP your crosshair is removed entirely. Consequently, you must imagine the crosshair where it normally would be.
If this feels hard to do, practice the AK-47 and M4 for a while with your crosshair turned off. You'll notice that, even though there is no visual indicator anymore, your mind automatically determines the spot of your would-be crosshair. Once you feel comfortable enough, switch to the AWP and try to hit as many bots as you can without scoping. Make sure to shoot at the bots from different distances just to get a feel of how far you can push the AWP's accuracy. Additionally, just like all other guns, running while shooting will make your bullets fly all over the place, while crouching makes the cone a little smaller.
Optimal Positioning
An AWP is like a lightning strike, devastating when it hits you, but unable to spray someone down quickly after the first attack misses. After every single shot, you have to pull back the bolt of your rifle to load another bullet into the chamber for your next devastating shot. In order to minimize this window of inactivity, you should quickly switch from your AWP to your knife and back to reset the animation which will cut the time it takes to reload in half. However, this still leaves a short window in which you are left entirely vulnerable. To prevent yourself from getting swarmed during this reduced downtime, there are a few things you can do.
First of all, you have to think thoroughly about every action you take. One way of doing this is pretending you’re the main subject of The Police’s breaking hit 'Every breath you take': "Every breath you take, and every move you make, every bond you break, every step you take, I'll be watchin' you." In other words, take into account your vulnerabilities on every position. This does not mean that you should never take risks. There are many situations where you should aggressively peek with your AWP. But while doing so, be aware of the angles to which you are exposed.
For example, if you’re a counterterrorist on Mirage there are three main positions you can play from as an AWP: CT-spawn, stairs, and triple box. Triple box is the most aggressive one; it allows you to keep an eye on connector, ramp, and palace by moving around triple box. However, it also leaves you exposed to many different angles. Enemies from both short and connector can easily kill you from a distance, and you can very quickly end up being sandwiched by opponents pushing you from both sides of triple box. Some of these drawbacks can be countered temporarily, for example, by putting down a smoke grenade in connector. However, it might be better to play from CT-spawn as this allows you to hold both ramp and palace from a safer position. Additionally, this position gives you great control of the site if the enemies make it through without running the risk of being pushed from two sides.

Every position has its advantages and drawbacks.
Of course, this leaves short and connector entirely up for grabs. Luckily, CS:GO is a team-based game and these gaps in your defense can be patched up by your teammates. If one teammate holds underpass from connector and another one holds connector from short, you already have great control of middle without being overly aggressive. In case the pressure on A becomes too high, your teammate from connector can easily put down a smoke and help you hold the site from stairs, while your teammate on short can hold a late connector push. As for yourself, if you get information that several enemies are pushing towards short, you can go up to triple box to assist your teammates through connector.
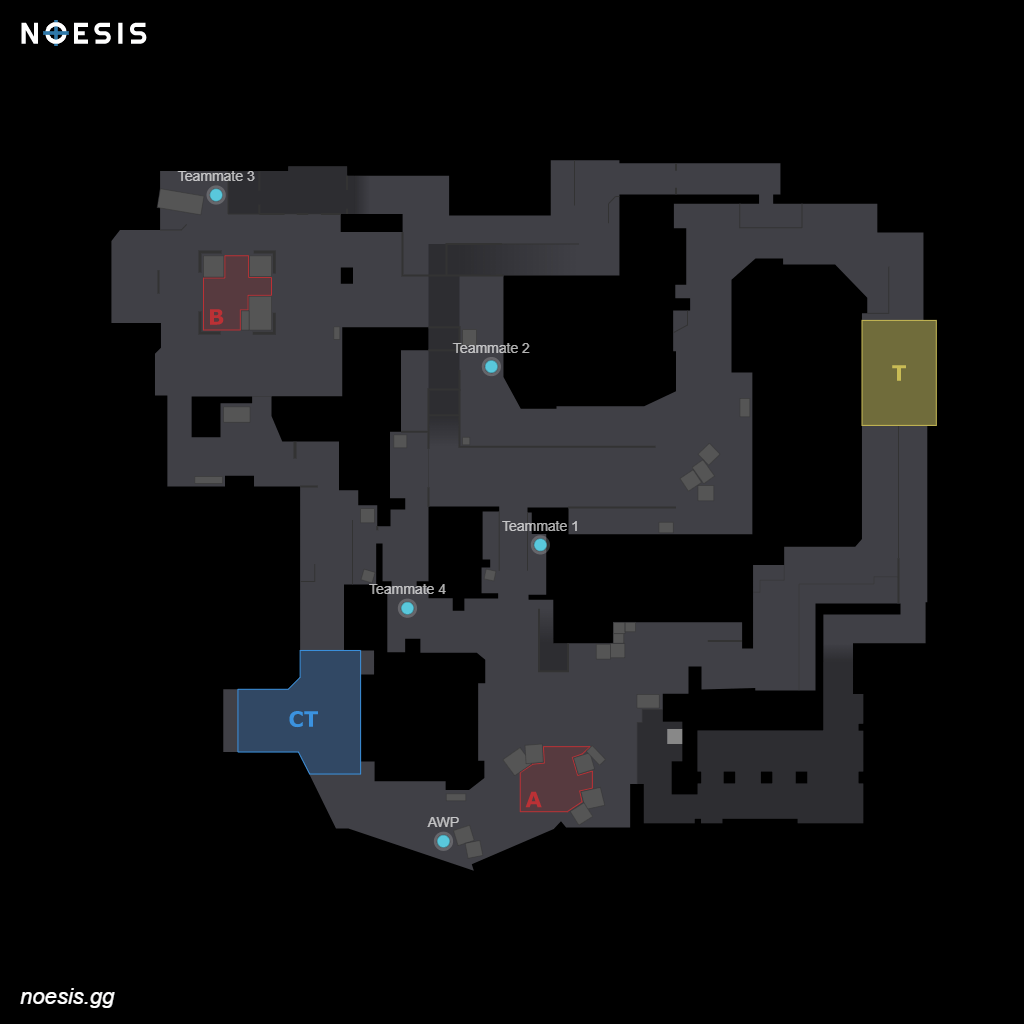
A possible team setup that gives you great control over the map, while leaving ample room for rotation.
Secondly, the AWP is a perfectly accurate weapon at all ranges. Consequently, you should usually play on positions from which you can shortly withdraw after taking a shot to reload. Look out in particular for positions from which you can put some distance between you and your enemies while also assuring you're able to retreat behind cover during these short moments of vulnerability. The earlier example of playing from CT-spawn is a great illustration of this principle. On this position, you can hide behind the box or booth while waiting for the next bullet to be chambered. If you're on the T-side, a comparable position on the same site would be the palace position, from which you can rain down vengeance on the entire A site while hiding behind the wall during your downtime.
While you're hiding behind the cover, don't forget to switch to your knife and back to decrease the time it takes to pull back the bolt. Keep in mind that your opponents might make use of the short window where you’re stuck behind cover as an opportunity to hold your position, ready to pull the trigger the moment you show an inch of flesh. If you think this is the case, you can drop a flash, smoke, or even a pistol to distract him before peeking out.
Close Range Engagements
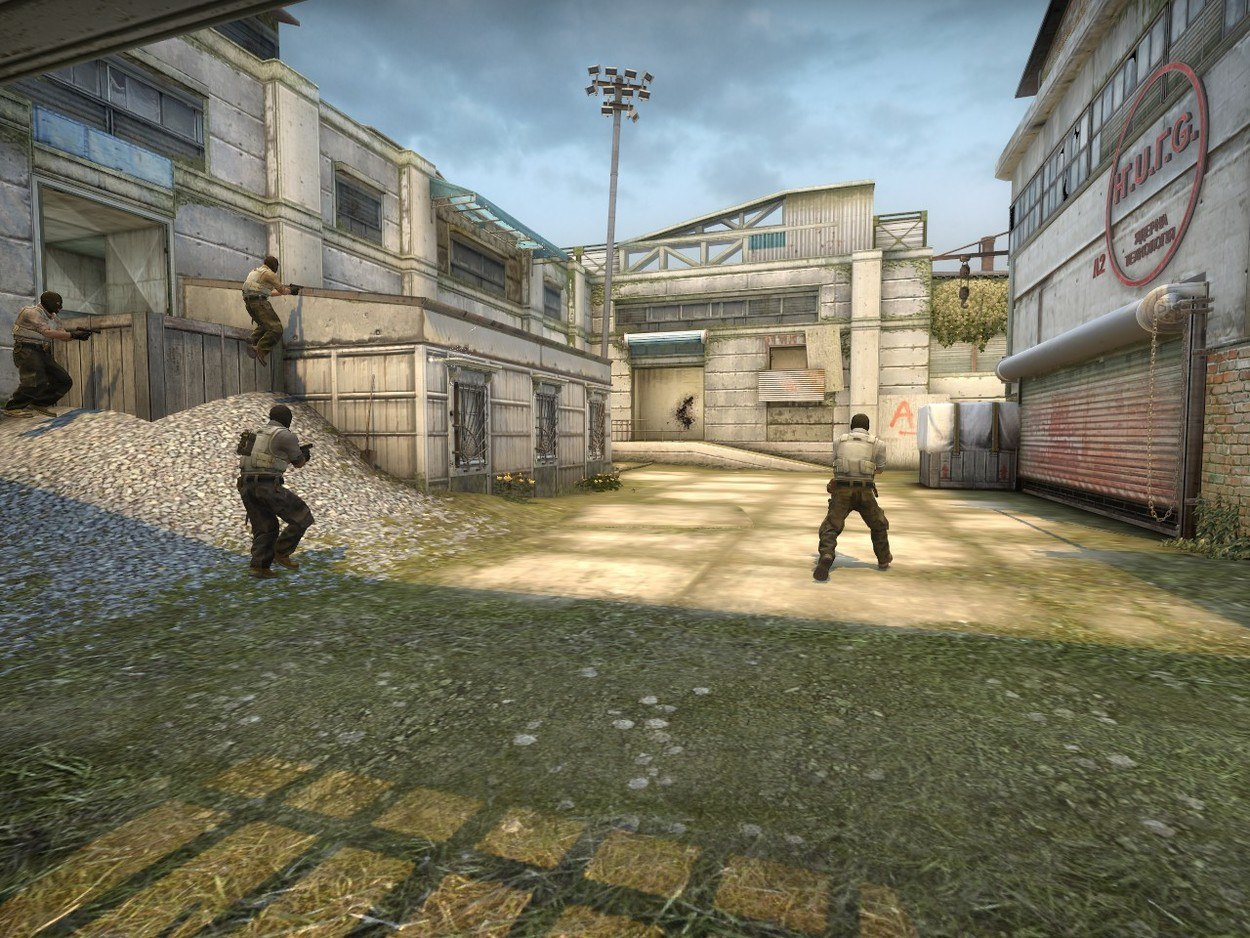
However, sometimes there are just too many angles to cover and one of your enemies might suddenly show up closer to you than you had anticipated, possibly accompanied by several of his companions. In these situations where you find yourself cornered with no way out, your magnificent AWP will often be of little use to you, unless you manage to hit a couple of noscopes or manage to face your enemies one by one. Smart enemies, however, will usually swarm you taking advantage of your vulnerable state between shots. If the situation seems favorable and you believe you will get hold down the fort with the AWP, you should go for it. In all other cases, however, there might be a better option to make the best of this hairy situation.
This means you will switch to your trusty side-arm for some close combat action. To prepare for such situations, it is consequently a good idea to upgrade your pistol to a Desert Eagle or P250 if you have the funds to do so. Especially the Desert Eagle can be an absolute monster in both close and mid-range battles. To assist you in your survival, you can also use your utility as a means to damage or escape. A well-aimed grenade or molotov cocktail can tick down the enemies' HP sufficiently low to get you much faster and easier pistol kills. A flashbang on the other hand can blind your enemies making them easy targets, while a smoke might allow you to clear certain angles or hide out until your teammates can provide the necessary support.
Be Unpredictable
By extension of what we just discussed, you must also make sure not to become too predictable. While one angle might work very well in certain situations, if you have taken up that same exact angle in the past couple of rounds it might actually work against you as your enemies will prefire that spot or use their utility to flush you out. There are always many different possible approaches to defend or attack a site and it might be a good thing to switch things up. If you played a very defensive position for a couple of rounds, go and play a more aggressive position in the next one.
If you have peeked mid every time, go somewhere else and possibly get a pick on an unaware enemy. Be unpredictable, and, especially on the defensive side, switch up the positions from which you hold the push. For example, on the long position on Inferno you can play right behind the pillar to watch mid, in the little corner in the back watching short, arch, close to site and library. Simply by switching up all of these positions you will already prevent enemies from blowing your brains out even before you have registered their presence. Moreover, a more defensive position might be justified if you expect the enemies to be on an eco or force buy.
Another sneaky way of being unpredictable can be exploited when you're crouching behind a box or ridge. Usually, you will fire a shot, duck behind cover to pull back the bolt, and reappear when you're good to go. However, instead of immediately standing up once the AWP is ready to get fired again, wait a little longer and move slightly to the left or right. Then, stand up, try to get a kill, and immediately crouch down again. You can do this a couple times provided you don't get overrun. This makes it very hard for the enemy to predict when and where you will appear, which lowers the chances of taking a bullet to the head before you can pull the trigger. However, as you're doing this you should also mentally reposition the spot you will pre-aim as there is a high possibility your enemy will have pushed you.

When to Buy
Even if you are a god amongst men, the decision to buy an AWP is not one to be taken lightly. Coming in at $4750, the sniper is the most expensive gun in the game. In fact, for the same amount of money, a player can almost buy a full loadout. This heavy investment means that you should not buy an AWP if the rest of your team won't be able to get equipment of their own. While the AWP can do some great damage, if your teammates are unable to hold the frontline because of their loadout, the risk to overrun by enemies more than eager to snatch this expensive monster from your hands is just too high. At bare minimum, you should have two rifles available to your team.
By extension of this, depending on the economy of both teams it might be a good idea to to forfeit a seemingly lost round and save the AWP for the next one. Make sure to always discuss this with your team though, as you don't want to be the guy that baits his teammates and doesn't commit with them. This can result in a round where your team has four SMGs and one AWP. In this case, your job is to survive the round with the AWP in possession of your team. Above all, you should avoid that the AWP ends up in enemy hands. If you have a feeling you won't live to see the next round, you should throw the AWP out of the map if possible.
Conclusion
The AWP is a fantastic, powerful weapon that can be the deciding factor for many rounds. However, much like Thor's hammer, it is only effective when wielded by the right person. The AWP’s full potential can only be realized by a person that possesses all of the following traits: accuracy, map awareness, utility knowledge, and gamesense. All of these traits combined, the AWP user can be a devastating and deciding force on the battlefield.
Visit our partner Vie.gg for the safest market and best customer care in esports betting.
Must be age 18+ and reside in a country where online gambling is legal. Gamble responsibly