Following almost three years of Early Access, Eternal Return has now officially launched. With fresh system revamps, there may be players eager to give the game a try for the first time. While the complexities of the game are what make it fun, they also create a challenging learning curve at the outset. Players familiar with MOBA should have no trouble picking up character mechanics but may encounter difficulties when it comes to looting and crafting. Having a solid grasp of both is crucial in Eternal Return and allows for better understanding of the game’s other systems. Let’s delve into the basics of looting and crafting and how you can get better at them.
Items
To start, let’s examine the various items found in Eternal Return. There are Weapons, Armor, Consumables, Installations, and Materials. Characters have six equipment slots available, but unlike some MOBAs, Eternal Return’s equippable items are slot-specific. This means you can equip only one item type per slot. The slots consist of the weapon, chest, head, arm, and leg.
Consumables aid in HP/SP regeneration and stat boosts, while installations serve utility purposes such as Cameras, Drones, and Bombs. Additionally, ingredients are essential materials for crafting many of the game’s items. Items have five rarities – common, uncommon, rare, epic, and legendary. The most powerful items fall under the legendary rarity, requiring at least one of the five Special Materials to craft.
The five Special Materials include Meteor, Tree of Life, Mythril, VF Blood Sample, and Force Core. You can obtain them in various ways during the match, such as from Air Supplies, Wild Animals, Boss Monsters, and Kiosks.
Planned Paths
After picking out a character you’re interested in, the next step involves creating or finding a Plan. These Plans act as guides during matches, directing you towards specific items and optimizing your looting efficiency. In Eternal Return, many items have designated spawn zones and a finite amount that can be looted directly in each zone. For example, Factory will always have 12 Lighters, and the spawn locations within the zone semi-randomized each match. The semi-randomization ensures that a specific item is distributed somewhat evenly across the zone and prevents them from spawning all on one side.
Having a Plan streamlines looting and crafting during a match, eliminating the need to memorize crafting recipes and item locations from the get-go. For newcomers, I strongly recommend starting with pre-made plans crafted by other players. This approach enables you to jump right into the game and learn through gameplay.
Plans can be found in the Loadout section, alongside Augments and Tactical Skills. If you are familiar with League of Legends, Augments and Tactical Skills function similarly to Runes and Summoner Spells respectively. Here, you’ll find several recommended plans for each character, as well as search and sort for additional options. Any of the top recommended plans should serve as a good starting point. The idea is to master the basics of looting and crafting before transitioning into creating or finding a plan that suits you.
Starting Items and Late-Game Items
In addition to starting items, you’ll notice a section dedicated to late-game items. Your planned path focuses on getting you a starting set of Epic items as fast as possible, before you attempt to transition to more powerful Legendary items.
Late-game items lack fixed paths due to the varying ways Special Materials can be acquired across different matches. The late-game items list lets you quickly switch your targeted items once you've completed the starting items. Simply press ‘P’ or click the symbol next to your targeted items. You can create multiple late-game lists per plan, enabling flexible adjustments during a match. I suggest creating a list consisting of a few consumables and installations for easy reference, especially when you are still learning various recipes.
Looting
When the match starts, you’ll automatically spawn at the first location of your selected plan. You can reference your path, and various timers, by tapping or holding ‘Tab’ to open the map. The top right corner will display your targeted items, while targeted materials within a specific zone appear right above the mini-map.
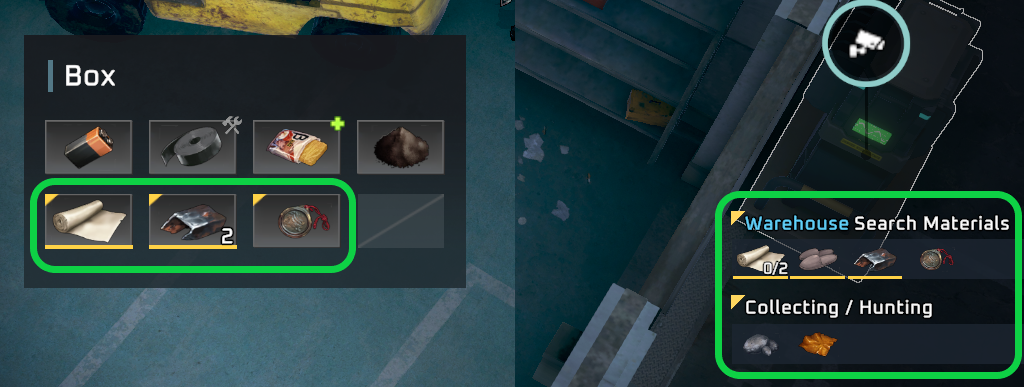
As you search through boxes, all targeted materials are marked with a yellow triangle. A yellow underline on the targeted item indicates its exclusivity to the current zone within your path. Conversely, a targeted item without a yellow line indicates its presence in other zones of your path. Of course, these visual indicators are simply to help you in quick prioritizations. Missing out on targeted items is not the end of the world, especially in highly contested zones. Missing items can be acquired from zones outside your path or obtain them through the Remote Drone function.

If you are struggling to find items, you can also make use of Security Consoles not only to obtain some temporary vision but also to check the remaining items within the zone. This is especially helpful during the late game, when most items have already been claimed. It’s important to note that excessive checking in the early game may be counterproductive, as items are still plentiful and such checks could potentially slow you down.
Lastly, there is an ‘Auto Loot’ option, located in the Advanced Settings of the Game section, that automatically loots all targeted items when opening a box. This feature is typically enabled by default and can be useful for some players. Although the Auto Loot function is decently fast, manual looting remains slightly faster. You can decide whether this option suits your preferences.
Crafting
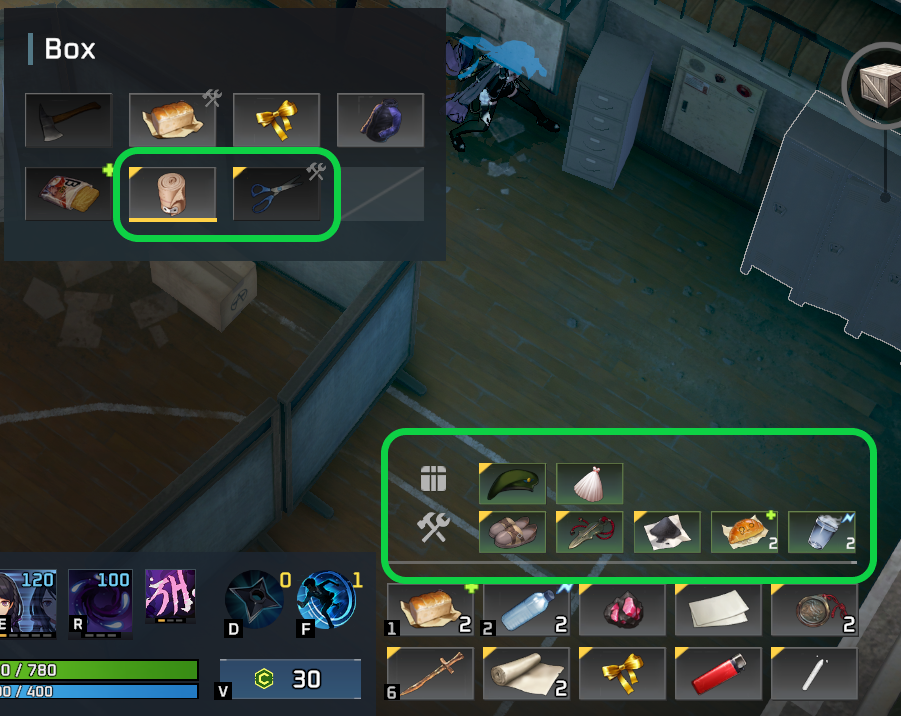
When you have items available for crafting, a quick craft list will appear just above your inventory. Clicking on them or using the default quick craft keybind ‘Z’ initiates the craft. Using quick craft will craft the left-most item on the list.
As you loot, you may notice two sets of the quick-craft list. The bottom set, indicated by the hammer and wrench icon, are items that can be crafted from your inventory and equipment slots. The top set, marked by a box icon, are items that can be crafted from the materials within the current box you are looting. This means you can technically craft items from the current box without needing to loot the items first, which may come in handy in certain situations.

If you take a look at the keybinds under ‘Actions’, you’ll notice a ‘Quick Craft’ and a ‘Quick Craft - Plan Protected’ option. The game defaults to the Plan Protected version, which prioritizes items in your saved plan, marked by the yellow triangle. It is recommended to stick with the Plan Protected version in the beginning to avoid unintentionally crafting the wrong item. After you become more proficient, you may want to play around with some of the extra crafting keybinds. The game allows you to keybind each slot of both quick-craft lists, eliminating the need to click on specific crafts.
Credits
Credits are a valuable currency that you can earn throughout the match to purchase materials and services. You’ll be given an initial amount at the start of the match and generate more passively each time the match cycles between day and night. Additionally, you can earn more credits by hunting wild animals and killing enemy players.
The first way to use Credits is through the Remote Drone, which can be accessed through the Crafting Menu (B), the VPad (V), or the targeted items list. Items purchasable through the Remote Drone are marked with a ‘C’ icon. Simply right-click the desired item to purchase and add it instantly to your inventory. Note that only items of Common rarity may be acquired through the Remote Drone. Remote Drone is a great way to fill in missing items.
The second way to use Credits is through Kiosks, distinguished by the same ‘C’ icon across various zones on the map. Kiosks contain Special Materials, Escape Materials, as well as the ability to revive dead teammates. After selecting the item you want, the Kiosk will summon a Supply Box for you to loot. For beginners still unfamiliar with many of the map objectives, Kiosks are one of the best ways to transition to Legendary items.
Air Supplies, Craters/Ancient Trees, Boss Monsters
Let’s quickly go over a few map objectives you should pay attention to when it comes to loot. Throughout the match, a variety of rare items and monsters will spawn, presenting additional opportunities for loot.
Air Supplies are loot boxes that periodically drop across the map. There are three kinds of Air Supplies: Food Boxes, Epic Boxes, and Legendary Boxes. For beginners, Food Boxes can be quite useful, especially for those yet to master consumable recipes. Meanwhile, Epic Boxes contain Special Materials and Legendary Boxes contain Legendary Armor.
In addition to Air Supplies, Craters and Ancient Trees also periodically spawn throughout the map, providing Meteors and Tree of Life respectively. Meteors and Tree of Life are the most common Special Materials to obtain in Eternal Return. I recommend focusing on learning about legendary items crafted from these materials initially, as they tend to be more accessible.
Alpha, Omega, and Wickeline are the three Boss Monsters that appear during a match in Eternal Return. Eliminating these bosses yields rare materials and items, with Wickeline also offering a unique buff – a DOT that applies to enemies on hit. You can find spawn locations and timers when you open the map. While Alpha and Omega remain stationary after spawn, Wickeline will roam around the map until killed. For players familiar with LoL and Dota, Wickeline can be considered similar in concept to Baron and Roshan.
How to Improve
For beginners, I highly recommend committing to a single character and path until you feel more comfortable with the basics. The key to improving your looting and crafting efficiency lies in repetition and practice. When you first begin, focus on following the plan down to the T and completing your starting items. Gradually, as your speed increases, start attempting additional tasks one at a time.
For instance, consider finding a consumable that aligns conveniently with your path and start picking up its materials while you work on the starting items. You can also try to hunt more wild animals along the way, especially chickens, for additional experience and Credits, all while maintaining a decent looting pace. Another example would be identifying and picking up materials along the way that can be used to transition to legendary items later. You get the gist.
Once you’ve become proficient at your chosen path, try out other plans or characters using the same approach. Eventually, you’ll have a firm enough understanding to create or choose paths that fit your playstyle. Furthermore, your familiarity with items and zones will allow you to focus on other aspects of the game, such as character mechanics and map objectives. You’ll also be knowledgeable enough to adapt to different situations on the fly, adjusting pathing and itemization depending on the lobby.
Conclusion
Hopefully, this guide has provided a solid starting point for your journey into Eternal Return. This game offers a truly unique and fun experience, with plenty of interesting characters to choose from. So, dive right in and enjoy what the game has to offer!


