


Fortnite Ballistic Map Overview: Skyline 10
We dive into the latest Fortnite mode Ballistic and explore the map to uncover all its secrets.
We dive into the latest Fortnite mode Ballistic and explore the map to uncover all its secrets.
Fortnite’s new Ballistic mode is a mix between Fortnite fast-paced combat and the strategic aspect of tactical shooters. Both of them combine creating a mode of everlasting fun and competitiveness.
The maps in a tactical shooter are its backbones and Ballistic is no exception. Learning the map, its strategies, and how rounds go is quite important if you want to succeed in a tactical shooter. In Ballistic’s case, there is only one map, which makes things a lot easier for any beginner player.
So, here is a detailed overview of Fortnite Ballistic’s only map Skyline 10, along with some attacking and defending strategies and tips to help you win more rounds.
Related: Fortnite Beginner’s Guide
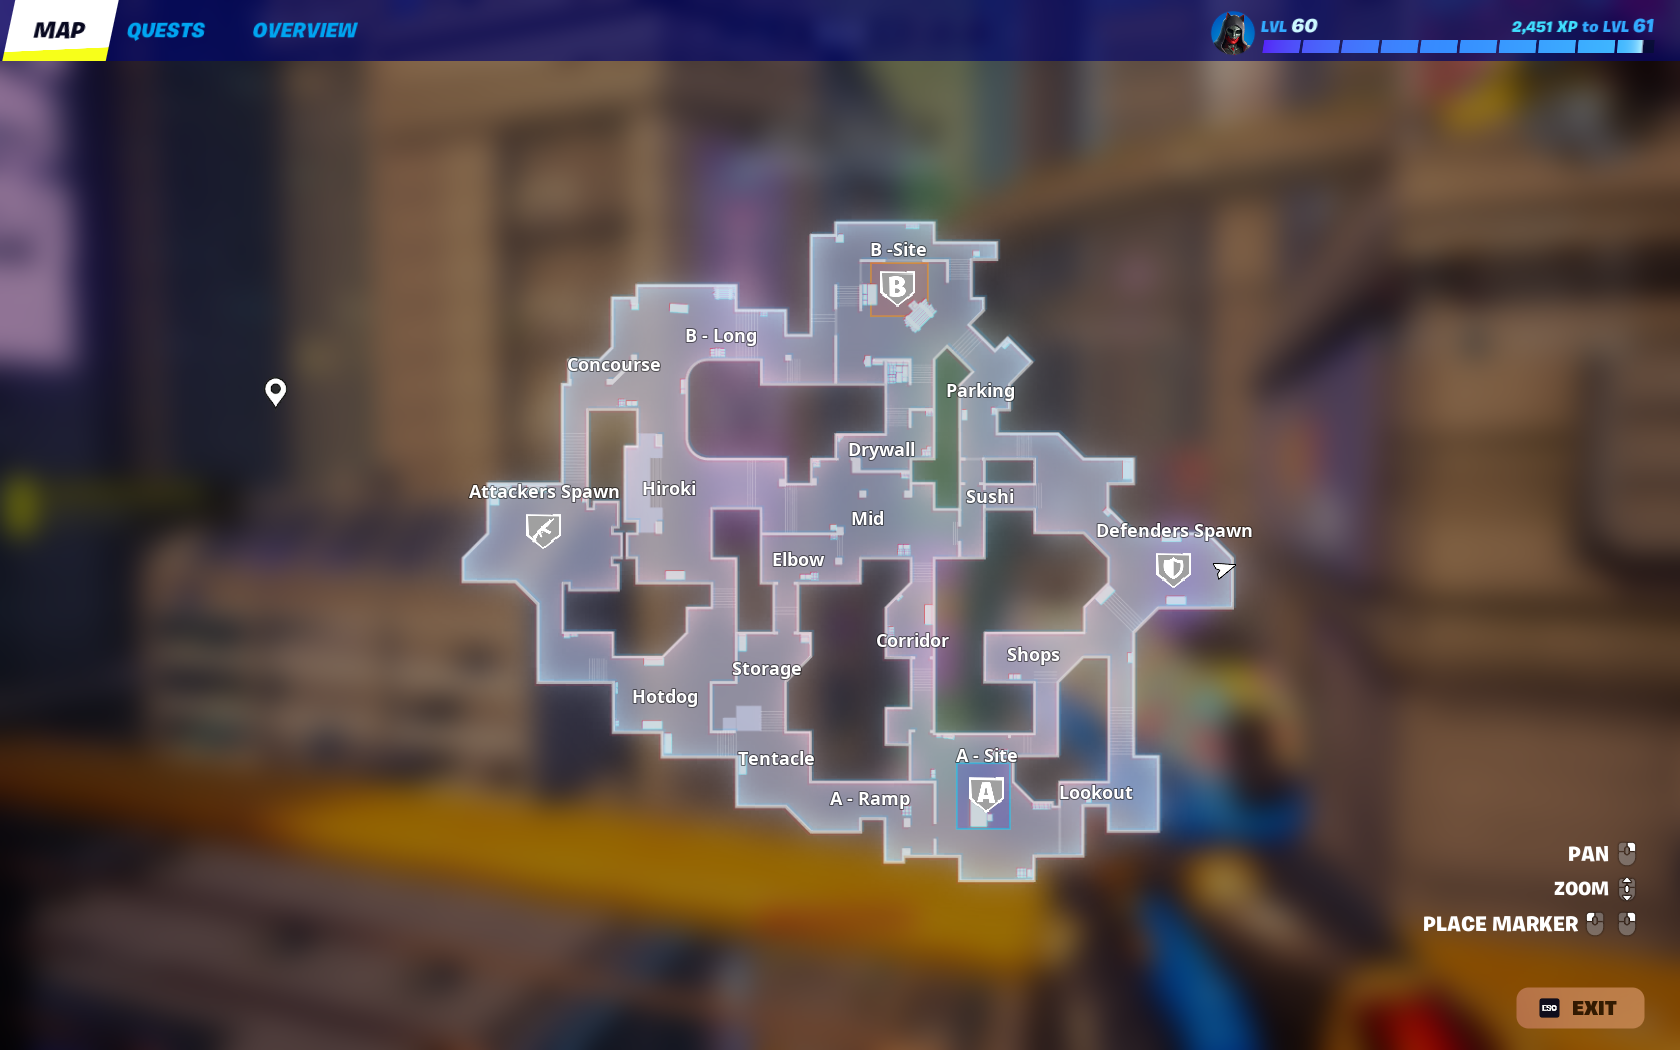
Skyline 10’s layout is quite standard for any map in a tactical shooter. It’s two sites separated by a Mid. Everything is then connected through narrow routes. There is a mix of high and low ground points allowing you to position yourself differently. The map is also quite small, which makes it easy for flankers to take advantage.
In terms of design, the map features a downtown urban theme, with graffiti on the wall and construction areas. Overall, It’s a nice-looking map with a lot of room for tactical play.
Because of the standard map layout, the attacking strategies are quite simple. You can usually go for an all-out site push, or mid/site split push. You can also execute fakes easily as the map is quite small or just play for picks if nothing works out well. With that said, here is how you can attack both the sides and mid.
There are only two routes to B from attacker spawn which makes attacking the site very simple. You can go an all-out B rush. An all-out rush works well for B, because the entrance into site from B long is quite wide, so you can easily make your way in with some utility.
Here is how your rush on B should go. First, try taking control of B long with some utility, a good flash usually gets the job done. Once, you have taken control of B long, the next step is to smoke out the Parking and Drywall, to cut off the enemy team. From there, hand the device (bomb) to the one with the Shield Bubble so they can plant safely. When entering the site, make sure to clear all corners as players will try to camp.
Of course, this is just an optimal scenario. Things can easily go wrong, and in that case, you need to use your game sense and adapt to the situation. If the rush isn’t going well you can always rotate.
The other way to hit the site is by doing a B/Mid split. You take B long control as normal, but some of your teammates also try to take mid and approach from Dry Wall. You will need to take mid-control with some flashes and smoke off Corridor and Sushi. Then, you can push the site from Dry Wall. Again, you might face some resistance at Mid as players will rotate from A to help their teammates.
Mid is a very important point to hold. As attackers, you should have at least one player watching Mid or holding it. It ensures you don’t get flanked. Generally, you should always try to take Mid control if possible.
Taking control is quite easy if you use your util right. Use smokes to block enemies and flashes to push them back. You can also use nades and other utilities like impulses to your advantage. Remember the goal isn’t to rush Mid but control it. Because, if you have Mid, it opens up a lot of doors for attacks on both sites.
Similar to the B-Site, the attacking on A usually falls down to two options, an all-out rush or a split. However, an all-out rush is quite hard to execute as the entrance to A-Site (A Ramp) is quite narrow. You can easily get pressured with names and flashes. This is why the mid-split route is much better. But, getting onto the site is the hard part, the site itself is quite easy to fight for you just need to Lookout and Shops and maybe throw a nade behind the container and you should have decent control. Then, just plant the bomb and play safe.
Again, in tactical shooters, things often don’t go as planned so you need to adapt to the situation and make decisions.
If you want to do a mid-split push, just do the same thing as for B but smoke Dry Wall instead of Corridor.
Fakes are an essential attacking strategy and work quite well, especially in lower elo. It’s as simple as making enemies think you are attacking one site while attacking the other. The simplest fake goes like this. You send some of your players to one site and tell the other to wait by the other.
You make noise at one site (usually done by utility or aggressively fighting for control), then the enemies will likely ask their teammates to rotate leaving the other site undefended. Your teammates can then just walk into the other site and plant. You can then quickly rotate back, and you have a free site.
This is just an example of a simple fake. You can’t repeat this tactic multiple times as enemies will catch on. But it can be a trump card to help you win important rounds (like ecos or full-buys). The fake can be anything, it’s all about confusing your enemies with misinformation.
Defending is quite simpler than attacking because most of the time you are just reacting to what the Attackers do. Generally, speaking as defenders you should try to be patient and play a bit more passively. Here’s how you should approach defending.
The most basic setup is 2-1-2, where you have 2 defenders on each site and one holding Mid. This works well as if they attack one site the Mid defender can quickly rotate to A, while the one from the other side can take his place at Mid. However, this does make your Mid control a bit weaker as enemies can take advantage that you have only one defender.
If you are further into the rounds, it is a great idea to have a sniper on Mid. They can easily get a kill if the enemies are careless, and having a sniper also makes pushing Mid a lot harder.
But the setup you go for changes depending on the enemies and how they are attacking. For instance, if they are constantly fighting and pushing Mid, it is a good idea to have 2 people there. The same goes for sites, if they are favoring one site having 3 defenders that is a good idea.
Apart from these, there is one setup that you can try. It’s an all-out one-site defense. You basically put all your defenders on one site or have one at Mid and all the others at one site. You should use this only if you have a strong suspicion that the enemy is going to push that site.
Both A and B sites can be defended by holding entry points. The positions you hold depend on how the attackers are attacking. If they like to push slowly then holding a bit aggressively is a good idea, and if they are more aggressive hold from the back.
As defenders on a site, your goal is to buy time for your teammates to arrive, because no matter how good you are it is a 2v5 and the chances of winning are low. So, try to buy time with smokes and needs. If the situation gets too dire just rotate off the site. It’s better to retake it as a full team.
For B site, a sniper works really well as the entry point is quite wide and you can easily get kills. A, on the other hand, is close range so snipers don’t work well. However, shotguns and SMGs can work excellently if you position yourself right.
While you shouldn’t be the first one peeking when you are a defender, surprise aggression can be a really good tactic. Attackers don’t expect defenders to get super aggressive and push. If you plan it right, you can get easy kills.
For example, on B long you can ask for a flash from your teammate and peek aggressively. The enemies won’t expect it, and you can get a kill or at least some damage on them. The same goes for the Mid and A site. As they say, offense is the best defense.
When attackers decide to push a site, they often have to give up map control for other areas. This is where you can flank the enemy team to sandwich them. In tactical shooters, the term is lurking, where you are sneaking around the map and trying to get behind the enemies.
Of course, don’t do this every round as attackers will catch on and they will leave a player to watch for flanks.
Skyline 10 is a well-balanced and great-looking map. It’s small and compact, meaning fights are quick and chaotic. There is plenty of room for both strategic play and all-out madness. This guide serves as a basic foundation on how to attack and defend on this map. You can mix up these tactics to suit your games.


