Swarm Disaster’s Difficulty V poses quite a challenge, especially for those without strong five-star characters in their roster. While Swarm Disaster may be tailor-made for limited units like Imbibitor Lunae and Fu Xuan, it is still possible to tackle Difficulty V with only free characters and Light Cones. Fortunately, there are several viable Paths that you can utilize to great effect. This guide will show you the three best Paths to take and some tips to help you beat Difficulty V of Swarm Disaster.
Characters
Our team will consist of Fire Trailblazer, Natasha, Serval, and March 7th. While free units will rarely reach the damage heights of limited units, this composition boasts great survivability and decent AoE. We will be relying on our chosen Paths to carry most of the damage in the later stages of the run.
As one of the best tanks in the game, Fire Trailblazer serves to taunt away nasty abilities and to consistently shield the team from chip damage. Natasha, being the only free healer, is a safe addition to the team as damage will inevitably get through the shields in Difficulty V. Serval will be our chosen damage dealer as AoE is quite important in Swam Disaster, especially against Lesser and Juvenile Stings. Herta is a viable replacement for the damage slot, depending on the Blessings you obtain, however Serval should generally be a more consistent choice.
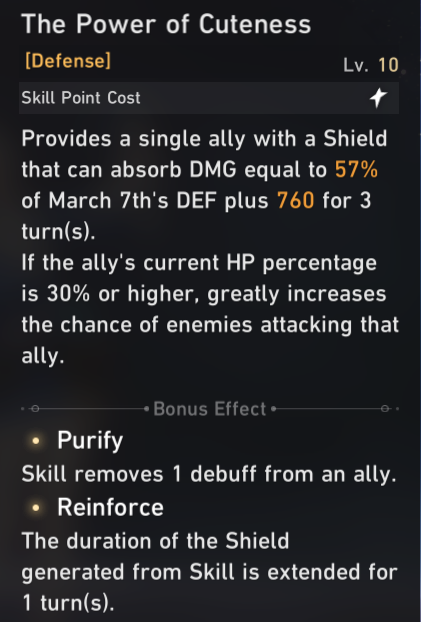
Lastly, March 7th, the standout member of the team, is one of the main reasons that free units are able to tackle Difficulty V. Her Skill provides an enormous shield that can protect even the squishiest of units from hard hitting abilities like True Sting’s Swarm Onslaught. With the ‘Knight of Purity Palace’ set and Defense (DEF) main stats, you should be able to easily hit 3,000+ DEF on March. At Trace level 10, the resulting shield should be enough to cover almost an entire health bar for a unit with around 3,000 HP. In addition, March’s shield also provides a cleanse for the targeted ally, allowing the team to have access to two cleanse abilities between her and Natasha.
In terms of team positions, Trailblazer should be in either the first or fourth position, with Natasha right next to her. This way, any cleave abilities that Trailblazer soaks will only splash onto Natasha, who is relatively tanky due to high HP stacking. Serval should take up the slot next to Natasha, with March covering the opposite end of Trailblazer. By separating Natasha and March, it decreases the chance that abilities, such as Outrage from Lesser Stings, can simultaneously crowd control both units, ensuring that a cleanse ability is readily available.
Light Cones
There’s a limited selection of free Light Cones, but the ones available are sufficient enough to get the job done. The following Light Cones and their Superimpositions are all available from either Herta’s shop or Forgotten Hall’s Light Cone Manifest:
- ‘Texture of Memories’ for Fire Trailblazer
- ‘Quid Pro Quo’ for Natasha
- ‘The Seriousness of Breakfast’ for Serval/Herta
- ‘We Are Wildfire’ for March 7th
Regardless of what Light Cones you have available, I recommend maxing their levels out as the stats gained are quite significant.
Relic & Planetary Sets
The Relic and Planetary options can be quite flexible depending on what you have available and the substats that you roll. Regardless of what is available or chosen, I highly recommend leveling most of them to at least level 12, just to have a solid amount of stats. These are not the only options, but here are my general recommendations:
Fire Trailblazer
- Relic: Knight of Purity Palace
- Planetary: Broken Keel, Fleet of the Ageless, Belobog of the Architects, Space Sealing Station
- Recommended Stats: DEF, Fire DMG, Energy Regen Rate
Natasha
- Relic: Any 2-piece combination of Passerby of Wandering Cloud, Longevous Disciple, or Messenger Traversing Hackerspace.
- Planetary: Fleet of the Ageless, Broken Keel
- Recommended Stats: HP, Outgoing Healing, SPD, Energy Regen Rate
Serval
- Relic: 2-piece Band of Sizzling Thunder & 2-piece Musketeer of Wild Wheat, 4 piece Band of Sizzling Thunder
- Planetary: Space Sealing Station
- Recommended Stats: ATK, Lightning DMG, CRIT Rate, CRIT DMG, SPD
March 7th
- Relic: Knight of Purity Palace
- Planetary: Belobog of the Architects
- Recommended Stats: DEF, Effect Hit Rate, SPD
Communing Trail & Trail of Pathstrider
Before delving into the Paths, I strongly recommend completing most of the non-hidden Trail of Pathstrider objectives. While it may involve some grinding, the Communing Trail levels significantly boost your damage and survivability. If you want to farm the hidden objectives as well, you can do so at lower difficulties since you're guaranteed a Path choice after every Plane. If you find Difficulty IV challenging, you can apply many of the tips that will be provided in this guide to improve your performance.
Paths
The three Paths that I recommend are Nihility, Preservation, and Destruction. Abundance is also a common and viable Path for weaker teams in both Simulated Universe (SU) and Swarm Disaster. However, Abundance has some drawbacks, mainly its dependence on Dewdrop Blessings and needing multiple Resonance Formations, which can take longer to come into effect. If unlucky, Abundance can often falter at the first and sometimes second Plane Bosses, typically due to low damage output. Furthermore, the Passive Path Buff promotes longer routing around the Planes, which, combined with its lower damage relative to the other three Paths, often leads to more time-consuming runs. While Abundance is still a good option, I would put it behind Nihility, Preservation, and Destruction.
Nihility
The Nihility Path excels in offering the highest and most consistent damage output for free-to-play (F2P) teams. It's also one of the easier Paths to manage, thanks to its spammable Path Resonance ability, allowing you to focus on survival while it handles the heavy lifting. While Nihility may not match Preservation in terms of survivability, it still offers several decent defensive options, especially when combined with other Path Blessings.
The key to Nihility's strength lies in its Passive Path Buff, which boosts Damage over Time (DoT) damage by 18% for every Blank Domain visited. Maximizing this buff is crucial, even if it means facing higher Disarray Levels, as it significantly increases your damage.
Nihility's Path Resonance and Resonance Formations are also notably powerful. In terms of Formation order, I recommend starting with 'Outsider' to accelerate regeneration, followed by 'Suffering and Sunshine.' The regeneration from 'Outsider' will allow you to frequently use the Resonance ability later in the run. Meanwhile, 'Suffering and Sunshine' provides a significant amount of damage and Weakness Break Efficiency, thanks to the Resonance ability's increased regeneration rate in the late game.
The last Formation, 'The Doubtful Fourfold Root,' and the two Resonance Interplays can be chosen based on the Blessings received. While all three have their strengths, 'Outsider' and 'Suffering and Sunshine' take priority.
For Blessings, it's crucial to obtain at least one of 'Funeral of Sensory Pursuivant' or 'The Man in the Cover' to apply 'Suspicion' stacks, which increase enemies' DoT damage taken and offer defensive benefits when combined with 'Call of the Wilderness.' 'Offerings of Deception' is another valuable defensive choice, especially when combined with 'Dispel Disaster' from the Abundance Path.
Two additional noteworthy Nihility Blessings are 'Before Sunrise' and 'Night Beyond Pyre.' 'Before Sunrise' increases Ultimate usage frequency, providing Energy for your Resonance ability and resulting in more DoTs to regenerate your Ultimates, creating a powerful loop for the late game.
'Night Beyond Pyre,' in conjunction with the 'Devoid' stacks from 'Suffering and Sunshine,' excels in breaking Toughness Bars swiftly, which is important against Bosses like True Sting. However, its effectiveness in Swarm Disaster can vary because True Stings are only weak to Quantum and Imaginary. So, 'Night Beyond Pyre' may not be as impactful unless you can pick up an applicable Weakness from the first Plane Boss or obtain the 'Shudder' Blessing from Remembrance. However, if you do find an applicable Weakness, ‘Night Beyond Pyre’ becomes a universal good pick for all Paths.
Preservation
Preservation is an exceptionally durable Path that offers respectable damage through team shields. It's slightly more intricate than Nihility due to interactions with certain Blessings and shields but remains relatively straightforward.
Like Nihility, stacking Preservation's Passive Path Buff to create larger shields is a key strategy. The initial Resonance Formation you should select is 'Isomorphous Reaction,' as it generates Energy for the Resonance ability each time an ally is shielded. This synergy is especially potent when combined with Fire Trailblazer's Talent, which provides shields for the team with every action. Your next Formation choice will depend on your specific needs, whether it's more damage or survivability. When in doubt, 'Eutectic Reaction' is a solid option, as the 'Amber' effect can effectively nullify significant hits.
The 'Spiked Armor' Interplay adds some decent damage, while 'Cold Snap' is highly situational. Pursuing 'Cold Snap' is usually not a high priority unless you manage to obtain Ice Weakness from the first Plane Boss, along with strong Remembrance Blessings. In such cases, replacing Serval with Herta may be considered.
As for Blessings, having one of 'Resonance Transfer' or 'Metastatic Field' is vital as they enable 'Quake' damage, which is Preservation's primary damage source. It is important to keep your team topped off on shields to deal more damage through ‘Quake’ and the Resonance ability. Any Blessings that enhance 'Quake' and shield effects are welcome.
Moreover, 'Macrosegregation' is among the best defensive Blessings, although it can be tricky to utilize in our composition. It heavily relies on the action sequence of Fire Trailblazer and March, as the shield's strength reflects the first one applied. March's shield is significantly stronger than Fire Trailblazer's but is applied less frequently to the team. To maximize the benefits of this Blessing, ensure that March's shield is applied before Trailblazer’s, whenever 'Macrosegregation' activates. Fortunately, the enhanced version of 'Macrosegregation' mitigates this problem.
Lastly, 'Hypoeutectoid' is a fantastic Blessing for March, as it reduces the need to spend Skill Points shielding herself. With careful planning, this Blessing can be further bolstered by 'Macrosegregation’ as well.
Destruction
Destruction is possibly the most challenging of the three Paths to use but offers substantial damage and durability when played effectively. Balancing your health for damage and survivability can take a few runs to get used to. Like the other two Paths, focus on building up Destruction's Passive Path Buff.
I recommend selecting 'Cataclysmic Variable' as your first Formation because Destruction's damage and resilience heavily depend on your team's missing health. 'Extreme Helium Flash' is a solid second choice due to its DEF reduction and additional damage. While 'Event Horizon' is a nice bonus, the two Interplays, 'Substellar Belt' and 'Zero Age Main Sequence,' are considerably better and should be prioritized.
Furthermore, Destruction's effectiveness also relies significantly on 'Fighting Spirit,' making 'Universal Heat Death Characteristic' and related Blessings exceptionally valuable. Lastly, Destruction holds one of the strongest Blessings for our team composition, 'Regression Inequality of Annihilation,' particularly its enhanced version. This Blessing excels at protecting your characters, especially Serval, from one-shot scenarios. In my opinion, this Blessing should be prioritized above all else, regardless of the chosen Path.
General Tips
As mentioned earlier, it's crucial to start stacking your Path's Passive Buff as early as possible. I recommend being proactive with your Re-rolls and Cheats in the initial stages to manipulate the Plane Domains to your advantage. This concept also extends to Blessing Resets since ideally, you'd want to have your first Formation or, at the very least, one Interplay before confronting the first Plane Boss. With so few Domains in the first Plane, the first Boss can often be the biggest bottleneck for our team due to lack of damage.
Given the unpredictable nature of Swarm Disaster's rogue-like gameplay, I strongly recommend Downloading additional characters whenever the opportunity arises. You never know when a character might fall due to misplays or sudden one-shots. Having extra characters on standby until the next Reviver can potentially save a run. It also allows you to adapt more effectively to various Blessings and situations by swapping in specific characters. Apart from Respites, an Adventure Domain will always feature a Downloader. As a side note, Asta is a great choice for Adventure Domains, thanks to her attacks ability to cleave multiple objects from range.
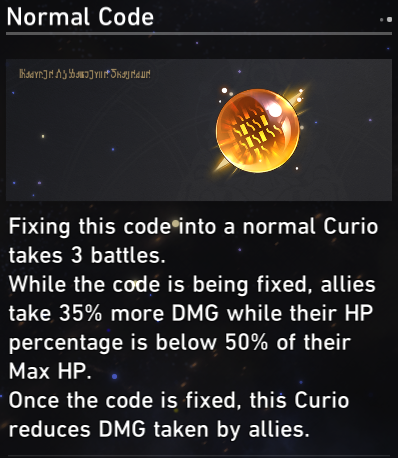
Concerning Curios, it's generally a good decision to opt for those that offer Blessings or Enhance Blessings. Your Curio requirements will vary from one run to another. In cases where you must choose between random Blessings or Curios, Blessings are usually the safer choice, as acquiring a Negative Curio can often prove troublesome. Error Curios, on the other hand, are exceptionally powerful and should be seized when the opportunity arises. For example, 'Normal Code' synergizes well with the Destruction Path, enhancing your survivability. Error Codes often appear as a choice when you begin a new Swarm Disaster run.
Occurrences present some of the game's most enticing rewards, such as Ruan Mei's rare event that grants all Blessings of your Path or enhances all Blessings in your possession. While entering Occurrences may carry certain risks, they are generally worth the gamble due to the potential rewards. One noteworthy event to watch for is 'Mirror of Transcendence.' By selecting 'Yearn to get a response' and 'Fight the curse,' you can engage in a battle that yields two 3-Star Blessing choices. This event can only occur once per run but is exceptionally rewarding.
Combat
In terms of combat, your primary focus should be on keeping Serval shielded with March's Skill. Serval's fragility means she can easily succumb to consecutive attacks from even regular mobs at Difficulty V. During encounters with high incoming damage, March may also need to maintain her own shield as a precaution.
This team composition can be quite demanding in terms of Skill Points, given the need to sustain shields, taunts, and occasional cleanses. You can balance this by occasionally forgoing Trailblazer's Taunts in favor of her Enhanced Attacks when you are confident that Serval can endure with March's shield alone. Natasha should primarily rely on her Ultimate for healing, reserving her Skill for emergency heals and cleanses. This approach helps maintain a relatively neutral Skill Point expenditure, with Serval and March utilizing the majority of them.
However, maintaining this strategy can be challenging during tough encounters, which means Serval will need to occasionally contribute to Skill Point generation. Serval’s Basic Attack still deals decent damage, especially when enemies are debuffed with Shock. Additionally, you can consider acquiring Skill Point-generating Blessings from Paths like Propagation and Abundance.
True Sting (Complete) Boss
During the True Sting Boss encounter, it's crucial to focus on eliminating the Lesser and Juvenile Stings. These summoned Stings continually apply Wind Shear DoTs when they attack and deal extra damage to targets with existing Wind Shear debuffs. If left unchecked, the stackable DoTs can deplete most of your shields and HP before critical moments. You can utilize Trailblazer's Taunt to absorb most of the stacks but remember to cleanse before the stacks become too high. Additionally, the presence of summoned Stings enhances the Boss's damage and increases the number of hits from their significant ability, Swarm Onslaught. Your Resonance ability is often the most efficient method to deal with them swiftly before they become a problem.

Leverage the Stings' explosion upon death to inflict damage to the Boss Stings and other summoned Stings. These explosions not only deal substantial damage but also have a high chance of applying a debuff that increases their damage taken. By prioritizing the summoned Stings, you can reduce incoming damage while still dealing meaningful damage to the Boss through the Resonance ability, AoE attacks, and Sting explosions.
Closely monitor your Skill Points, particularly during Phase 2 when the Boss starts casting Swarm Onslaught, so you can ensure Serval and March are constantly protected. Depending on your team's strength, you can adopt a more aggressive approach by sacrificing Taunts in favor of Trailblazer's Enhanced Attacks. Trailblazer can generate a considerable amount of AoE damage throughout the fight, especially if Fire Weakness is applied to the Boss. This approach requires careful management of shields and cleanses.
Conclusion
Attempting Swarm Disaster Difficulty V with free units can be very challenging and may take several tries before you succeed. Due to the game’s rogue-like nature, there is no sure-fire way to beat Difficulty V every time. However, Nihility, Preservation, Destruction, and Abundance offer F2P teams the best chances against it. With these options, you can hopefully finish the last objective in Trail of the Pathstrider.


