


How to Achieve Zero Ping in Fortnite
When the ping skyrockets, your internet can’t always be the problem. Fortunately, you can expect nearly zero ping in Fortnite with these easy methods.
When the ping skyrockets, your internet can’t always be the problem. Fortunately, you can expect nearly zero ping in Fortnite with these easy methods.
No matter how skilled or competitive you are, a higher ping is a recipe for disaster in online gaming. While this problem stays constant across the board, battle royale games such as Fortnite are where one can’t afford it, even for a couple of seconds.
Whether it’s your divided attention or simply a lack of skill, recovering from errors in Fortnite isn’t easy. That’s why achieving almost zero ping in this game can make the difference between winning and losing matches. Luckily, we have just the guide for you. From in-game tweaks to network adjustments, here’s how pros are getting the lowest ping possible in Fortnite.
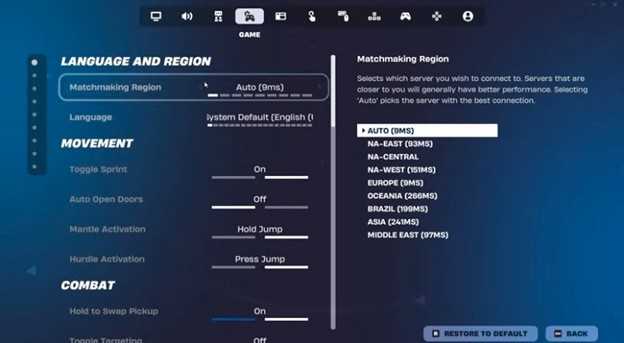
The first thing we will change is the in-game settings. Simply head to the “Game” tab in the settings menu and make the following change in the “Language and Region Section”.
Leaving it to auto is the best decision, as the game automatically detects the nearest server to your location and pairs you up. Since a shorter distance between you and the server equals better performance, this setting can help reduce the ping level. However, if you don’t trust Fortnite's Auto mode, manually select the server with the lowest “ms” and call it a day.
After taking care of the server, navigate to the “Game UI” tab and make the following change in the “HUD Options” section.
This way, the game won’t constantly register your ping throughout gameplay and keep it stable. Together, these two settings will provide a smoother experience and enhance focus. Now, simply click “Apply,” and we are all set for the next step.
Each component in your machine doesn’t just run by itself; the operating system needs something to rely on to work with a device the way it’s meant to. For that, the role of drivers comes in. These crucial add-ons are tailored for a specific part, enabling them to function as intended.
As we are chasing the lowest possible ping, our primary focus is on the system’s network adapter. Since every networking task, including Fortnite, goes through here, updating to the latest driver can make all the difference. If you haven’t already, here’s how to switch to a fresh one.
This way, you can update to the latest driver supported by your network adapter. If you are already on the newest version, the system will notify you.

Before we dive in further, stop using Wi-Fi. Not just for Fortnite, but for online gaming in general. Wireless connections are fine when the requirement is media streaming and other related activities. But when it’s about competitive gaming, where delays are dealbreakers, switching to a wired connection is what pros do.
Several factors combine to cause poor network performance when playing on Wi-Fi. Packet loss, distance, and interference from other signals in the environment ultimately contribute to a higher ping. This is a universally disliked situation that forces gamers to hook up a shiny new Ethernet cable. It prevents jitters and interference by creating a direct pipeline from your router to the gaming system.
Speaking of packet loss and jitter, another method that can be helpful in achieving a lower ping is updating the DNS servers. Some ISPs provide DNS that resolves to the wrong servers, or is simply far from your closest Content Delivery Network (CDN).
As a result, the IP resolves significantly late, and you experience lag due to a slower DNS. Fortunately, we have just the tweaks you need to opt for a faster DNS server. Follow the steps below to reduce your ping like a pro.
Upon selection, hit the Properties button below to prompt a window. This is your IPv4 section, where you can make modifications. To update the DNS server, click on “Use the following DNS server addresses” and enter the best server address manually.
Now simply check “Validate settings upon exit”, click ok, and you are good to go. To feed your curiosity, these are not just numbers; they represent Cloudflare’s DNS server, designed specifically for gamers.
Last but not least, eliminate network throttling as it’s an underdog that silently contributes to a higher ping. Naturally, the operating system reserves the internet for background services and throttles down the internet flow to distribute it evenly. For gamers, this causes more harm than good because they can’t fully utilize their internet for smoother online gaming.
However, getting rid of network throttling is still possible by following these straightforward steps.
On paper, locating the SystemProfile folder may seem tricky, but honestly, it’s pretty simple to reach once you open the Registry Editor yourself. With that taken care of, we are just a couple of steps away from disabling network throttling. Here’s what to do next.
By following these steps, you have successfully disabled network throttling. This means the operating system will no longer allocate internet resources for background applications, which can harm your Victory Royales.
These five simple methods are real game changers, coming straight from the experts. While they can be too technical for many, there’s no more straightforward way to zero ping on Fortnite. For those still struggling with lag regardless of these methods, it’s time to upgrade, as your internet could be the real culprit.


