While most pro players rock the turret-molly combo from Killjoy on the Italian map, Cypher is equally viable, with NA Champion Dapr exclusively using him on the map. With Ascent’s slanted surfaces, tiny ledges, and high buildings, Cypher shines as a formidable anchor to either site he decides to grace his presence with. While his setups are formidable, and almost always guarantee a kill if the enemies push carelessly, learning how to create your own, flexible but equally tricky tripwires is a necessity if you want the enemy team to watch every step they take in fear of having their sneaky flanks exposed. On top of teaching you fantastic setups for both A and B site on Ascent, we’ll also teach you the two main criteria for making your own sneaky wires.
The Tricks to Creating Your Own Tripwire Spots!
While having fantastic setups is a great utility to hold down a site pre or post plant, enemies will start to destroy the tripwires and cameras after dealing with them after a few rounds. Due to this, an extremely valuable skill for you to master is to know how to make your own sneaky tripwires on the fly that will catch your enemies off guard. There are two main criteria to account for when making a wire spot:
1. - Having your tripwires going past a doorway rather than on it. Having the ends of your tripwire not visible in the doorway affects an enemy pushing through it in two ways. Firstly, it’s harder to see the tripwire (shown below) since the enemy cannot see each end of the tripwire. Secondly, they won’t be able to shoot the tripwire without either walking into the tripwire or going for a wallbang, which completely exposes their location. This method is the go-to method for having an effective wallbang that cannot be countered without a shock dart or Raze utility being wasted to destroy it.
2. - Curves/Slopes. Curves and Slopes are your best friend when creating tripwire spots. Curves allow you to create tripwires at unexpected angles that almost always initially catch your enemies off-guard. The reason it tends to be unexpected is due to the fact that the majority of players will be looking for wires that go straight across an area, rather than diagonally.
Guarding the A-Site
A-Site is a fantastic site for Cypher with the high buildings in the area and the many slanted boxes and structures around the site. There are one-ways for this site but they are pixel perfect and not super viable. Here is an overview of the A-Site setup for Cypher on Ascent.
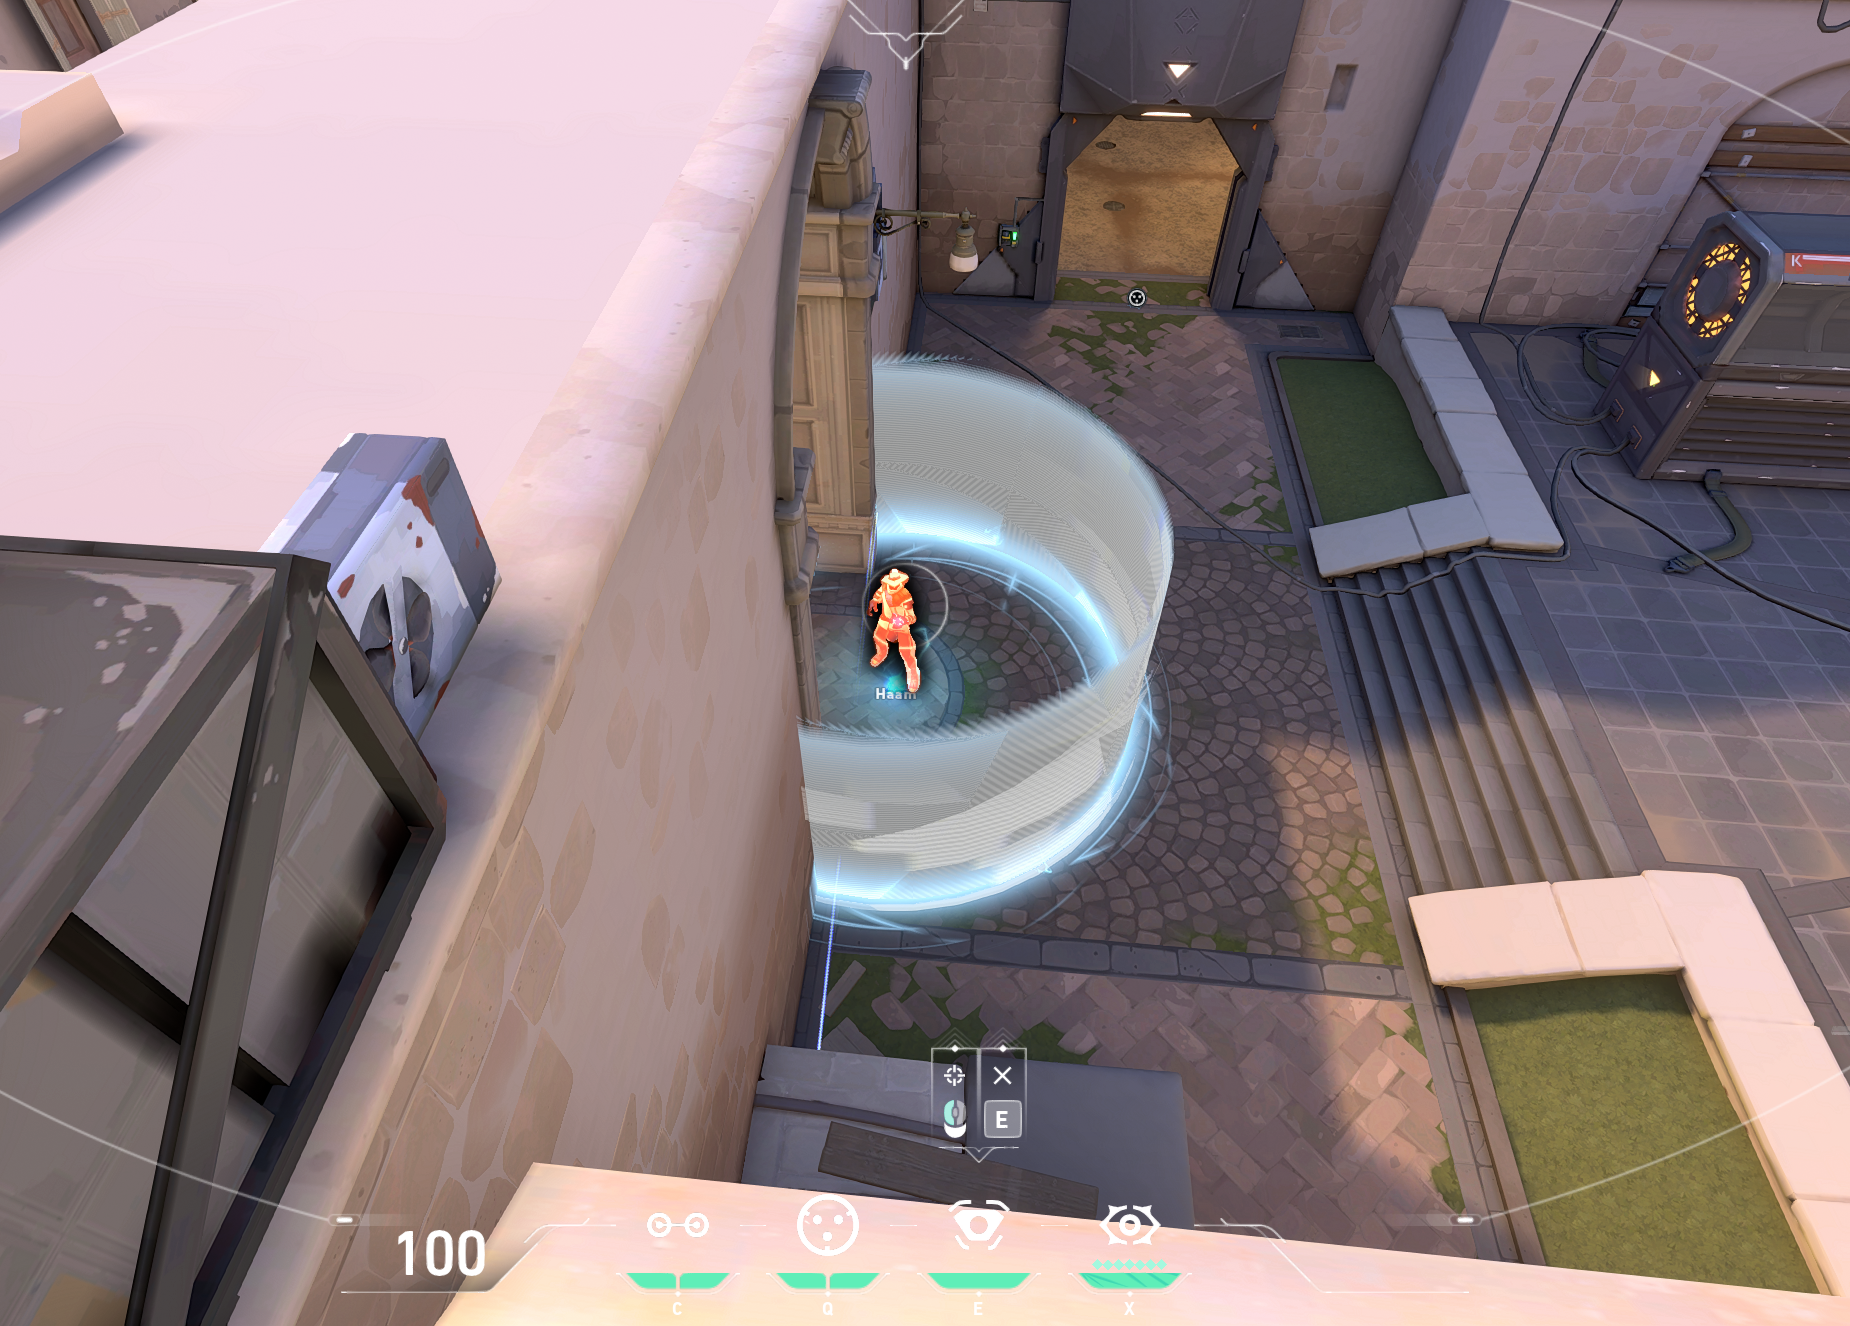
First up for the setup is the trickiest part, the camera. This camera is a fantastic camera that is perched high up, right above a window cover that makes the cam quite tricky to spot. The difficult part of this camera is crouch jumping from Heaven to Generator. To achieve the jump, you need to run with your knife out and crouch at the apex of your jump to hit the slope of the generator. Once you get on the generator jump off and throw your camera at the spot shown below:
While this cam is tricky, it has a fantastic view of the A-Site, as shown below. Due to the camera not covering Generator, we suggest you hold this camera while standing at the back of Generator.
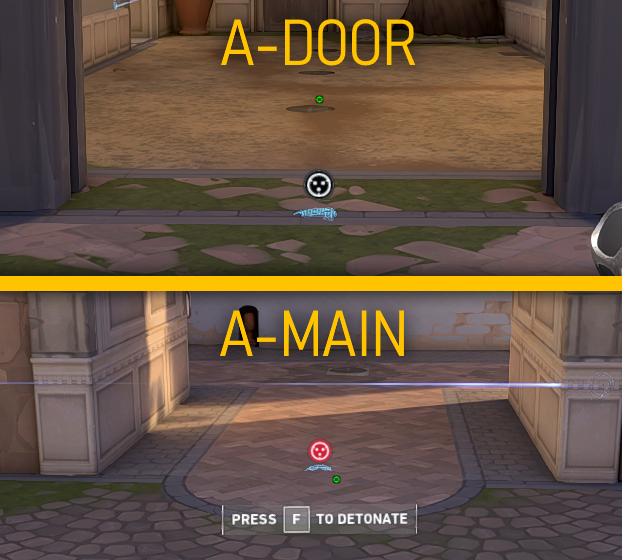
Next up are the tripwires for the A setup are the tripwires, first off is the tripwire for A-Main. This tripwire is fairly simple once you understand the end goal. You must throw the tripwire on the exact slap shown below, and you must put it at the right spot to where the other end of the tripwire goes past the doorway, and not going inside the doorway. As you can see from the enemy’s point of view, you cannot shoot this tripwire without pushing up into A-Main and triggering it, seriously exposing yourself.
This next tripwire will be in Tree to cover any potential pushes from Catwalk. This tripwire is rather simple, just throw it at the vase holding the tree at an angle so the other end of the wire hits the left-hand wall of Tree. This trip is great because it cannot be shot from enemies pushing catwalk without positioning themself at a vulnerable position that they can easily get punished by from someone holding Garden.
Finally are the cages you’ll be using for this setup, and how to play with this setup. Just throw one cage in front of A-Door and A-Main. The cage at A-Door is just to give a lot of flexibility and time to reposition if enemies push Catwalk to A-Site. The cage at A-Main is a fantastic cage for two reasons, firstly it’s a great cage to play in conjunction with your tripwire so you can shoot enemies caught in a tripwire without any risk of them seeing you. Secondly, with this cage, you can see people in your cage from the camera spot we thought you earlier.
How we suggest you hold this site is by holding the back of the generator, and once you hear presence A-Main and see utility going out to the site, activate your cage if they do not push, that is totally fine, the main purpose of your utility is to buy time for your teammates to rotate, so you are doing your job perfectly. If they push you they will get caught in the trip and you will get a free kill. All in all this is a fantastic default setup for using Cypher on A-Main.
Extra Tripwires and Cams for A-Site
This is an excellent tripwire if the enemy team has a Jett that likes to dash through your tripwires because her dash most likely will not reach this spot and will most likely catch her off-guard. In general, is it also just a very tricky trip that not many players will expect.
Next up is this sneaky hidden tripwire that goes into A-Door, as you can see this wire goes into the doorframe, being completely hidden. The reason this trip should not be your go-to trip for A is due to the fact that closing the door will instantly destroy the tripwire. Though it still is a clever tripwire if you are an attacker holding post plant, and the door is already destroyed.
Next up is a sneaky retake camera used if you are trying to retake A site as a defender from the attackers. It gives a decent view of the site and heaven and a great view of Tree and Garden, and great for finding people holding cheeky angles.
The final extra camera is a good pop camera to see if people are pushing A-Main and how many. A ‘pop camera’ is a camera you can quickly throw to a location and activate to get quick info. Beware that this camera usually will get shot immediately if they are pushing, still great information to get.
Holding B-Site
B-Site should be the go-to sight you hold on Ascent due to the closed corridors you have to go through to get to the site, whether it is Stairs, B-Main, or Sidewalk. Holding this site is fantastic due to how much B-Main is a chokehold and how hard it is to enter to B-Site. B-Site is also home to an easy-to-execute but extremely deadly one-way that can easily shut down a full push onto site. Here is an overview of the setup.
First up on the Ascent B-Site setup is the camera. This is an extremely simple camera but has a great view of the site. Just jump off of the platform outside of Market and throw your camera to the left of the window on the building right above Shed.
This is the view of the camera. It has a great view of Site, Market, Sidewalk, and Boathouse.
Next up are the tripwires for the site, both of which are fairly simple to execute. For the B-Main tripwire, just throw it on the corner of the right-hand side of the doorway in B-Main and make it connect right next to logs. This is a great tripwire as it is hard to notice when pushing out due to the odd angle it sits at. As well as it catches people coming from Market trying to go logs, and does not let them escape.
This next tripwire is for people pushing from Middle to Market. Simply just place your tripwire at the left-hand wall next to the fruit till and the other end should land on the slanted wall to the right. This is a great trip because the enemies cannot see the ends of the wire, and cannot shoot it without pushing through it, or wallbanging it at an unusual angle, which can easily be punished.
Now for the one-way, this cage has quite a simple lineup and has room for error. Just stand in the corner of the stairs leading out of Market, and line up the left dip of your Health HUD to the boat shown below and the right slant to the brick shown below. This one-way does not have to be pixel perfect and is fairly easy to execute.
This one way should only be held from Stairs as it does not fully block Defenders-Spawn and you will most likely get shot holding that position. Here is the angle you hold with the one way, and the enemy’s point of view.
Overall, this B-Site setup is deadly, and simple to set up, we highly suggest you go B more than you go A, but you absolutely should switch it up once the enemies get too comfortable. We suggest you hold this site from Stairs, and when your B-Main utility runs out or gets destroyed, check your cam and watch them running onto site, and communicate their positions to your teammates. If they push Sidewalk you can tag them with your camera and try to get a cheeky wallbang on them, or just outright peak them.
Extra Cameras for Attackers for Both Sites or Middle
This is a fantastic pop cam for attackers that can quickly let you know who is on B-Site or what utility is being used to hold the site. Just jump onto the boxes in B-Main and chuck your camera at the spot shown below. This cam gives a great view of site and logs (not shown in the GIF)
This next camera is just a simple camera to see who is holding Market and Catwalk from mid, and is fairly easy to execute as shown below. Just jump up from tiles and throw it right above the power box shown.
The final camera is a simple camera to throw from A-Main onto A-Site that can quickly show locations before taking a site. First, you should throw a cage masking your location if it is not already smoked off by an ally or enemy, then just throw the cam onto the right-hand wall as high as you can while jumping, and then scope the area out as fast as possible. The faster you activate the cam and look around, the less likely it is to get shot.
Overall, Cypher is an extremely strong lurker and anchor on Ascent as long as you remember what makes a tripwire strong and have a good site setup to hold. What is equally important is that you know where to hold and when to activate your cages and cameras. We here at Dignitas fully hope that you make your enemies rage at your setups and take every step with caution in fear of getting caught on an annoying wire of your own ingenious and diabolical design.


