KAY/O is an interesting agent, to say the least. With his suppressive ZERO/POINT, demolishing FRAG/MENT, or his outright busted pop flash-driven FLASH/DRIVE, KAY/O is shaping up to be one of the most powerful agents in the whole game. With all that in mind, why, according to Valorbuff.com, does he only have a measly 42% win rate competitive? This is almost solely due to one simple reason, most people do not know how to play him yet. Today, we will try our best to remediate the situation by teaching you what you need to know to dominate your matches using the robotic soldier.
The Basics
To start off this guide, we’ll be talking about his abilities and the mechanics that surround them.
Basic Knowledge
KAY/O’s ZERO/POINT ability has the same speed as Sova’s Recon Bolt at two charges, this is useful because a lot of the lineups that you may know on Sova can translate over to KAY/O, though that may not always be a good idea, as KAY/O’s ZERO/POINT should be used in different scenarios. Also KAY/O’s ZERO/POINT has a smaller range, and can go through obstacles, unlike Sova’s Recon Bolt.
KAY/O’s FRAG/MENT grenade has the same speed as Killjoy’s Nanoswarm, both their left and right-click. This is a very useful piece of information as you can use Killjoy lineups as KAY/O. Make sure to keep in mind that KAY/O’s FRAG/MENT is a grenade, while Killjoy’s Nanoswarm is a Molotov, meaning KAY/O’s grenade cannot go through walls or obstacles, while Killjoy’s Molotov can, so many of Killjoy’s lineups may not be super effective with KAY/O’s FRAG/MENT.
Momentum affects the speed of which a FRAG/MENT grenade moves, running forward makes it go faster, walking backwards makes it go slower. Most of the time you should be running forward when using a FRAG/MENT if you want it to go where your crosshair is, jumping will also help in that aspect. An example is shown below.
Pop Flashing
A technique that every player should know, especially if you come from Valve’s tactical shooter Counter-Strike, pop flashing. Pop flashing for those who do not know is throwing a flashbang that detonates just as it is visible to the enemy player, making it so they are unable to dodge it. KAY/O’s left-click for his ability FLASH/DRIVE can be used to pop flash, but what is special is his right-click, which detonates in 1 second as opposed to the left-click’s 1.6 seconds. This reduced flash time can be used to pop flash with ease, though keep in mind his right-click is slightly tossed while the left-click is thrown.
To pop flash using KAY/O’s FLASH/DRIVE make sure to throw the flash behind you and push with it. It is best to throw your flash out of a doorway or around a corner to peek. Once you throw it, wait until your gun is back out and push. With a bit of practice the FLASH/DRIVE should detonate right as you peek.
ZERO/POINT
The main thing to keep in mind when using KAY/O’s suppressing ZERO/POINT is that it should not always be used as a Sova Recon Bolt. While it can be used to grab info, it should operate more like a Skye flash, giving you information but also enabling you to peek, push forward with other utility, or create space for your team. It is also important to keep in mind that KAY/O’s ZERO/POINT knife can get shot, but unlike a Recon Bolt, it can go through walls/obstacles, allowing you to throw the knife in spots that cannot be shot or are hard to shoot but still suppress enemies. Furthermore, you should try to throw your ZERO/POINT more towards the center of an area rather than at a wall near the edge of where you want to suppress. By doing this you’ll allow your Zeropoint to cover more area.
Here are some examples of knives that can be used to suppress enemies that are rather hard to shoot. These are not necessarily lineups, just spots to throw the ZERO/POINT.
Lineups
Finally, now we move on to the lineups. With KAY/O’s knife having the same speed as a 2 charge Sova Dart, it is quite easy to come up with your own lineups, and you can easily follow the three of the four lineup tips we taught you in our Sova Breeze guide.
With that in mind, let’s look at the lineups we came up with for KAY/O.
Haven
First up for the guide is Haven. Haven is a fantastic map for KAY/O due to it being very open vertically for lineups but still having small spaces that make his ZERO/POINT effective at stopping a push or creating space to take a site. The weakest part of the map for KAY/O is the massive tower above B-Site that makes lineups from A-Site to C-Site and Mid to A-Site or C-Site impossible to accomplish, but overall, we still think KAY/O is a fantastic pick for Haven.
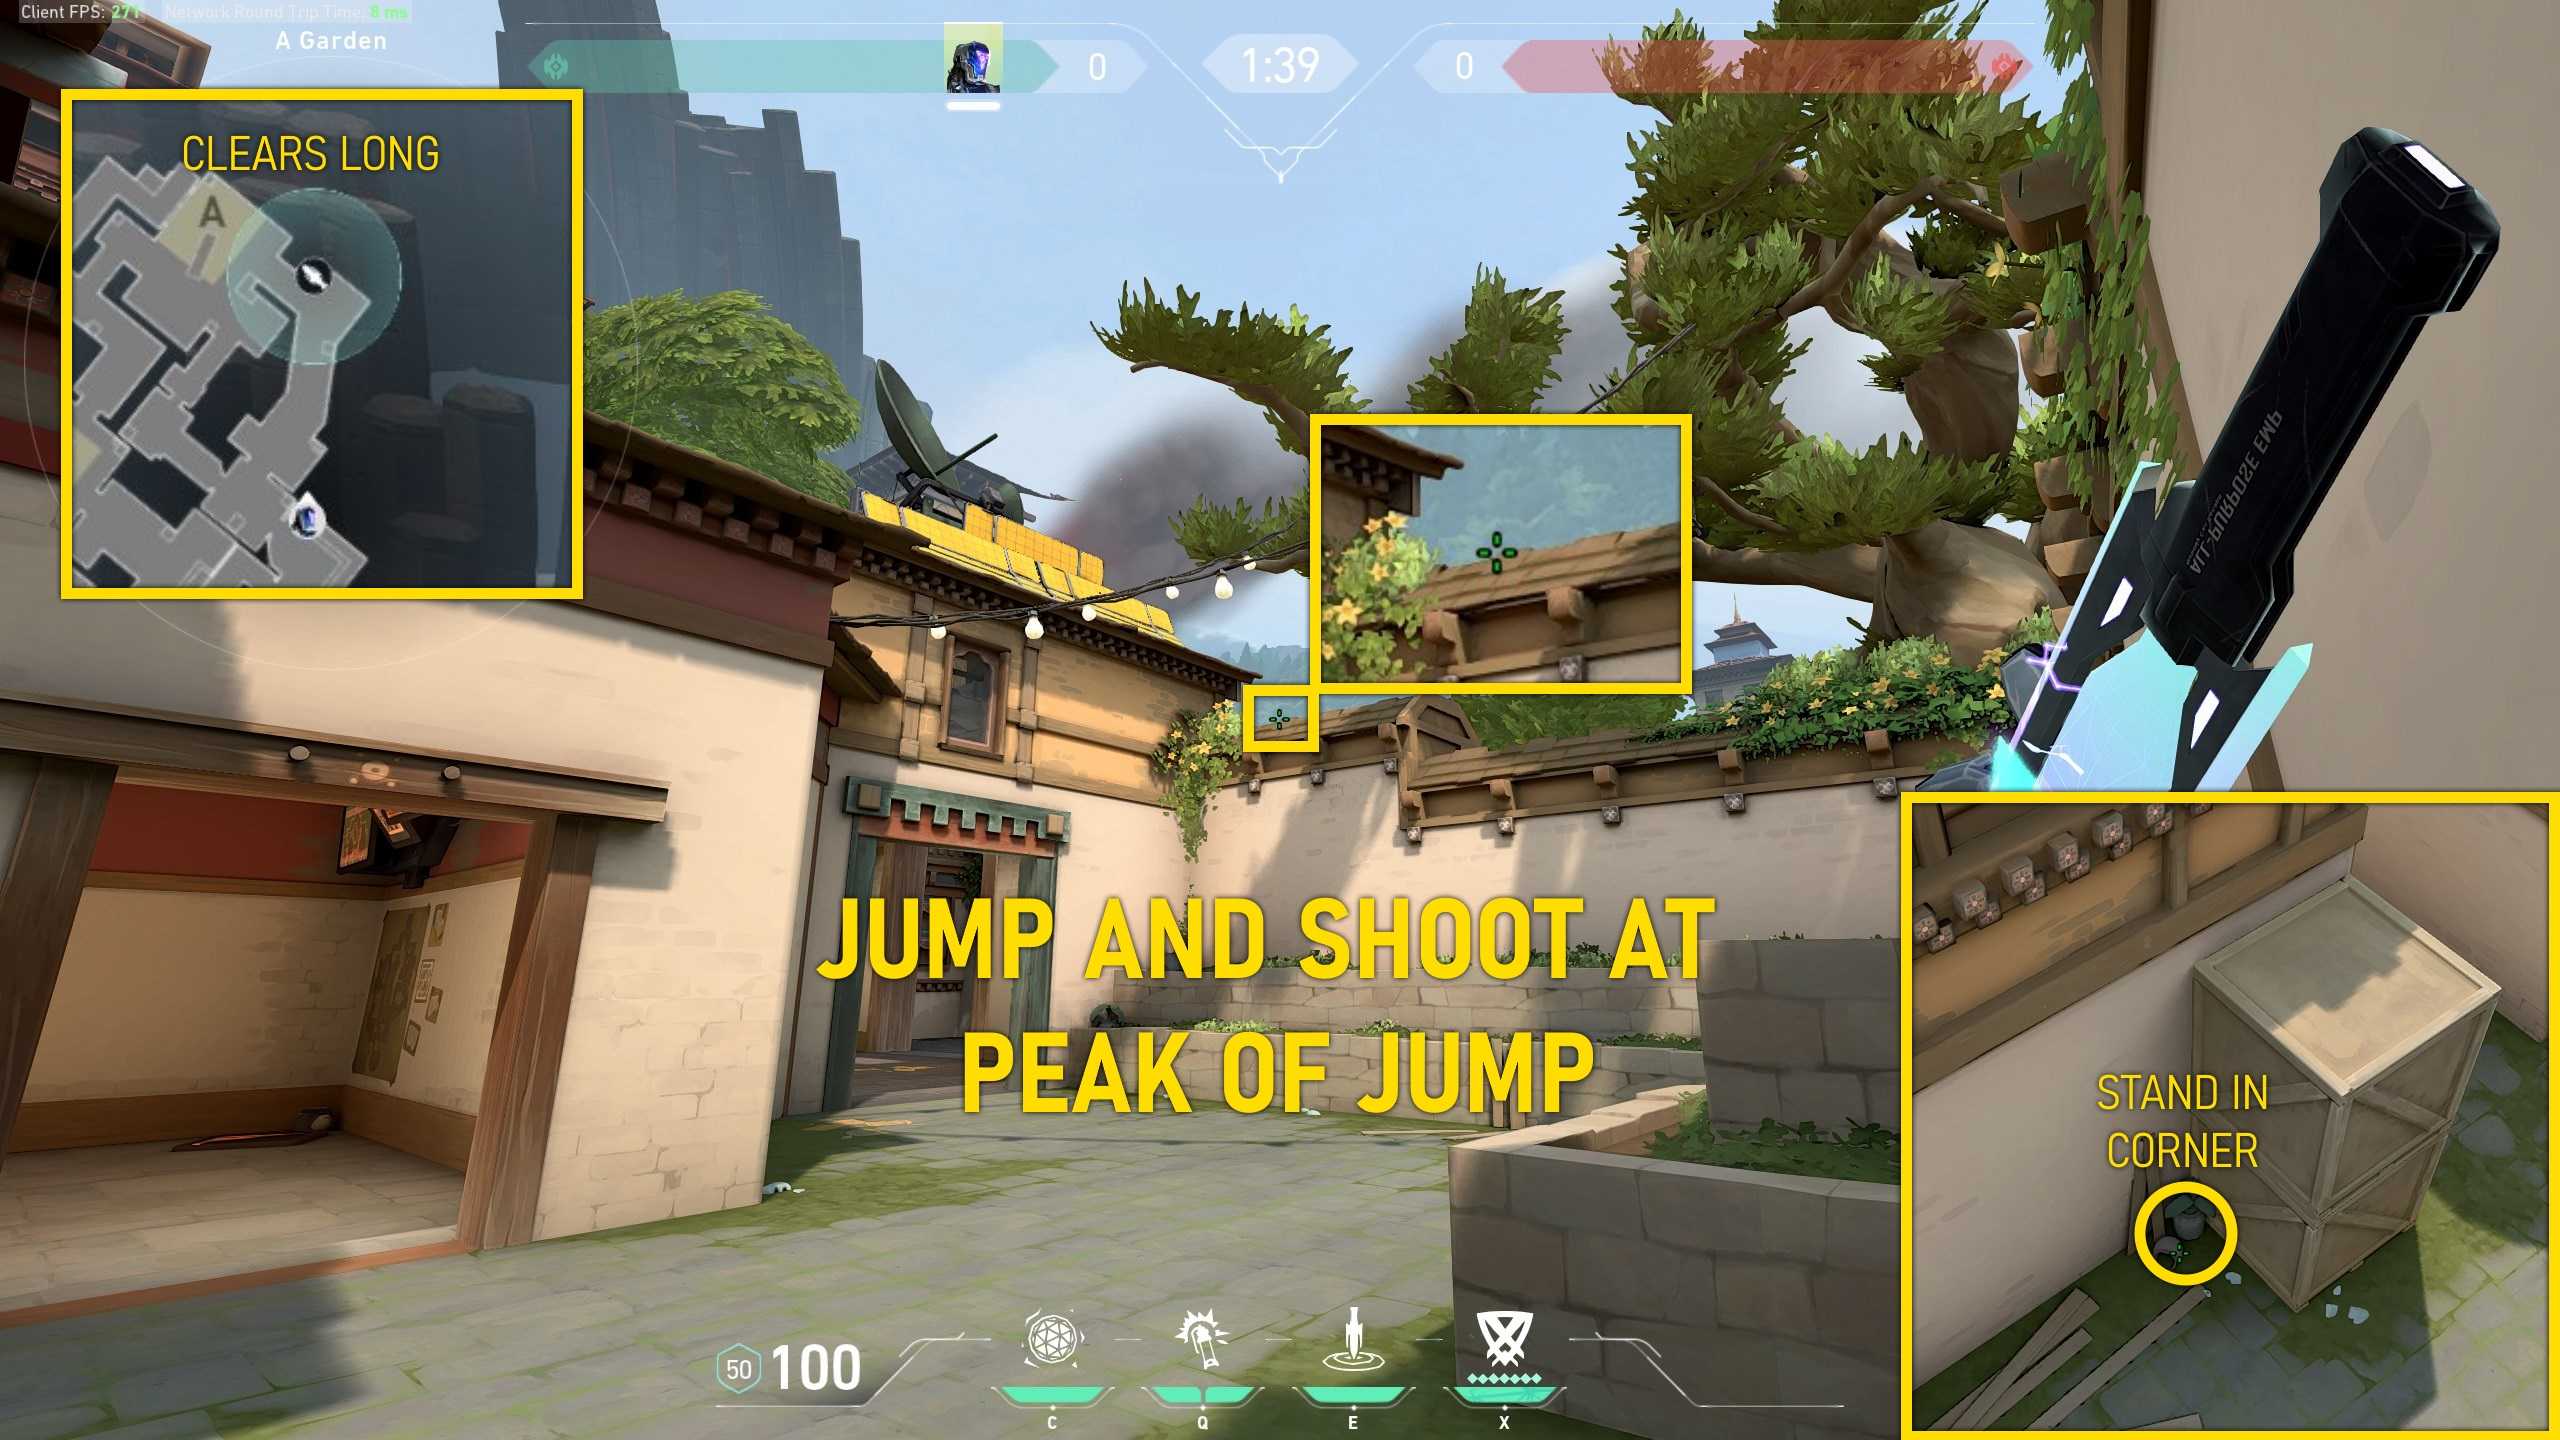
First off is a ZERO/POINT lineup to clear out long and some of short, this lineup should be used towards the beginning of the round to get information on if an OP is holding Long or to start an execute onto site. All you have to do is stand in the corner of the boxes shown below, line up your crosshair to the second little notch on the wall’s roof and just jump and left click at the peak of your jump.
The next ZERO/POINT lineup is also for A-Site and should be used if the enemies are taking a more passive approach or have a Sentinel on site, allowing you to suppress them and push onto site without having to deal with Alarmbots, Tripwires, or any stalling abilities. This lineup does take a long time to reach the site, so it can be quickly done, and you can then meet up with your team just in time for it to land. The execution is simple, just stand in the same spot as the last lineup, put the tip of your ZERO/POINT ability icon up to the tip of the branch shown below. Be careful as this lineup can be easily shot, and should not be used often to avoid them expecting it.
The next lineup is a post-plant grenade lineup for KAY/O’s FRAG/MENT that lands cleanly in the default plant spot. All you have to do is stand in the corner up to the sandbags shown below, and line up the corner of your right-click indicator to the corner of the building shown below, and throw with a left-click.
The next ZERO/POINT lineup is a lineup that can be done at C-Site that should be used as a defender to support your team and stall a push to A-site. The ZERO/POINT lands in between A-Long and Sewers and clears both. The lineup is quite hard but is a rewarding lineup to learn. Just stand in the front left corner of C-Site and line your crosshair up with the left side of the hole between the leaves shown below, you’ll be able to tell which one because this one is the biggest hole and has a little bump on the top left of the hole.
Split
This map really has no lineups that can be game-changers or can out-do the usefulness of any normal ZERO/POINT or FRAG/MENT, though that is not to say that KAY/O is bad on this map. In fact, KAY/O is fantastic on this map. Due to the closed and tight confines on this map, KAY/O’s ZERO/POINT and FRAG/MENT can completely demolish a team’s momentum and turn the tide.
Ascent
Ascent is a fantastic map for KAY/O solely due to the amount of Killjoy and Sova lineups that can be used effectively. I’d say the only downside to using KAY/O on Ascent is that you probably will not be using Sova, and you will be missing out on a lot of plays that Sova can use.
The first lineup is a FRAG/MENT lineup that can be used to clear up Generator on A-Site and it is good for retakes and attacking. Simply just stand in the left corner of A-Main, line up your crosshair between the two peaks, lining your crosshair vertically to the peak of the left one, and throw with a left-click. This lineup is good but, keep in mind the enemy can easily dodge the nade as FRAG/MENT cannot go through obstacles.
The next FRAG/MENT lineup is a post-plant lineup that could potentially be used to deny a plant on Defenders, but mostly should be used to deny a defusal. Just stand in the corner of the tall green boxes in A-Lobby and put your crosshair at the tip of the most right peak shown below, and throw with a left-click. This FRAG/MENT will land right on top of default, and will surely kill any defuser or force them off. Make sure to have a teammate holding A-Main. If you are alone, quickly move back to A-Main to continue to try and deny the defusal.
The next FRAG/MENT lineup is an attackers lineup to clear Stairs on B-Site, to allow your team to advance on site with one less spot to check. Just stand in the left corner of B-Main, aim your crosshair at the top of the middle bar on the windows, run and throw your FRAG/MENT. This lineup also works for Killjoy’s Nanoswarm.
The next lineup is a ZERO/POINT lineup that goes from B-Site to Top of Middle, and can create an opportunity for your team to peek out and hold an angle if they are off it. Just stand in the corner shown below and line up your crosshair on the corner of the roof of the house on the skybox below. Beware that an enemy may not leave and may continue holding the angle in Middle.
Bind
Bind is a great map for KAY/O simply since every way to enter a site is a chokepoint that KAY/O can suppress, flash, or stall with a FRAG/MENT. KAY/O also has fantastic post-plant lineups that can single-handedly win you a round.
The first lineup is a lineup that sends a ZERO/POINT from A Teleporter to B-Site and can be used to support your team if you teleported to fake, or to fake a site push to be before pushing Showers. All you have to do is stand in the left corner coming out of the teleporter, line up your crosshair to the leaf shown below, jump, and left-click.
The next lineup is a post-plant FRAG/MENT lineup for A-Site that lands in default to deny a defusal. This lineup is most effective with a Killjoy or a Viper to use all your abilities to deny a defender up to detonation. Just line up in the corner of B-Short shown below, and put your crosshair on the corner of the leaf shown, and left-click your FRAG/MENT.
The next lineup is a post-plant FRAG/MENT lineup for B-Site that lands in default to deny a defusal. Like the last lineup, this lineup is most effective with a Killjoy or a Viper to use all your abilities to stall until the spike detonates. Just line up with the second rock on B-Long, put your crosshair on the edge of the roof shown below, and throw with a left click. The FRAG/MENT should land right on default.
The next lineup is a lineup to send a ZERO/POINT to A-Short from B-Site and should be used to stall an enemy push as a defender right before you rotate to A-Site. Just stand in the corner shown below, line up the left edge of the green charge indicator of your ZERO/POINT to the edge of the air conditioning unit shown below, and left-click. It should land in A-Short and suppress anyone trying to enter A-Site.
Icebox
Much like Split, there are not many lineups for the map solely due to the fact that you do not need lineups to do well on the map, and KAY/O excels on his own due to the plethora of spots to throw a ZERO/POINT or FRAG/MENT. The only downside with using KAY/O on Split is how strong Sova is, and most of the time you will not be running both.
We do have one FRAG/MENT post-plant lineup for B-Site that lands right on default to deny a defusal. Just stand in the corner shown below, put your crosshair on the corner of the red beam shown below, and left-click. It should land right on default. Furthermore, the FRAG/MENT will prevent any more enemies from pushing up to the site from the right of Middle.
Breeze
Breeze is a decent map for KAY/O due to the sheer amount of lineups he can create due to the openness of the map. However, the openness of the map does make his ZERO/POINT, FLASH/DRIVE, and FRAG/MENT weaker than on other maps, so he is not at his best form here.
The first lineup for Breeze is a retake ZERO/POINT that goes into Cave to catch anyone playing post-plant off guard and prevent Molotovs and grenades from going out. Just stand in the corner of the map border and the box shown below, aim the top of your FLASH/DRIVE icon with the vines shown below and left-click.
The next lineup is a ZERO/POINT lineup that is thrown from A-Site and lands all the way in B-Main. This ZERO/POINT should be used to support a teammate as enemies push B-Main or to catch someone defaulting off guard. Just line up in the corner of the boxes on the left side of A-Site, put the line between your FLASH/DRIVE and ZERO/POINT up towards the corner of the pyramid shown below, and left-click.
The next lineup is a ZERO/POINT lineup that hits B-Site and clears the left side of B-site and allows your team to push up with more info and possibly a suppressed enemy, creating space. Just stand in the corner of the cannon, and put your crosshair on the leaf shown below, It is just the second protruding leaf above the cannon, so it is easy to remember. This lineup is not pixel perfect so do not worry about getting it exactly as shown.
The final ZERO/POINT lineup is a very simple B-Site lineup that should be used during a retake situation. The ZERO/POINT should land right in the corner of site to clear a part of B-Site and part of B-Main. Just stand in the back corner of Defender’s Spawn, line up the tip of your ZERO/POINT icon with the chimney shown below, and left-click.
Conclusion
Now that we’ve taught you the mechanics behind KAY/O’s abilities, how to use your abilities properly, and have given you an arsenal of lineups to use in your next match, you will be destroying your opponents in no time. We hope you enjoyed our guide and found it useful. Good luck, soldier!


