


Must-Know Macro Tips for Each Role in League of Legends
Confused about what to do around the map? Feeling like the enemy is everywhere? We’ll give you a look into what you should be focusing on in your role to affect the map to elite levels!
Confused about what to do around the map? Feeling like the enemy is everywhere? We’ll give you a look into what you should be focusing on in your role to affect the map to elite levels!
Since the Elemental Dragon changes for Season 10, League has become far more focused on macro-play in both Solo Queue and professional play. Meaning that the gameplay emphasis has been geared towards taking Towers, Dragons, and Baron while using the pressure generated from those to take more. Naturally, the importance of Dragon draws a lot of that focus to be in around Bot and Mid, but with impact spells like Teleport and mobility being higher than ever across the game, even Top Laners can get involved in map-defining plays that change the outcomes of games.
Today we’re going to be breaking down what each role can do to impact the map from a Macro perspective. And we’ll be starting our look with the Top Lane and working our way down the map.
Top Lane Macro is often boiled down to “who gets the better Champion pick.” Which, though true in some instances, is a bit misguided. This line of thought comes from Top Lane’s very counterpick based nature where some Champions can entirely nullify certain matchups in Top. But, just because a Champion has been hard countered doesn’t mean there aren’t methods to outplay and impact the map to the point where you remain stable as the counter-picked Champion.
The first Macro skill that Top Laners should develop lies hand-in-hand with a Micro skill, wave manipulation. Top’s matchup dependent nature brings wave-manipulation front and center as the key skill to overcome bad matchups. Proper wave manipulation allows you to not only gain resources through last-hitting, but it also allows you to move away from your lane and make impact plays alongside your Jungler and Mid.
To boil it down quickly, the wave concepts that you should look to master as a Top are Fast Pushing, Slow Pushing, and Freezing.
Fast Pushing is, simply put, quickly crashing your wave by utilizing all your abilities to have the wave press to the enemy’s side of the lane. Your opponent will either be forced to match your wave clear to maintain the wave state, trading resources with you in terms of Health or Mana, or they’ll allow the wave to come to their side creating what we call a Timer for you. On your Timer following a fast push, you can move away from your lane to ward, assist your Jungler with a Herald take or invade into the enemy Jungle, or you can even look to make a gank play Mid. In bad matchups, these three plays are the key to creating an advantage for yourself to overcome the negative matchups and have an impact on the game.

Slow Pushing is where you generate a large allied minion wave through careful last-hitting of the enemy wave. Your slow killing of the enemy wave is going to cause wave after wave of allied minions to build up behind you, and then, when the time is right, you can look to clear and push the wave into the enemy turret to set-up for a dive or roam. Massive Slow Pushed waves that crash into turret make dive plays more successful, since not only are there minions to juggle turret aggro with, but also because the minions will fight your opponent when they look to trade back with you on dives, increasing your damage output. Kills on dives means plates in the early game or turrets in the mid to late game, so successful manipulation can set up this angle.
Additionally, slow pushed waves that crash into turret create a point of decision for opponents. If you slowly crash a massive wave into a turret and are aiming to roam around the map, the enemy must decide between your play and the wave. Sure, they can answer your play by moving to support their Jungle against the invade or counter-gank your gank to Mid, but while they do this, the wave that you built against them is pounding away at the turret up Top with tons of damage. And with each minion death, there’s less gold going into the pocket of the Top Laner, so unless their efforts to answer your roam are met with kills and assists, largely their movement won’t be worth it if your team has correctly set up their plays.
Freezing, the final wave state we’ll talk about, is about keeping the wave on your side of the lane through careful last-hitting. By keeping your wave frozen on your side of the lane, you constantly put your opponent in a state of risk since they will have to overextend to last-hit, and any resources spent trying to break the freeze creates prime trading and ganking situations for you in lane. Freezing is the most common way to generate a lead for yourself, especially when you’re ahead in matchups, but it does limit your macro potential since you’ll often be pressed against the wave just outside of your turret range and unable to move around the map unless the fights are occurring in your Jungle.
Master each of these wave-states and knowing how to set them up is going to be key to enabling your ability to affect much more than your matchup in Top, thus improving your Macro-Game. You can find out more about how to improve your wave-manipulation in our guides ”A Guide on Wave Control for League of Legends” and ”Improving Your Wave Management in League of Legends.”
Jungle is all about macro play and resource trading, so there’s a lot of places to start. But, we’re going to key in on one particular map objective that often gets overlooked, Rift Herald. Rift Herald often gets tossed to the wayside in lower elo brackets or improperly used since it doesn’t apply the same teamwide benefits as Baron or Dragon do. But that doesn’t make it any less impactful to your success as a Jungler.
In fact, it’s often more worth it for your snowballing potential as a Jungler to give up one, maybe two, Dragons in favor of claiming the two Heralds that spawn pre-20 minutes. This will allow you to get yourself and another one of your lanes off the ground so you can take things over towards the end-game. Ideally, we won’t be giving up Dragons, but Herald is almost always a better call pre-20 since. Truly, the only Dragons that matter in lower elos are the 4th and 5th Dragons.
So, what are the instances that we should look to take the Rift Herald? Well, there are a couple and the first of these is when we’re on the opposite side of the map from the enemy Jungler. You can gain this information by placing gate-wards on objectives or by pinging/asking your team for deep wards in the enemy Jungle. Rift Herald being soloable by most common Junglers means that if you see the opposing Jungler on Botside while you’re Top, you’ve got a pretty good chance to secure the Herald unopposed.

The second instance would be after plays Mid or Top. If either one of your lanes makes a solo kill and remains to push their lane or you pull off a successful gank, that can immediately translate into you rushing to Herald with or without your laner. In instances when you’re with your laner, evaluate if it should be you or your laner that takes the Herald. The faster recall from Herald gets whoever takes it back on the map faster, and whoever opts for it should have an immediate play in mind. For you, as a Jungler, we’ll discuss that a bit later. But when it comes to your laners, take a look and see if their turrets are close to falling, or if the laner you’re gifting the Herald to is someone that can easily take turrets. On Champs like Fiora, Tryndamere, or Jax, the Herald can be just what they need to grab some plates, dive, and pull off a snowballing stomp.
Utilization of the Herald should boil down to three different angles. The first of these being to secure the first turret. As you pick up the Herald, evaluate across the Map which of the opposing turrets is most likely to fall. After your recall, you’d likely want to aim to drop it towards that turret to get it close to cap or capped entirely from Herald’s charge. If all turrets are at a neutral state, then you want to look to apply it on the turret that’s going to open the map up for you the most, that being Mid Lane. Having the Mid Lane turret in a weakened state makes it a great pressure point to play around and once it falls, you’re able to more easily invade and rotate through the enemy Jungle.
The second use of Herald should be done so in time with Dragon’s spawn. Often you’ll see either as Dragon is spawning or shortly before it, higher level Junglers rush Mid or Bot to drop the Herald to generate pressure while they go to contest Dragon. This is a great play that’s very akin to a Top Laner crashing a slow pushed wave to turret. Either your opponents have to answer the Herald capping their lane, or they have to show up to the fight late or down the Champion that might be responding.
The final use for Herald is when you use it responsively. This is when you use Herald to minimize the gains the enemy gets from their own successful play. If you’re on the opposite side of the map from the enemy Jungler when they’re making a dive on a weakened teammate or taking Dragon, you can drop Herald. This response is a fantastic way to keep the map pressure even and the losses you’ve incurred minimal.
Mid Lane being the center of the map helps shoulder the burden of Jungle’s ability to affect everything, but it also has to incorporate all the micro-skills that are required from a laner. This is often why the role is viewed as the hardest or second hardest role in League of Legends. But, a skill that is often overlooked by Mid Laners, especially those Assassin Mains that want to out duel and 1v1 their opponents constantly, is warding.
Yes! Warding is everyone’s job, not just the Support’s. And one of the ways you improve your ability to dominate your 1v1 matchup in Mid is by warding up your surrounding area! Of course, you won’t have the same amount of vision as a Support supplies, but your wards are just as impactful if not more, since through the early phases you and your Jungler are going to be the ones providing vision through the Topside of the map where the Support rarely ever goes prior to 20 minutes.
There are some simple locations to drop to improve your lane safety and they are:
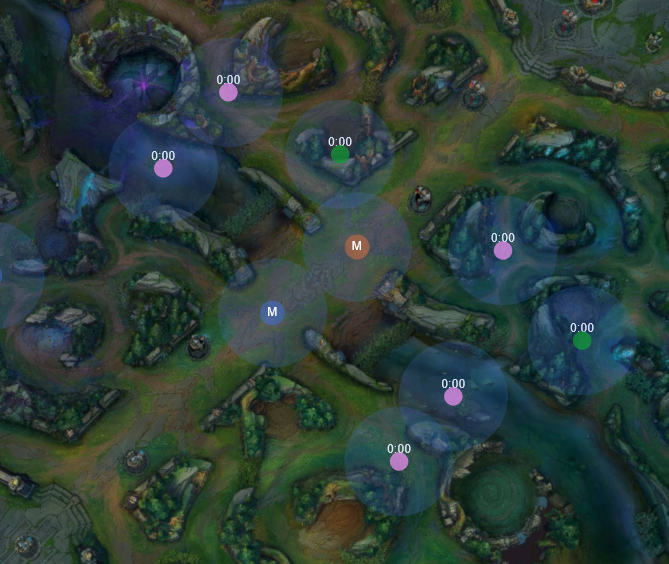
These locations each provide knowledge of Jungle pathing, and if you’re duoing with your Jungler, coordinating where you guys apply coverage can allow you both to make plays around the map effectively and safely with wider coverage. This is, without a doubt, the simplest way to improve your macro-game. The next level up from here would be to utilize your vision and knowledge that it provides to gank or invade the enemy Jungler alongside your own to starve them of resources.
Bot Laners often get a lot of slack in the Macro department since the role itself is very micro-intensive and the fact that the Support player often covers the macro-focused aspects of laning. However, that doesn’t mean Bot Laners aren’t extremely important to the macro success of a team in Solo-Queue. In fact, ADCs remain consistently viable due to their ability to DPS down large monsters and turrets, even with Mages attempting to slowly bully their way into the role.
But, largely, regardless of if you’re Mage or Marksman, the idea behind your macro-play remains the same. You want to be pressuring turrets, large neutral monsters, and generally whittling away at your opponent's defenses. And this all starts from setting yourself up with a good lane phase.
But, before we dive into the lane phase, the most important thing you can do, starting at Level 1, is to stand and protect your Jungle entrances. Making sure your opponents don’t invade or pinging out an invasion as it happens is key to making sure your Jungler has a good time and will eventually come and visit you Bot. Jungles set the tempo early, so having them have a successful first clear is key to having a great game that’ll pay off in your late game success. So, be a good egg and guard and leash for your Jungler so there aren’t any bad feelings to start the game.

Now, thinking about your lane phase, your goal as a Bot Laner should be to force the enemy to recall first, allowing you to push your wave to their turret and recall yourself to spend gold. Ideally, your Support will be helping you pressure your opponents on last-hits, so as you crash your waves you’ll always be in a state of health advantage over your opponent. With your enemies being chunked down, you create a disadvantageous situation for them to play in, and often greed will take them over bringing them to stay while low HP to secure their own last hits. During this time your pressure on them makes them vulnerable to death, and truly the only thing you need to worry about is a Jungle gank. But if your Support is warding effectively, you can keep the pressure on.
This micro pressure is generating macro pressure. Your constant pressure against their HP is also an attempt to create an opportunity for you and your minions to hammer away at the enemy turret and have the free rotation to Dragon whenever your Jungler is ready for it. Your biggest risk with this pressure is, as I said, Jungle ganks. But effective wards and well-pushed crashes will make sure you can bounce waves back to your side before you build up for another slam of pressure against the enemy.
Support Macro
Supports, like Junglers, bear the brunt of the Macro awareness for the team thanks to their duties to ward across the map. And naturally that might be a big focus on how to improve your macro, but you can check our warding guide with Biofrost here to up your game in that aspect! For our tip here, we’re focusing on roaming!
Roaming is an oft overlooked aspect of the Support arsenal, especially if you’re an Enchanter Main, since the idea of getting your ADC fed or protecting them at all costs is in the forefront of your mind. However, all Supports are capable of moving about the map to generate pressure, it’s not just a design exclusive to Alistar, Pyke, or Bard.
We cover a lot of how to roam as a Support with another one of our guides here: How to Roam As Support in League of Legends. But, I’m going to hit you with the quick fix tips to start generating map pressure.
Those are:
Naturally, before any roam, weigh your resources as far as Health, Mana, and Summoners go. If you’re down or the play would be risky without the high impact of Flash, roaming can result in wasted effort or potentially death for your lane partner if you’re not fully aware of the opponents’ kill potential. But, by roaming off of the above listed scenarios, you really set yourself up for success since you start to process and look for these windows to really win the map. Check out the full guide mentioned though. We dive deep on some insights that you should ask before even reaching those quick hits of moments.
Closing Out
So, there you have it! I hope these quick macro tips for your roles really helps amp up your game! If you win the map, you win the game more often than not! And always remember, your macro plays will always be more successful if you’ve got a teammate nearby! With that said, good luck in Solo-Queue as we push towards the end of Season 12!


