


Pokémon UNITE: Charging Up Rotom
Let’s take a look at the electrifying ally Rotom and how to secure it early and often for a supercharged early and mid game!
Let’s take a look at the electrifying ally Rotom and how to secure it early and often for a supercharged early and mid game!
Overall, Pokémon UNITE’s ranked gameplay relies quite a bit on early scoring, experience, and snowballing leads in preparation for the climactic spawn of Zapdos eight minutes in. There are multiple ways to create a lead early on in the game, and scoring goals is certainly one of them. Not only are points pivotal to winning the game itself, but every score gives you a small amount of experience, and over multiple scores this level difference can really add up. In addition, scoring large amounts of points on one of the goal zones located in the top and bottom lanes (eighty points for the first goal zone, one hundred for the second) will destroy it permanently!
Not only will this cause different wild Pokémon to spawn on that side of the map, but also your team will be able to operate much more safely without the enemy goal zone present to give enemies shields and bonus health regeneration. This is a pivotal part of ranked gameplay, and luckily Rotom is here to help!
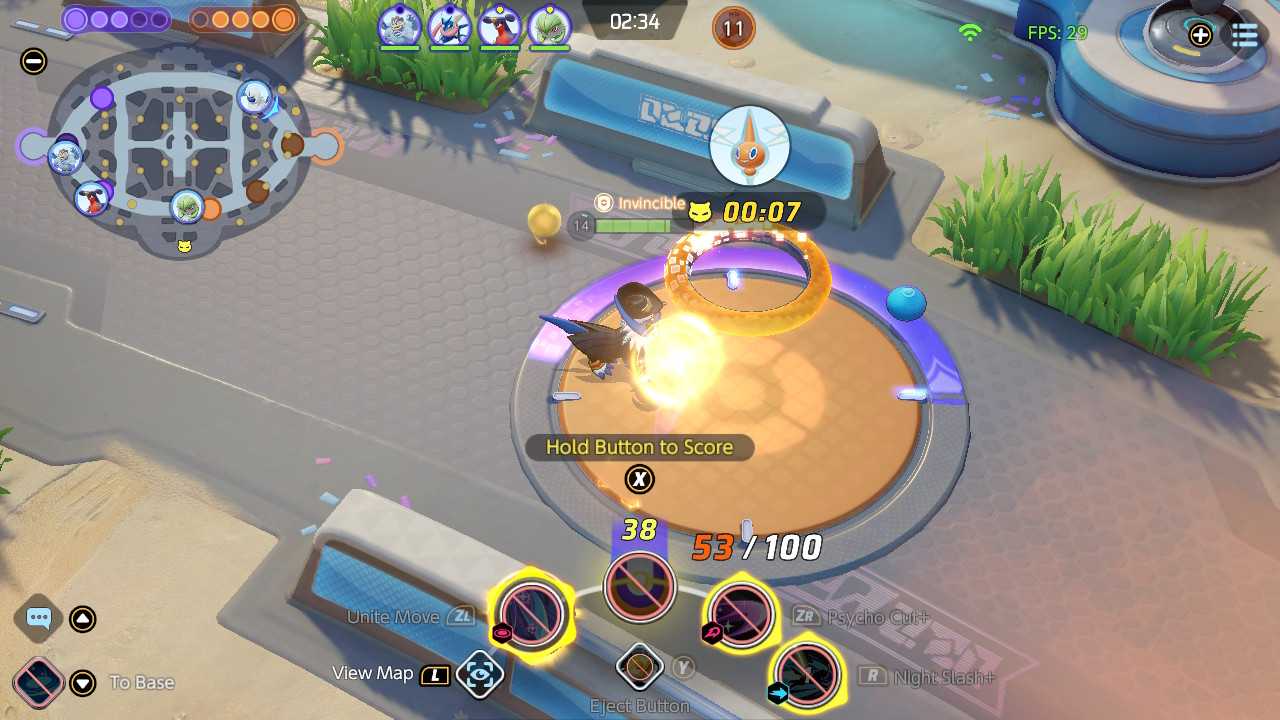
When Rotom is defeated, it is automatically activated. In addition to providing twenty scorable points to the player who clocked the final hit, Rotom will immediately respawn, becoming similar to a Wild Pokémon that is friendly to the team who defeated it. When this happens, Rotom simply moves down the middle of the top lane towards the nearest opposing goal zone. If it encounters any enemy Pokémon blocking its path, Rotom will stop in its tracks, delivering hefty basic attacks until its path is no longer blocked. If it manages to reach the opposing goal zone, Rotom will dematerialize immediately, dealing twenty points’ worth of damage to the goal zone and rendering it defenseless for the next twenty-five seconds of the game. As a side note, Rotom’s twenty point offensive total will be decreased a bit if it sustains significant damage. The decrease in points is hardly noticeable in the grand scheme of things (lowering Rotom to half of its max HP only reduces it to sixteen points), but it’s still something to keep track of as you attempt to let Rotom charge up the enemy goal zone.
When the enemy goal zone is in this charged vulnerable state, any member of your team can bypass the normal wait required to score goals, regardless of the number of points you wish to cash in. This can provide a heavy swing in score if manipulated correctly, setting your team on the path to an early point lead, as well as the potential for a destroyed goal zone provided that you score enough points off of the play. As an added bonus, while the enemy goal zone is charged, its healing and shielding effects for its respective team members will be left completely disabled, making defending against your push significantly more difficult.
When a ranked match reaches the seven-minute mark, Rotom will spawn at the very top of the arena, located right above the center of the top lane. Players will be alerted to this fact when it occurs, and the mini-map will also show a thirty second countdown leading up to its spawning each and every time. That being the case, be aware that after Rotom has been secured, it will respawn exactly two minutes later in the same location. Rotom will always remain in its designated area until it is being attacked and sent down the lane, or until the match reaches the two-minute mark towards the end of the game—upon which point Rotom will despawn permanently.
Once the two-minute mark has been reached, Rotom will despawn immediately, even if it was currently in combat at the time. Since it initially spawns three minutes in, and it can respawn every two minutes prior to the two-minute mark, that means that a maximum of exactly three Rotom are capable of spawning within a standard ranked game. Unfortunately, this objective’s benefits are much harder to take advantage of than those of others, such as Drednaw or Zapdos, but it can never hurt to secure more than one Rotom in a game provided that you’re given an opportunity to do so. Just remember that the mini-map will display a timer thirty seconds ahead of Rotom’s spawn and respawn timer each time, so pay attention to the clock and prepare accordingly if your team is aiming to secure it!
As the countdown appears in Rotom’s area of the mini-map, your team should start to determine how to approach the objective (if you plan to do so at all). If it is the first Rotom of the game, then Drednaw will be spawning at the same time on the opposite side of the map, in the beach below the bottom lane. Drednaw’s shields and experience are quite prized in competitive play, so most teams will often look to prioritize it first, but don’t forget about Rotom!
Securing an early Rotom can help snowball an advantage in the top lane by potentially destroying the first of the enemy’s goal zones, allowing your team a bit more freedom around that side of the map. As such, it is heavily recommended that you send at least one or two team members to contest and/or take Rotom if possible, or even more players if you feel that Drednaw cannot be taken in the current game state. Under normal circumstances, most teams tend to send large amounts of resources to Drednaw first, so if you prefer Rotom then it should generally be easy to take it in exchange for allow your opponents to take the former.
When attempting to take Rotom, as is the case with any objective, positioning is of the upmost importance. There are brushes in the top lane on each side beneath Rotom’s spawn point, both at the top and the bottom of the lane. If your team manages to set up shop in the area first, then these brushes are quite useful for setting up an ambush or for forcing opponents away while staying out of sight for a tactical advantage. Unlike Drednaw and Zapdos, while one team is attacking Rotom, the electric ghost will actually follow them slightly as it tries to retaliate. This means that one or two members can attempt to hold off the enemy team while the other members pull Rotom away as far as possible, helping to ensure that there’s minimal risk of having the objective stolen away from you and your teammates!

If the enemy team gets to Rotom first, don’t panic. As with Drednaw and Zapdos, you can actually scroll your camera up (hold the L Button and pan with the right stick) to Rotom’s area to see what its HP bar looks like, even if you can’t see Rotom itself or the enemies fighting it. This lets you know approximately how much time you have left to get to the objective, or if the opponents are fighting it at all in a given moment. Numbers are important for contesting an objective; if you notice any enemies trying to zone you away, try to focus them down before fighting the enemies taking the objective itself.
It can be pretty tanky at earlier levels, so you should have a little bit of time to work with. If you don’t feel that you can dispatch the guards quickly enough, then try to approach at a different angle than the one that they’re positioned in and look for a steal! Make sure to save your highest damage Move available, and swoop in right as Rotom’s about to fall to net your team a powerful ally for the next few moments.
Whether it’s through stealing it or securing it through early positioning, defeating Rotom gives your team a clear shot at scoring some seriously impactful goals, so come prepared with a lot of points to destroy the enemy zone. Rotom will proceed directly down the middle of the lane until it touches an opposing goal, so you’ll have to escort it there directly if you want it to arrive without getting defeated first. Rotom will stop to attack enemies that get it its way, so make sure you either zone them away with lots of damage or shove them back with displacing moves to allow Rotom to advance. Escorting Rotom can put you in serious danger of being flanked if it’s headed towards the second or third goal zones, so try to stick together as a team. Avoid walking up blindly without knowledge of your opponents’ locations and be careful of incoming enemies using their base’s springboard to get the jump on you!
Fortunately, if your opponents manage to take Rotom, you still have a chance to prevent them from getting much value out of it. While you can’t prevent the player that defeats it from gaining twenty scorable points, if your team manages to take down the reactivated Rotom before it charges up your goal zone, then you’ll have essentially nullified its effect. Thankfully, Rotom will stop moving forward if there’s an enemy player in front of it to do combat with, so stalling it for a bit is certainly possible. However, be aware that while stopped Rotom will dish out some rather painful basic attacks to whomever it’s in combat with, so don’t sit too long in the line of fire if there are enemy Pokémon supporting it.
If possible, try to stop Rotom right in front of your goal, so that you can attack it (along with any enemies supporting it) while receiving bonus healing and shields from inside your zone! Be careful, however. If an enemy manages to shove or otherwise displace your team from your goal zone while doing this, Rotom will likely be able to reach your goal zone and leave it vulnerable, so keep track of any enemies with troublesome abilities. Finally, moving up to take your zones can be very dangerous to your opponents, as the farther down the lane they go the more likely they are to be vulnerable to flanking maneuvers from your team. If you notice that your enemies are outnumbered or are in poor positions, leave some bulkier members to defend your goal zone from Rotom while the others look to pincer them from behind. This will cut off their escape and hopefully allow you to take them down, with Rotom to follow.
All in all, Rotom is a rather unique objective in Pokémon UNITE. Unlike Zapdos and Drednaw, which activate their benefits immediately upon defeat, Rotom requires the team who captured it to invest even more time and resources into securing its benefits afterwards. By leading it down the top lane to an opposing goal zone, Rotom can leave it completely defenseless, allowing your team easy access to scoring points without the usual delay. While this is certainly beneficial, the amount of time and effort it takes to manually escort Rotom down the lane—especially in the later stages of the game—often introduces an uncomfortable amount of risk with the objective. Unfortunately, this usually results in Rotom being deprioritized when compared to the more instantaneous objectives, however this supercharged specter is nothing to sneeze at in its own right. Ultimately, scoring goals wins games, and when utilized successfully Rotom lets you do so in explosive fashion at the push of a button!


