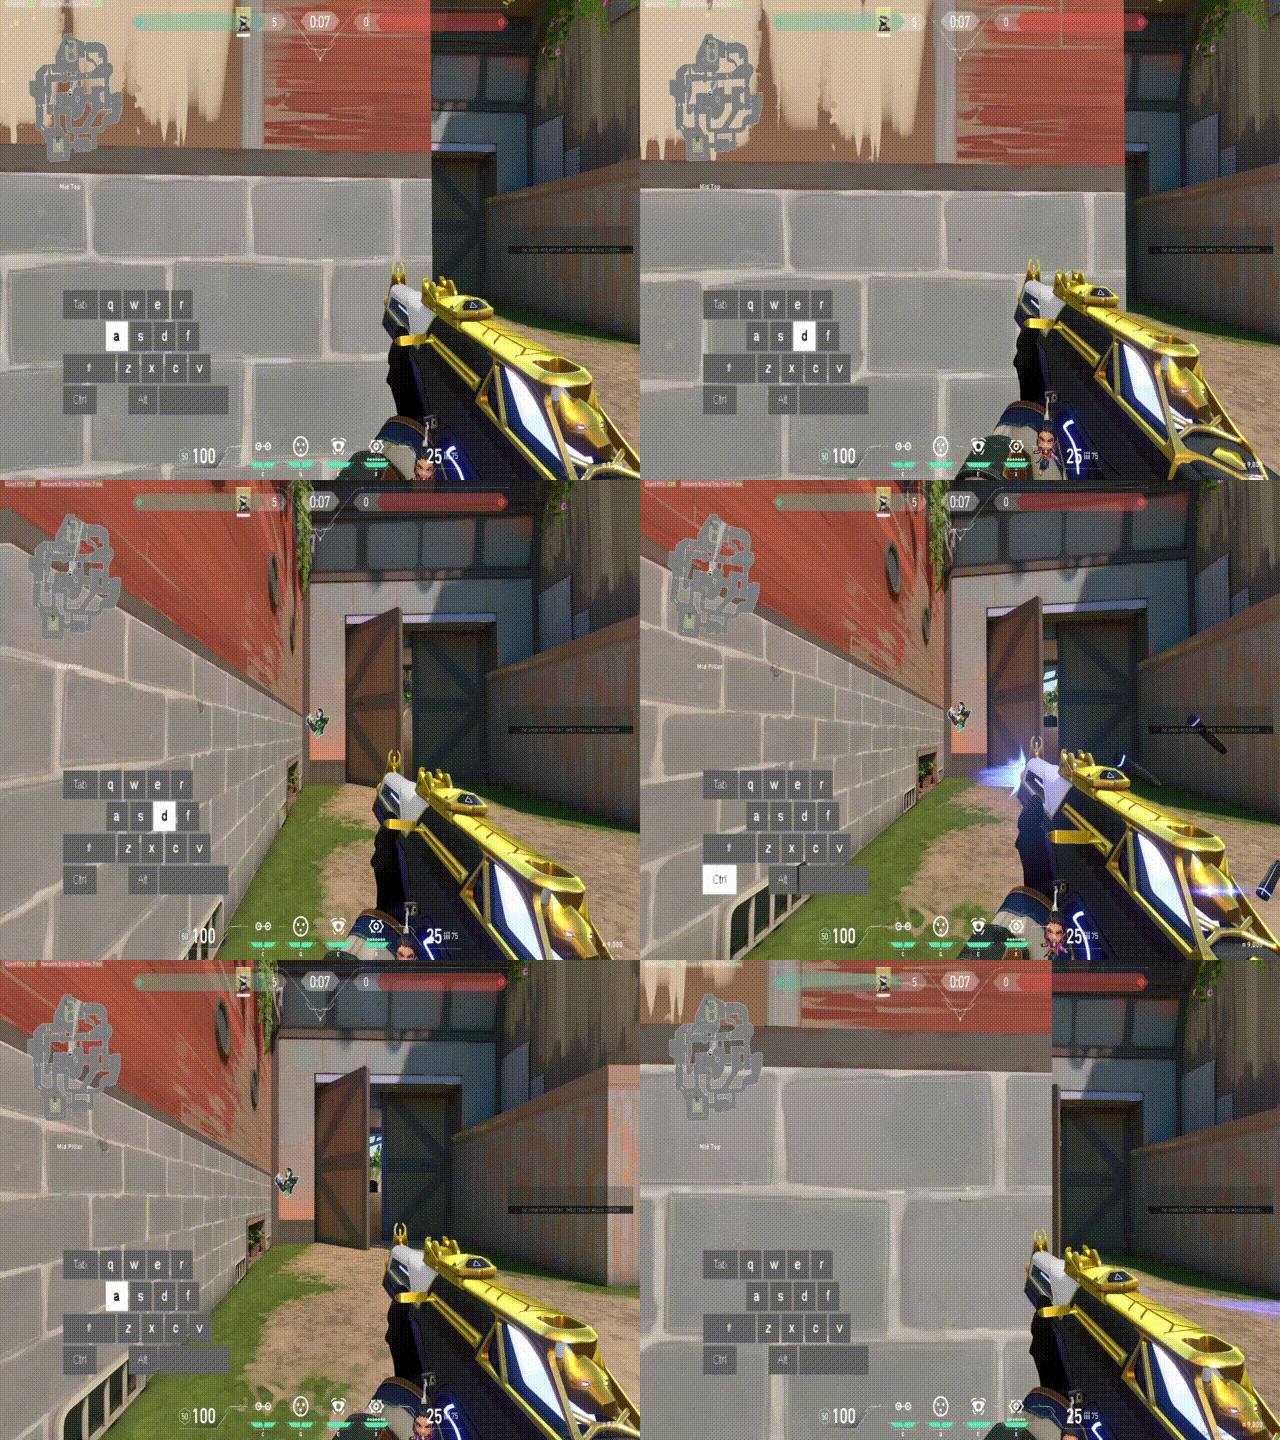
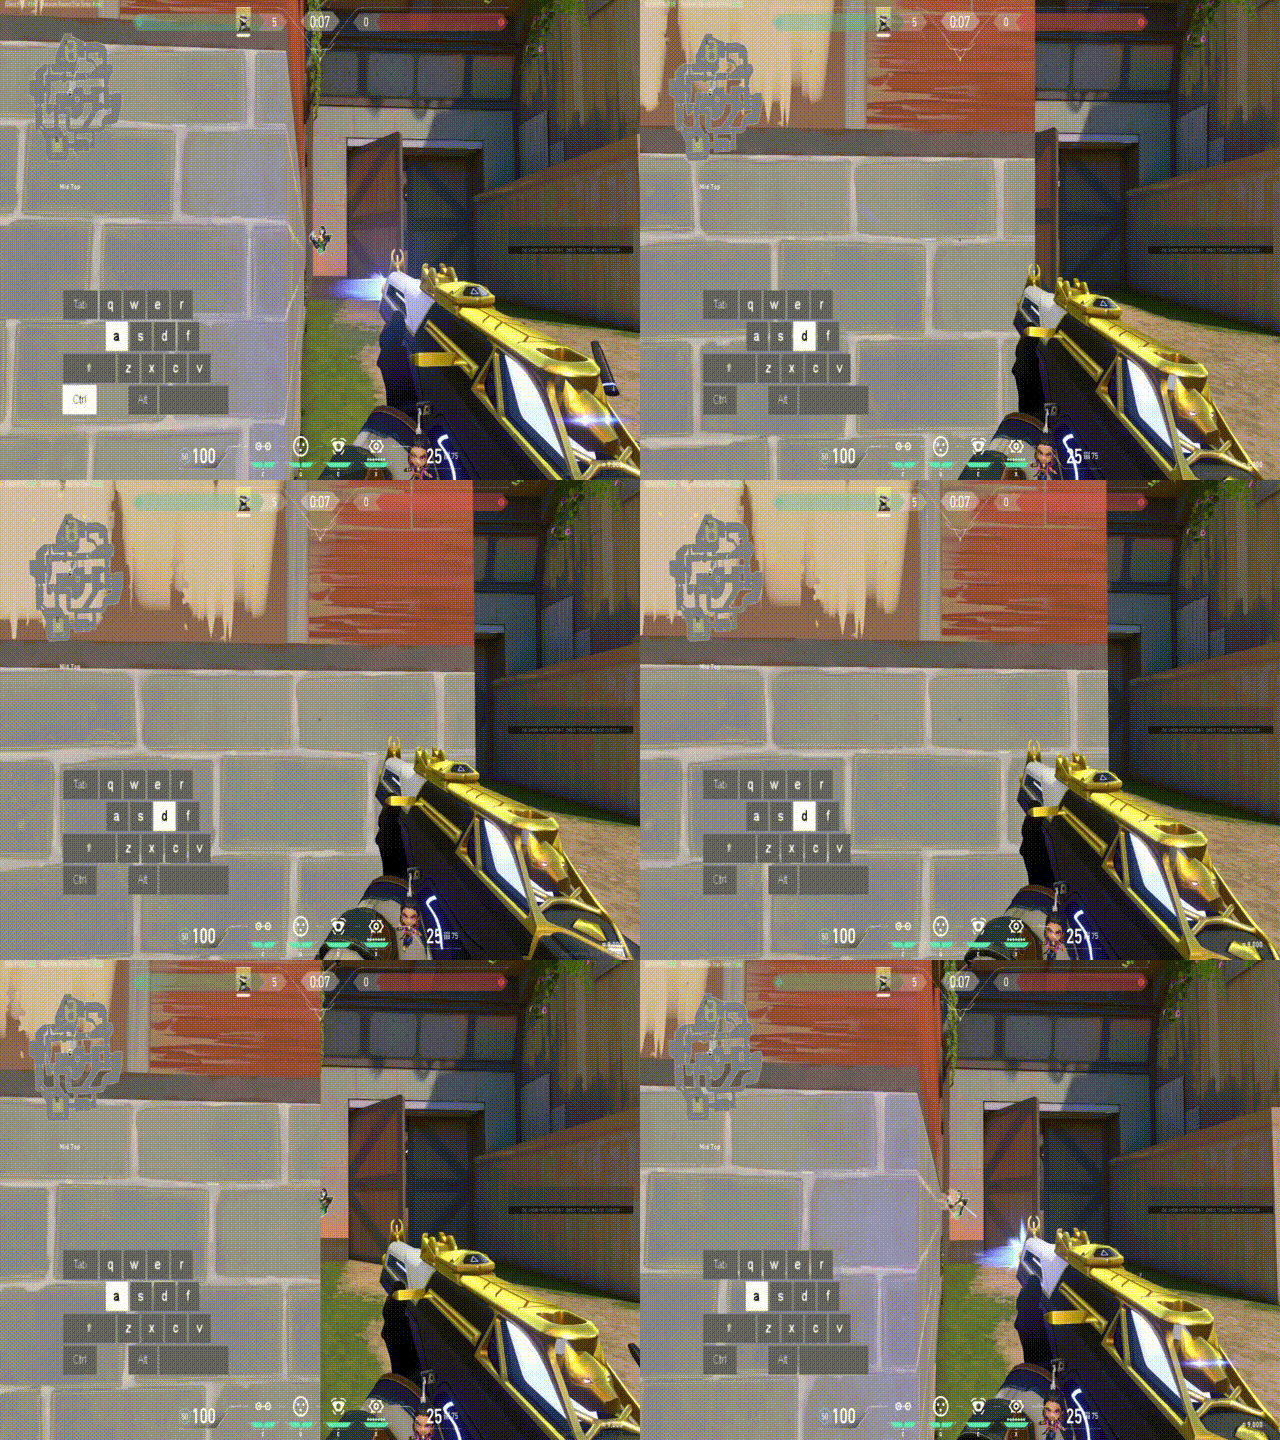
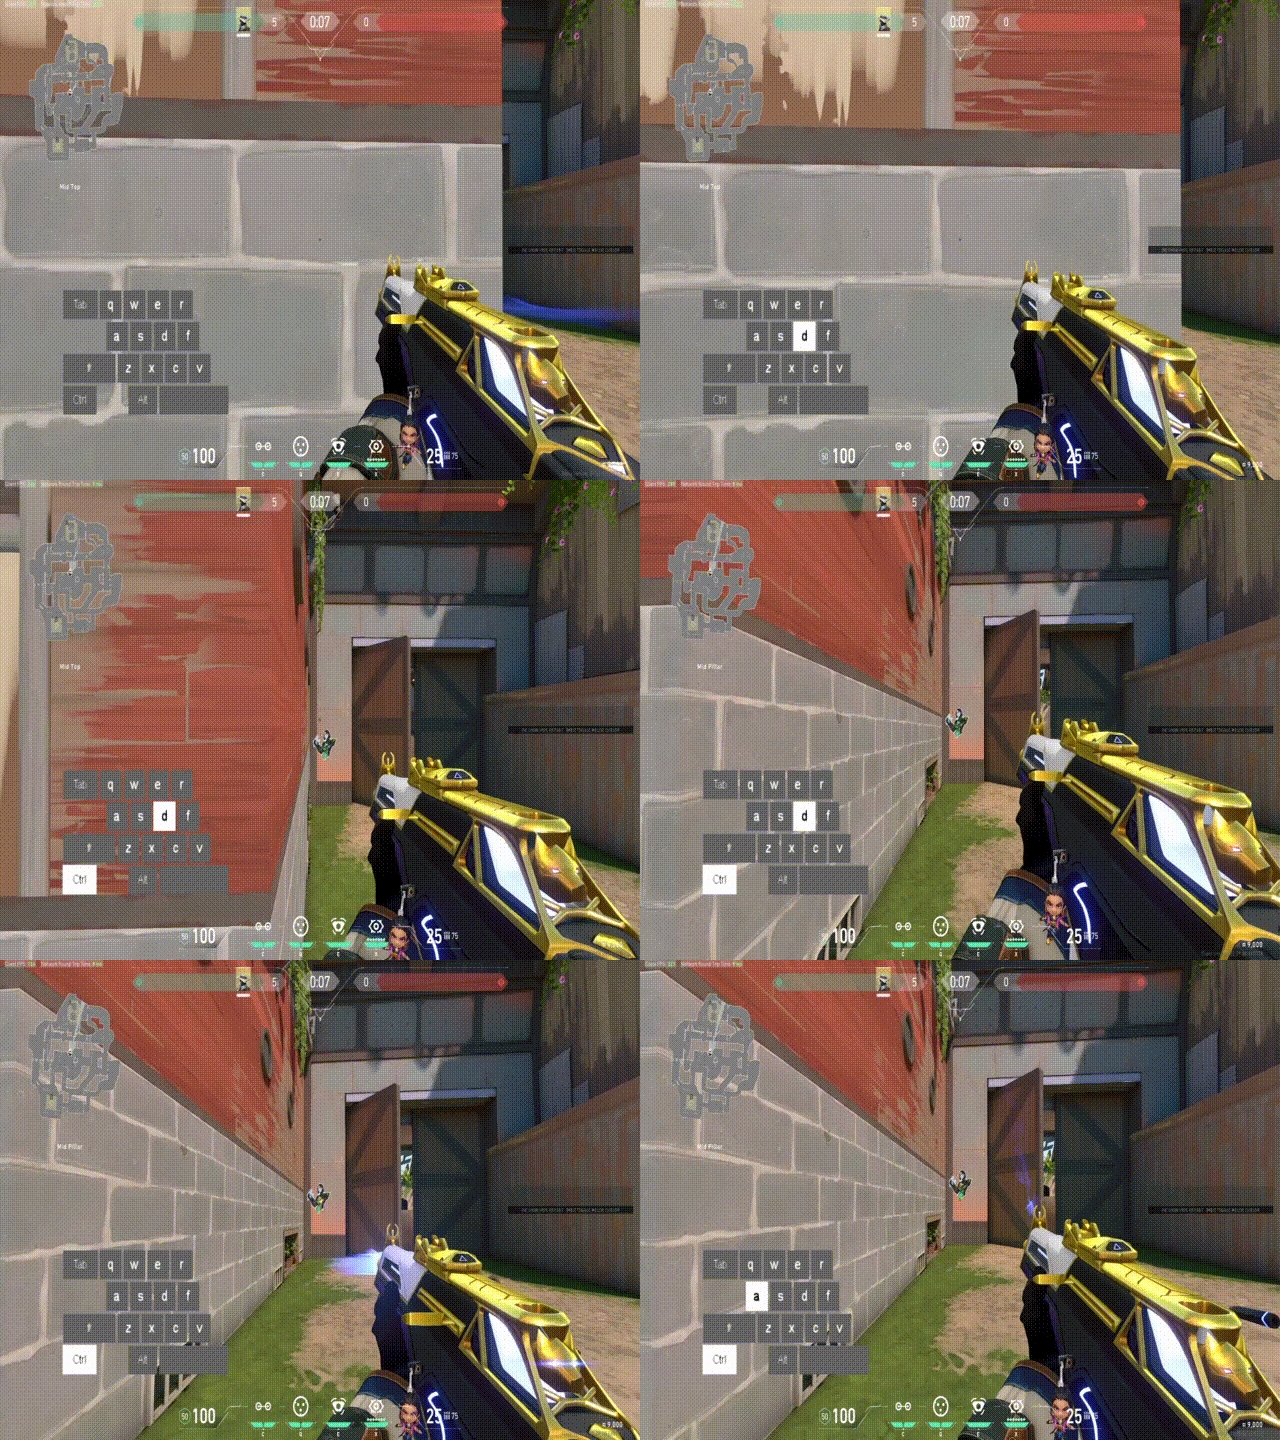
Most people would explain a player’s greatness by boasting about their aim, game sense, or spray control, but an extremely understated part of a player’s game would be their positioning or movement. Positioning in VALORANT is how one positions themselves effectively and movement is the way a player uses the game’s mechanics to move efficiently. Today we’ll be showing you how to effectively use movement to peek an angle.
Peeking
Peeking is an element of play in VALORANT that may seem simple at first glance, but there are several different ways to peek around an angle and each angle has its place for certain situations. Here are 6 of the ways you can peek an angle.
1. The first peeking method has two names, swinging, or some people like to call it a ‘Ferarri Peek’ due to the player fully speeding around a corner. This peek is really good online due to peeker’s advantage, which is a mechanic that causes someone peeking to react faster than someone holding an angle because of ping difference. Usually, someone should use this angle if you know where the enemy is, and you can just run out and instantly take them out. Or you can accompany this with a flash to get an almost guaranteed kill. While this method of peeking is definitely worth considering in a situation, I would not make it the go-to method.

2. The next peeking method is called “Jiggle Peeking” due to your player slowly but rapidly peeking and hiding at an angle, which kind of looks like a jiggling motion. This peek is a fantastic way to peek around an angle due to how safe it is, as most people will not be able to react to you peeking and shoot you quickly enough. Furthermore, if you know where someone is you can quickly shoot when you peek, and using counter strafing that comes with jiggle peeking, you can quickly and accurately tap at your opponent. A fantastic way to clear a corner is to slowly jiggle the angle, each time your peeks getting slightly wider allowing you to quickly see if an enemy is present in a given area. This is my go-to way to peek an angle and should be yours too.

3. The next peeking method is a method that does not really have a name but for the sake of organization, we will be calling it the “Jump Swing”, due to it being very quick like a swing but involves you jumping into a crouch spray. This type of peeking is only used to get a sneaky Operator pick down a hall or to prepare to spray down an enemy using an LMG, like the Ares or Odin. Besides those two applications, it is far too risky of a peek method and should not be considered in most situations, unless you want to tilt your enemies... or teammates.

4. The next peeking method is a fairly simple one and is just a normal peek but crouching while peeking, this is really a peek that should only be used a few times per game purely to throw your enemies off as if you are in a higher Elo, they will have their crosshair higher than where you peek. This peek could be slightly riskier in lower Elos due to the average player in those ranks having lower crosshair placement, risking getting instantly headshot.
5. The next peeking method is a simple peeking method that involves you jumping out on an angle and quickly performing a 180 while strafing away from the wall. This method is used to bait a shot out of an enemy rather than seeing an enemy. This method is most effective against the Marshall and the Operator due to their slower fire rate. This method overall is a great way to bait a shot, but there is one better method.
6. The next and final peeking method is a peek invented/popularized by Sentinels’ player, Dapr that is a modified jump peek that allows you to bait a shot from a sniper but at the same time get info and see an enemy. This is the best way to peek for info safely if someone is holding an angle against you. This method should only be used when you are willing to give away your location with noise, and not planning to shoot them, but just grab info.
Finding an Effective Angle to Hold
Finding an effective angle to hold is a part of positioning that comes with map knowledge and overall game sense, which takes time to develop, but here are some pointers to help you develop that skill faster. When you are holding an angle, you should be keeping track of several factors to determine if you can hold that angle or get out ASAP.
Here is an example of bad positioning and will be referred to as Image A
This is an example of good positioning and will be referred to as Image B.
Here are the two main factors you should look out for.
- Look and see if you can get shot from any angle that you are not watching.
- Image A is a poor angle because you are visible from the angle you are holding, A-Main, and from Heaven and Tree, allowing you to be easily shot from behind.
- Image B is a good angle to hold because you are only visible from people on A-Main and are not visible from people deep in Tree or Heaven.
- Make sure you can quickly run to safety if you are overwhelmed.
- Image A has nowhere to run to hide and you will be most likely shot before you can get to safety if pushed.
- Image B positions you in the safest part of Generator and that position allows you to quickly move to cover using the Generator.
Pop Quiz!
Next up, we’re going to be showing you two different positions and you are going to tell us which position is better, and we will give the correct answer and explain why.
First up are two angles to watch B-Long on Icebox, which angle is better, A or B?
…
…
...
Answer: Angle A
Why: Angle A is pushed up closer to the green box inside Tube and close to Tube itself which protects him from getting flanked in Mid and also if he is overwhelmed from Long he can go into Tube to reposition or attempt to deny a plant. Angle B is far to out and has no place to fall back to if overwhelmed.
Next, we go to Breeze middle for Defending side, which angle is better to hold, A or B?
...
...
...
Answer: Angle B
Why: Angle B is far safer of an angle to hold. While you can go behind the boxes to your right if you are holding angle A, there is no real place to go once you are there, and you are basically stuck. If you hold angle B you can retreat into Defender’s Spawn and either hold Hall or rotate to support your team.
Finally, we go to Haven Attacking Side garage door. Which angle is better to hold, A or B?
...
...
...
Answer: Angle B
Why: Angle A is vulnerable from Middle and Middle Window and can be flanked, furthermore angle A is closer towards doors and is, therefore, easier to get shot from someone holding Garage Window. Angle B is less vulnerable to flanks, is safe from being shot from Middle and Middle Window, is farther away from Garage Window, is less likely to get shot, and can fall back faster.
Clearing multiple angles guide.
Clearing angles in VALORANT is intricate and dangerous, and you must make sure to position yourself correctly while clearing multiple angles. As an example, we will walk you through the path someone should take while clearing A-Heaven and Screens from Defender’s Spawn on Split.
- Start here.
- Press yourself up against the right-most wall to quickly clear a part of Screens before moving on.
- Push to the left-most wall to clear Heaven.
- While still watching Heaven, move to the right wall past the doorway and turn towards Screens to fully clear the left corner and enable you to push to screens.
Pressing yourself up against both walls is extremely important because it prevents you from being vulnerable to being shot from anywhere else besides the place you are looking, and let you take 1v1’s and be able to safely take back a site, or pull off a successful flank.
Other Movement Tips and Mechanics
VALORANT has many mechanics that players should be aware of that can range from vitally important to tricks that can get you in spots that you normally cannot get to, that could give you a slight advantage.
1. Counter-Strafing: Counter-Strafing is a vital part of gunplay in VALORANT, that allows you to instantly be accurate when you want to shoot, all it involves you to do is to tap the key opposite of the direction you are moving to make your character stop moving. Counter-Strafing has a huge impact on your accuracy as shown below:
2. Crouch Jumping: Crouch Jumping is fairly simple but a great method to boost your jump effectiveness. All you have to do is jump and then crouch at the peak of your jump. It can be used to get you to spots you normally cannot, like on top of Generator on Ascent A-Site.
Conclusion
Overall, we have shown you how to properly peek an angle, hold an angle, clear multiple angles, and other movement mechanics that all come together to help you climb the ranks and succeed as a player in VALORANT. We here at Dignitas fully hope that you use these tips to outplay and outsmart your opponents and we hope that you found this guide helpful.
