


Pro Level Warding Guide with Dignitas Biofrost
Ever struggled with where to drop your wards? Biofrost covers the most important places on the map through every phase of the game in this piece!
Ever struggled with where to drop your wards? Biofrost covers the most important places on the map through every phase of the game in this piece!
Vision control is paramount to victory in League of Legends. If you can’t see your enemy, then you have no idea how to plan for their moves. So, having your vision in key locations at the right timings can make or break a gank, an objective, or even your entire lane phase. Today, we’re sitting with Dignitas’ QNTMPAY’s very own Vincent “Biofrost” Wang to cover the most important places to ward on Summoner’s Rift, as well as unpacking some extra knowledge behind when and why to ward each location!
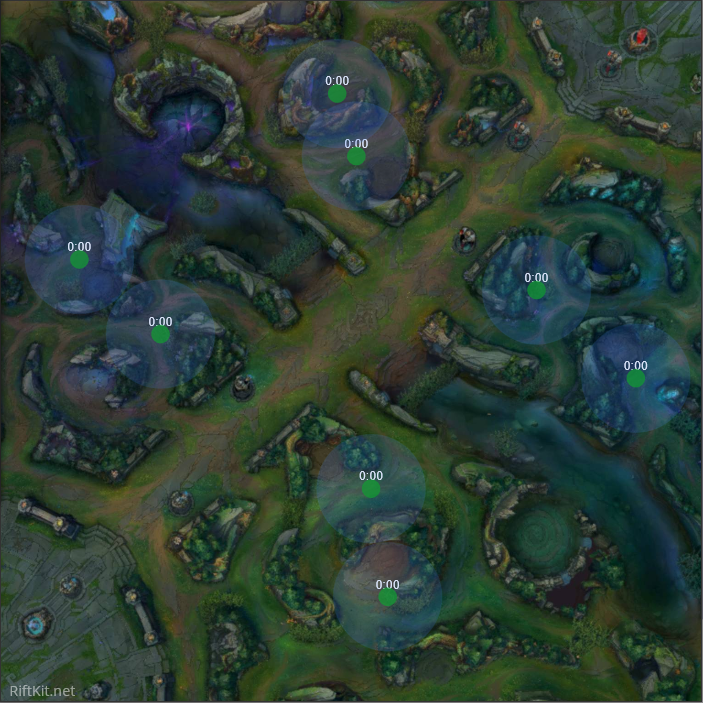
We’ll first start off with how we can get value out of our level one wards. As teams run out of base, typically it’s decided on if there’s going to be an invade or if there’s going to be a spread to cover the entrances of the Jungle. And regardless of whether the teams fan out or invade, there’s a common practice to try and sneak in and drop wards within the enemy Jungle.
Biofrost: “If your team has the stronger level one, you can invade and try to get wards on the enemy camps. The most standard spots being on one of the camps or on top of the enemy buff. (Raptors/Red or Blue/Gromp depending on your side.) You do this because it gives information to your team, helping with your early game. And you try to get wards as deeply as you can so that you can see which direction the Jungler is pathing.
If you have the weaker level one, you can try to deny enemies entering into your Jungle and dropping their own wards, or at least make their ward drops worse. Or, if you’re extremely weak in comparison, you can drop your wards preemptively as a defensive measure.”
Bio: “One of the earliest and best wards you can place in Bot is either in the middle of brush of the lane, or if you’re stronger, the forward brush on your enemy’s side. We talked about this a bit before in our Support Lane Phase Guide, but these wards help you establish ‘the push’ against your opponent, making it easier for you to trade or engage against the enemy from level 1-3.
After that, there are some pretty standard locations to ward throughout the phase that can help keep you minimally safe. These locations are Tribrush, the River Brush, and just outside of the Dragon pit. These spots are your ‘worst’ locations because they don’t really offer you much in the way of information, but they do help you keep safe in Bot, so they’re good if your window to ward is small.”
As Bio said, this minimal coverage will keep you safe and tip you off to when the enemy Jungler is taking a Scuttle or attempting an early Dragon cheese. When playing from Blue Side, having one of your Pinks in Tri Brush is ideal since it helps keep your Jungler’s safest approach from lane clear. Typically, this Pink should come from the ADC. (Yes. ADC Mains, buy a pink if you have the gold.) The Support’s pink then can be used to control vision in lane. This is especially valuable to more lane focused Supports who have excellent tools to engage fights (hooks/roots/snares) from out of vision.
When you think about things from the Red Side, Tri Brush isn’t really a necessity to ward unless you’re being pressured under turret. Playing from Red Side typically gives you a safer laning phase since the enemy has less avenues to gank you safely since they must path into your side of the map. So, this location is typically warded only when you’re under pressure or threat of being dove. Additionally, getting a ward in the curve brush that enters your Jungle at the Blue Buff is also a great defensive ward that will alert you to a potential dive situation and help your Jungler with their resource trading with their counterpart.
Bio: “If your windows are wide, like if you’re crashing a wave, the enemy is playing a very weak early lane, you have a better roaming Champion at Support, or if your ADC is just really far ahead, there are more aggressive spots to ward that are typically deeper in the Jungle. From Blue Side, warding over the blue buff wall to get vision of both the Gromp and Blue is great for information. If that’s too far for whatever reason, you can settle for the curved brush just on the opposite side of the wall, that gives you vision of the entrance and the blast cone there.
Thinking from the Red Side, controlling Tribrush is important when you want to keep your opponent pressured at turret. From there getting a ward on the enemy’s Krugs, Red, or in the pathway over Dragon Pit can help know when you back off or what direction the Jungler is moving to.”
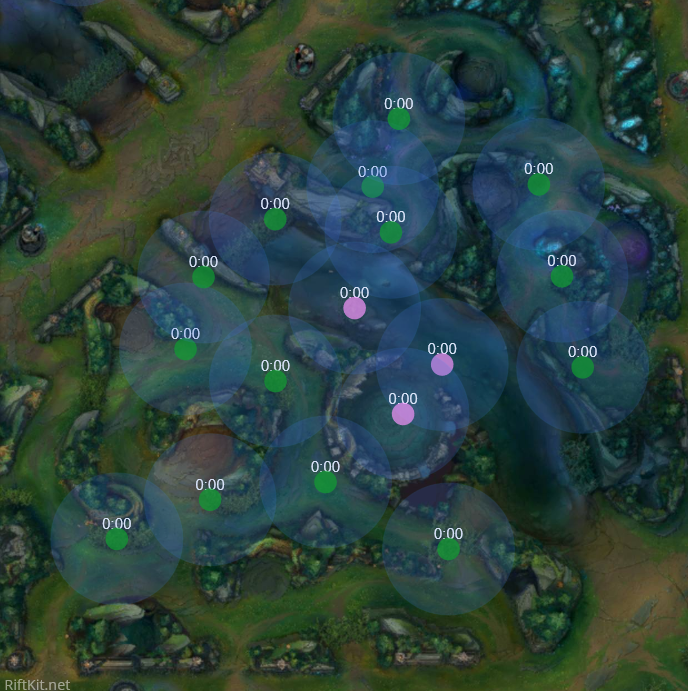
Bio: “When you have a lot of tempo over Bot, you can roam towards Mid and establish vision around the Mid Lane. These are the basic locations that you can drop coverage in:
Wards in the lane brushes are always great to help prevent ganks on your Mid Laner, they’re like river brush in Bot and are sort of the minimal ward location. The wards over the Mid Lane walls are good to catch pathing and incoming ganks as well, but can also be gotten relatively safely from the brushes/opposite side. The wards at Blue Buff, and deeper between Wolves and Mid often require a bit of support from your laner or Jungler. Oftentimes through the early game, players won’t check brush between Mid and Wolves so it’s a great spot to Pink to see the Jungler’s pathing. Additionally, when paired with a Raptor ward, you cover spots that Champions like Fiddlesticks, Kayn, and Zac like to play from.
These are also your most common spots to ward when you get into the Mid Game as well. So, when your Bot Lane has transitioned Mid and you’re looking to siege. The more aggressive you can be with the placement of these wards, the more rewarding they are.”
When it comes to the Pinks in the river or on your side of the map, these are often utilized in neutral or as defensive measures. The pixel brush wards and along the opposite red wall, are great locations to catch a Jungler in transition, naturally. Depending on what side you’re playing from, they’re also great defensive points if your Mid Laner is being put under pressure. These wards spot out movement, but also offer the information on dives.
Think you’re playing from Blue Side, if you Mid Laner is under pressure and at turret, it’s risky for you to move forward and attempt to establish vision in the river or enemy Jungle, solo that is. So, dropping a Pink or basic ward along your red wall covers the primary entrance of your Jungle. This lets your Mid Laner adapt around the potential pressure if the Jungler roams in. Thinking from the Red Side, wards serve the same purpose here as well.
Against the likes of Zac, Shaco, Evelynn, or Kayn, your wards have to be more adaptive than standard. The abilities of these Champions defy conventional warding locations and that’s what makes them so effective in Solo-Queue. (Well, that and their ability to steam roll games off of early leads.)
Naturally, you can’t have all of these locations warded at one time. But convention against these unique-angled Junglers is ‘the deeper the better’. Catching their approach is going to help you more than anything closer to line.
Bio: “When it comes to these early aggression Junglers like Xin, Shaco, or J4, when playing from Blue Side, if they start at Blue and look to gank bot early they’ll often path through Tri, straight down river, or in if you’re Shaco, come over your Tri Brush wall. The wards in the locations towards River are the preventative wards that will help against them at level 1.
Against a Jungler like Evenlynn, the biggest tip when warding against her once she’s level 6 is to get wards directly on top of her camps. She is forced to unstealth as she clears camps, so this is your best way of catching what side of the map she’s on.”
When playing from Red, these still help, but getting a ward over the wall down the alley to Krugs is also an okay option if you suspect an early Bot Gank and can’t get into Tri for whatever reason. The common second camp option after Red is Krugs, so if the Jungler sees they need a bit more time before their early gank, they’ll transition to the Krugs for clear and then look your way. Your ward here covers the approach if they try to come over the wall or sneak into lane.
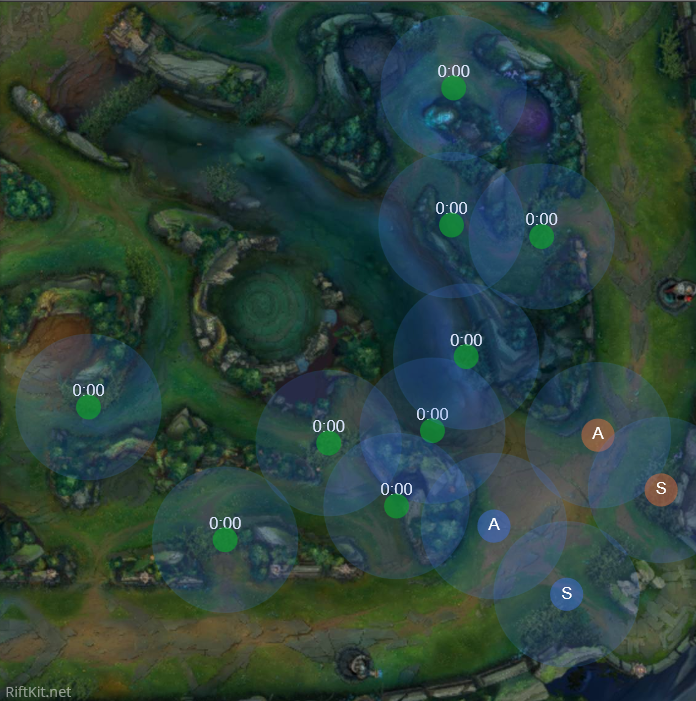
Bio: “Wards around Dragon are very similar to wards around Mid Lane. Minimally, you kinda just want wards around the entrances. Ideally, you want wards in each and every brush on the approach.”
Your wards around Dragon depend entirely on how large your window is. Your most essential wards as Bio mentioned are immediately at the entrances towards river. If you’ve got a number’s advantage or are capable of speeding your in and out, you can catch the wards around Red or Blue Wall, but you shouldn’t risk your life for these wards. In Solo-Queue, whoever takes the objective often boils down to whoever has the most people there or whoever got there first.
In this vein, if you’re on the team that is late to the Dragon, you want to take the pathway with the fewest wards and often with the most space for you to work with. This means you’ll likely be transition from Mid Lane and down river. Through this avenue you’ll typically only have to contest two or three wards which can generate enough pressure to create mistakes. If you’re extremely behind as a team, or are otherwise exceptionally late, it’s better to give the objective rather than walking in and dying for it.
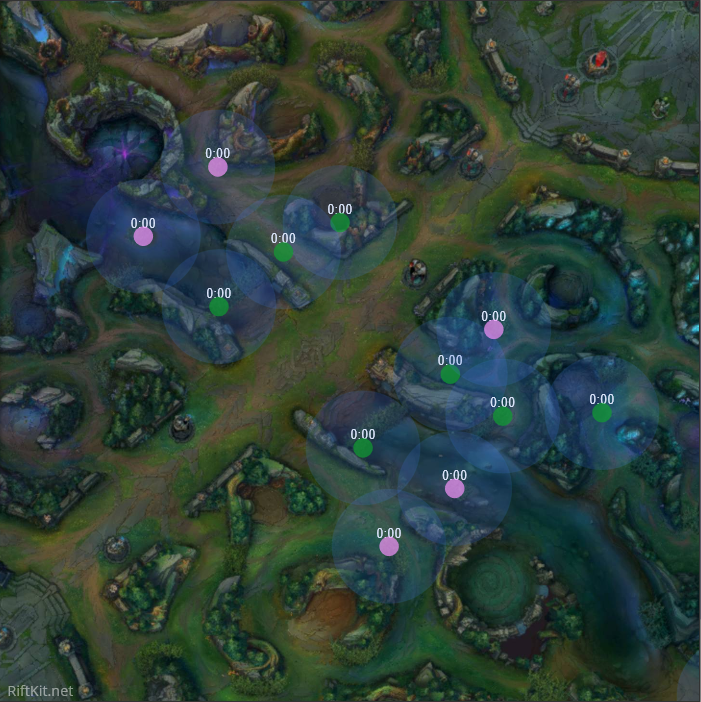
Bio: “Roaming to Top Side early is extremely risky and requires a lot of tempo or speed. But if you’re in a situation where your ADC can handle a 2v1 in Bot, if you can get up Top, an early gank from Support can genuinely shut the enemy Top’s lane down. You don’t typically ward when coming to this lane, but there are spots to cover when you’re coming to secure Rift Herald. These also serve as excellent spots to ward when looking to contest Baron.”
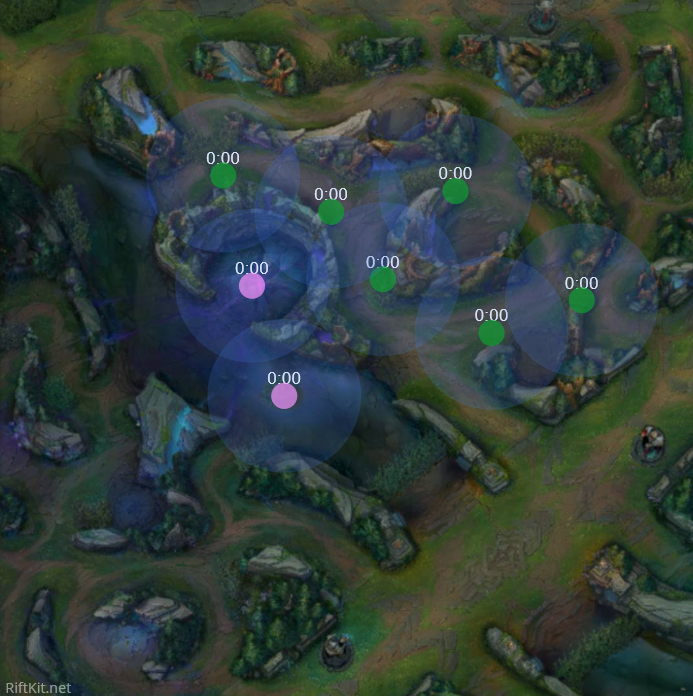
The Green wards cover common approach angles for enemies coming from lane or within the Jungle towards Herald/Baron. The Pinks are for direct pit control/river control when fighting in the area. In the case of Herald, you’ll often ward the pixel Brush and then drag Shelly towards it and fight closer to your Mid Lane to give your Mid Easier access to joining you. In Baron’s case, keeping the pit controlled is naturally important, and the pixel brush coverage denies enemies the ability to approach you from the primary river entrance from both sides.
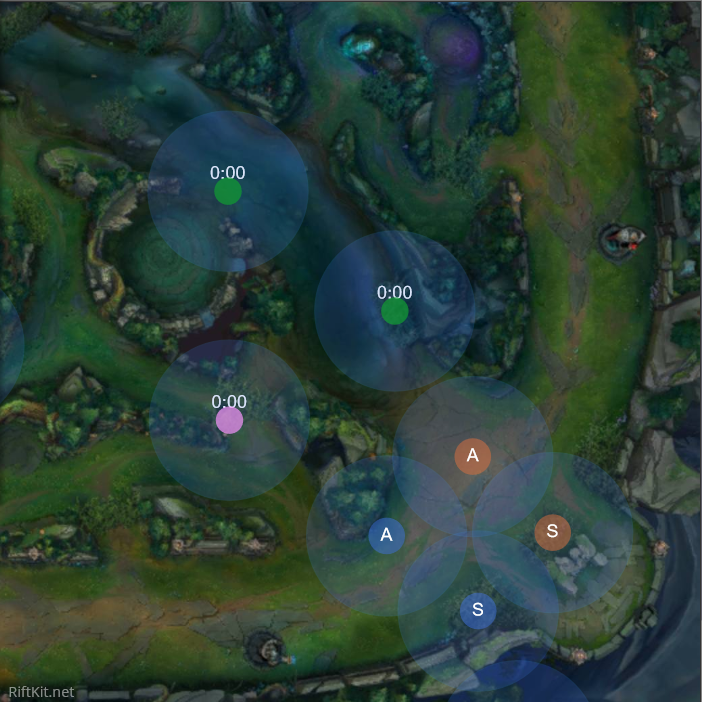
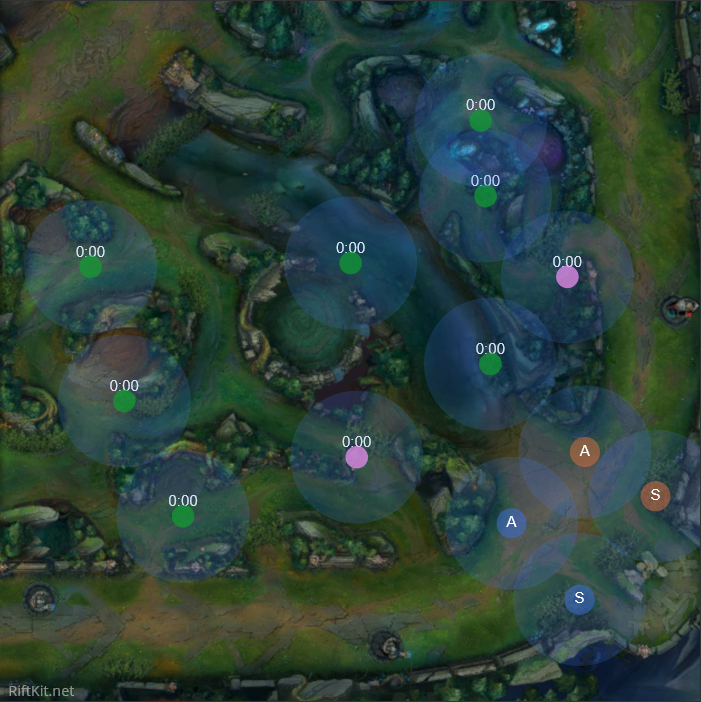
As you transition into the final stages of the game, have established your tempo, and are looking to control out the pace via sieging and pressure, you wards naturally begin to take over the enemy Jungle. Wards cover your flanks, transitions between side lanes, and are pressed against the enemy depending on how much pressure you can generate. Keeping these locations swept is also a huge deal since the enemy will look to clear these angles so they can try and catch a pick/approach through these angles. Additionally, vision control of these areas gives you transition advantage towards the neutrals that will end the game during the later phases, Dragon and Baron.
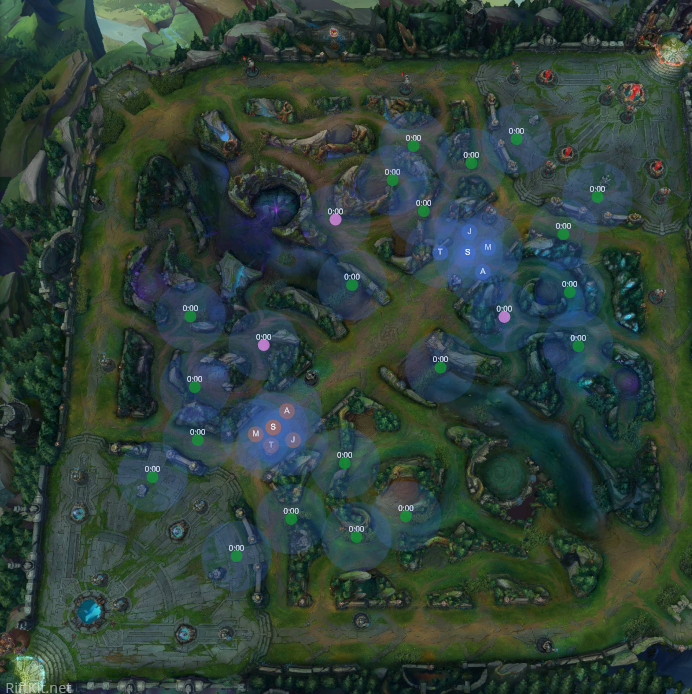
(For context, our Orange players here are Sieging and controlling a push against Blue Side, and our Blue Players are doing the same against Red.)
So, there you have it! Warding 101 complete! I’d like to thank Biofrost for taking the time to sit with me and work on this piece. We hope the information provided brings you a ton of success in your Support and Solo-Queue improvement. And remember, Vision Control is a team sport, not just the Support’s burden.
If you’d like to catch more of Biofrost, you can follow him at these social links!


