PUBG is a nuanced Battle Royale that takes thousands of hours to master. This article will be all about training and improving your aim. It will include two main tips for three different levels of player: beginner, intermediate, and advanced. Mastering PUBG’s shooting mechanics takes a long time due to the high amount of recoil and the difficult bullet mechanics. Even professional players only land around 8-13% of their shots, so don’t be discouraged if it takes some time before you start fragging out! The difficult learning curve is conquerable with consistent practice.
Beginner
Becoming Familiar with PUBG’s Weapons and Attachments
There are over 40 weapons you can choose from in PUBG, which can be pretty overwhelming at first. It is very important to become familiar with different guns, as you won’t find your favorites every game. Different guns have various recoil, damage, bullet speed, and bullet drop. It is highly recommended that you spend some time getting familiar with all of the different guns so you know what to expect when you pick one up in a high pressure situation in game.
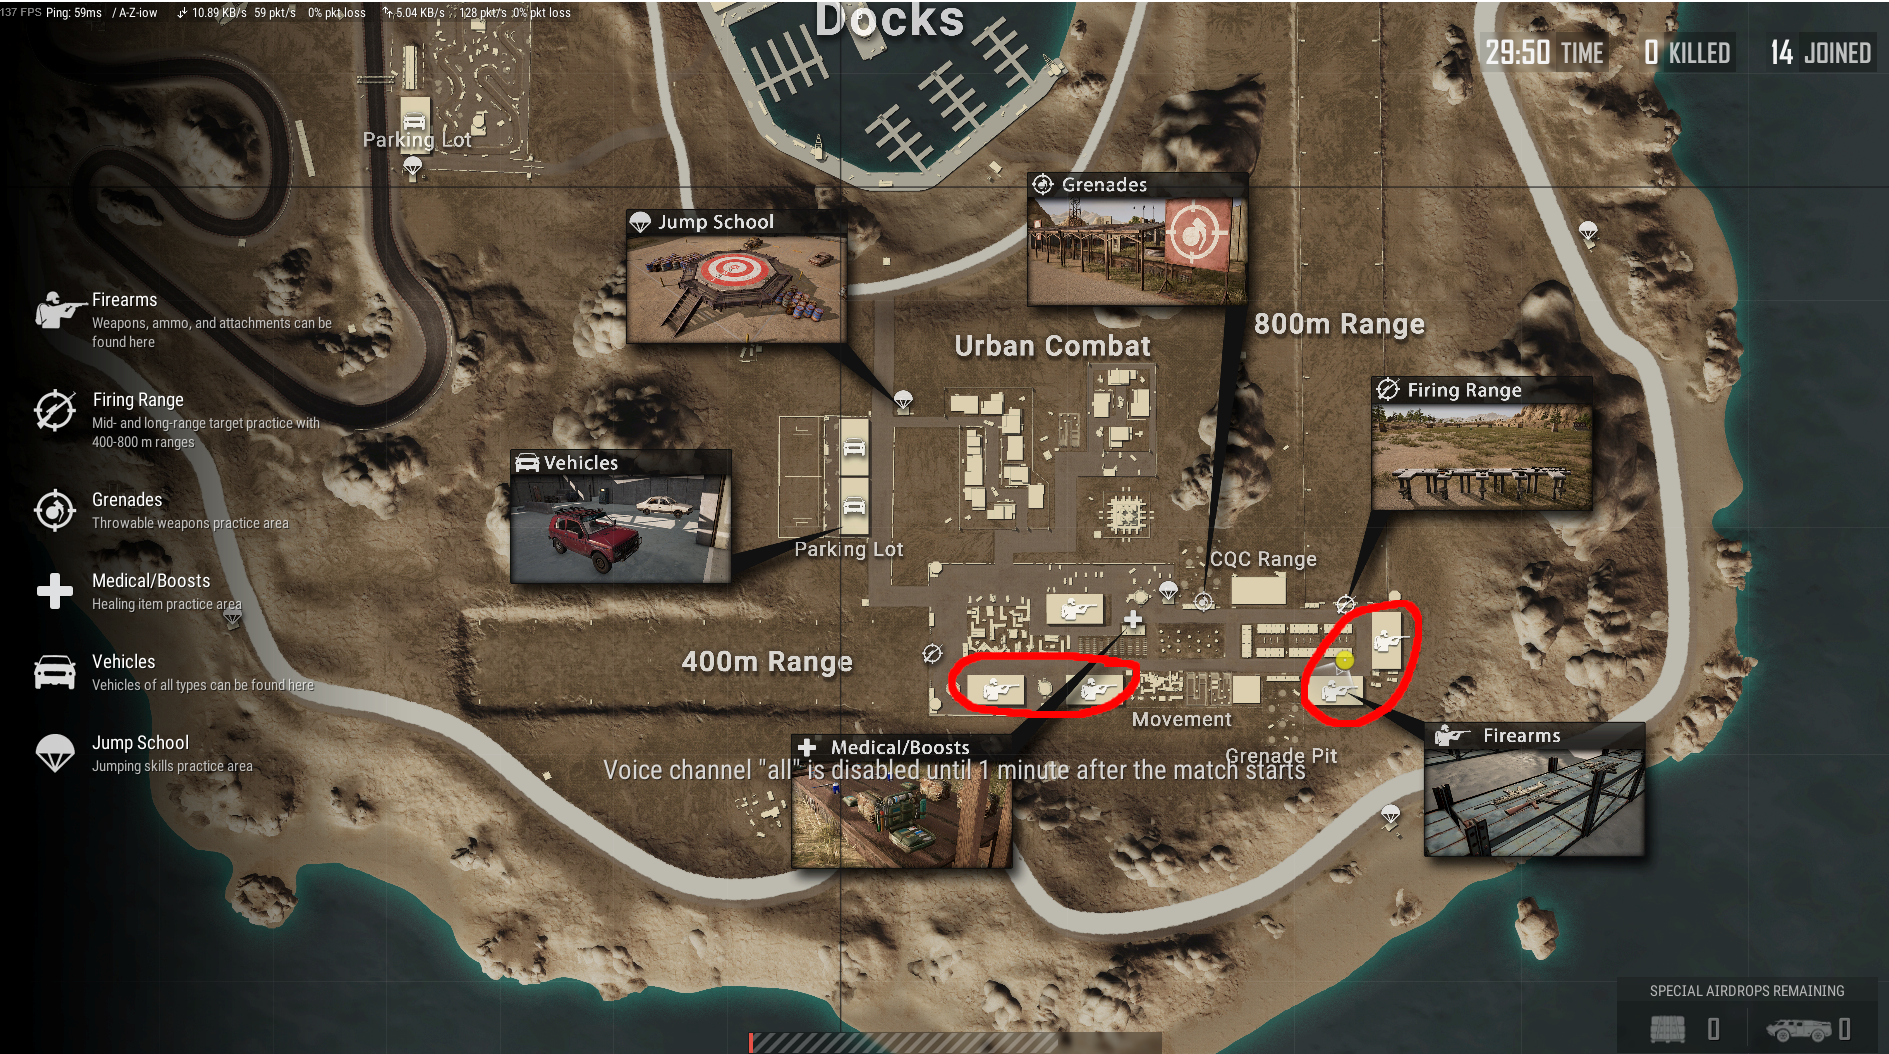
Fortunately, PUBG has a dedicated training map, the perfect place for honing your skills. Especially as a newer player this should be your go to spot for aim training and warming up. To get there, select the PLAY button in the upper left and then click TRAINING MODE beneath it. Once you load in, hit your map button and head to one of the warehouses with the “firearms” logo (circled in red below).

In this area you can spend some time with each gun. The other players practicing with you make for great targets! In these firearm warehouses you will also find all attachments and scopes. Play around with different attachment combinations and see which ones you prefer. The best overall attachment is the compensator. Attaching one will drastically reduce your guns' recoil, allowing you to hit the mark more consistently. Once you get a little familiar with all of the guns and attachments, you will get a feel for which guns you like most, and you can start to think about a loadout to look for in game.
Professional players typically use one AR accompanied by one DMR as their loadout, occasionally swapping the DMR for a sniper rifle. The idea is having one weapon (AR) used for close to medium range engagements, and another weapon (DMR) specializing in medium to long range fights. SMGs can hold their own in close range as well and have less recoil than ARs, so feel free as a beginner to use a SMG as your main automatic gun. However, vver time you should try to get used to having an AR as your close range weapon, as it is much more versatile. LMGs don’t see much action as an AR is better in nearly every situation. Shotguns are good if you’re camping in the corner of a house (frowned upon but useful tactic), but outdoors they are pretty useless. Pistols are never going to be your best option, so feel free to completely ignore them.
The ARs most commonly used by high level players are the M416, SCAR-L, Beryl, and AKM. The M416 and SCAR-L have slightly less recoil but do slightly less damage than the Beryl and AKM. All four are very viable, and it is recommended you get familiar with them over time. The DMRs most commonly used are the Mini14, SLR, and SKS. The mini is similar to the M416 and SCAR-L, doing less damage but having less recoil. The SLR and SKS hit harder but their lower bullet velocity and higher recoil make it harder to hit your targets. Getting used to these weapons early on will be tough but pay dividends in the long run. Once you decide on your preferred loadout, you’re ready to focus more on PUBG’s shooting mechanics in order to master your favorite weapons.
Intermediate
Bullet Drop and Leading Your Shots
As a more intermediate player, it’s time to become proficient at understanding PUBG’s shooting mechanics. Every bullet you fire takes time to fly through the air and will slowly drop. It is crucial to know your scopes will be zeroed to 100 meters by default. This means if your target is 100 meters away your bullet will land exactly where your crosshair is. However, as the distance between you and your enemy increases, you will need to adjust your aim to counter the bullet drop. With long range weapons such as sniper rifles and DMRs, there isn’t need to adjust within 200 meters. At 300 meters with an 8x scope, you will need to aim at the first dot below where the two lines meet in the center of your screen. After 300 meters the amount of drop begins to vary between the different weapons. We will cover that in a future article which will be a deep dive into bullet drop with all types of guns and scopes.
A great way to improve in this aspect is to run a couple hundred meters away from a group of people in training mode and train on them. You won’t always know exactly how far away an enemy is in game, so it’s useful to practice a lot and get a feel for how much you need to adjust without having to know an accurate distance.
Keep in mind that the larger scope you have equipped, the higher up it will look like you have to aim on your screen. For example, using a DMR at about 300 meters, you can get away with aiming just a few pixels about your enemy’s head with a 3x scope to hit a headshot. However, with an 8x scope, you will need to aim several pixels above the top of their helmet. Just like with recoil, lots of time in the training mode is the key to success to mastering PUBG’s bullet drop.

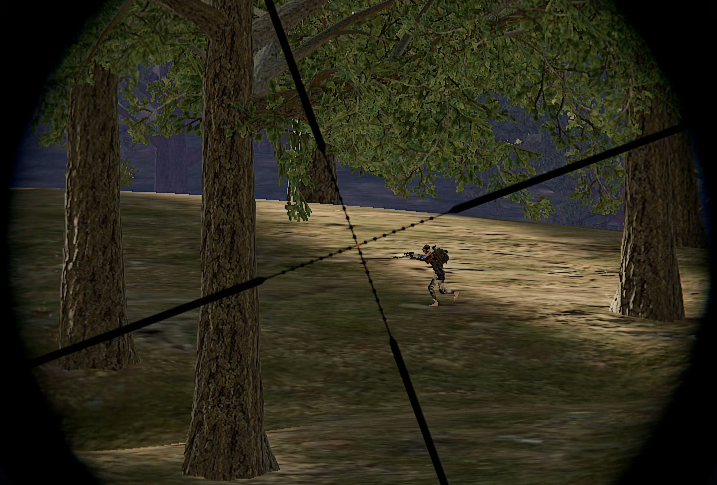
Hitting a static target at a distance is already tough but hitting a player far away and on the move can prove even more challenging. When presented with a running enemy, you will have to aim where you think they will be when your bullet reaches them, a skill called "leading your shot". The above screenshot is an example of where I aimed moments before a headshot kill. You can see I had to aim several feet in front of this player as they were running about 250 meters away from me (and only barely above his head as this was a sniper rifle). A good way of visualizing the concept is thinking about a team sport like soccer. You will often see a player pass the ball in front of their teammates’ current position, aiming for where their teammate will be in the half second it takes the ball to travel the distance. You want to apply this strategy.
The ideal way to improve at this is to go into training mode with a friend. One of you runs back and forth while the other takes shots practicing how much you have to lead with various guns and scopes. If you don’t have a friend willing to do that, you can usually find people in training mode running around for short amounts of time going to grab another gun or more ammo. Try to focus on anyone running while you can. Just like with recoil and bullet drop, each gun will feel a bit different and take practice to get used to. This is the most difficult of PUBG’s shooting mechanics to conquer and once you have a good feel for it you will pick up a lot more medium to long range kills.
Advanced
Crosshair Placement and Drive-Bys
Once you have confidence in your loadout and have a good understanding of PUBG’s bullet mechanics, it’s time to focus on some advanced tactics to take your game from good to great. The first advanced tactic is crosshair placement. The concept here is before you ADS you put your crosshair on or very near your opponent’s center of mass before you aim down sight or “ADS”.
This way you will only have to make small adjustments when you have ADS’d and are much less mobile and more committed to taking the aim battle. With how difficult the recoil can be in PUBG, it is extremely tasking to adjust your aim significantly while also controlling the recoil. Proper crosshair placement prevents this issue and will allow you to take down your opponents in shorter bursts instead of long sprays. Once you obtain consistent crosshair placement, you will have a much easier time grasping the final advanced tactic: drive-bys.
Despite a recent nerf, drive-bys in PUBG are still a viable tactic while being a lot of fun. The drive-by is an aggressive strategy where you gamble your opponent won’t be able to shoot you out of your moving vehicle before you can take them out from your vehicle. This is typically done either for fun or as a last ditch effort to take over a strong terrain location.
In order to pull out your primary weapon and shoot it while still moving, you need to switch seats while simultaneously holding down forward + boost (shift + W by default). This takes a lot of coordination in your fingers, so as always make sure to practice in training mode first. Many players even switch up their keybinds in the settings to make this maneuver easier and more comfortable. Also, try to switch to a seat on the far side of your opponent if possible. This way your character will lean up and above the car when you ADS and some of your torso will still be protected by the doors and roof of the car, making you a smaller target for your opponent.
It’s important to get a handle on crosshair placement before drive-bys because of how crucial the initial shots of a drive-by are. You not only have to control your recoil, but also continuously track your opponent as you drive past them at a high speed. Additionally, after your first few bullets, you are usually beginning to coast past your opponent at a high rate of speed, meaning your shots are going to be from longer and longer range. Even professional players usually cannot confirm a drive-by kill if they miss their initial three to five bullets. Over time and with accurate crosshair placement, the drive-by can be a key strategy to many late game plays that win games.
Conclusion
This guide should help players of all levels improve their aim, from the basics up to advanced tactics that can be the difference maker in a win or lose situation. The most important takeaway should be to consistently practice if you can. Even just 15 minutes per day in the training mode working on the basic fundamentals of recoil control and bullet mechanics will keep your aim crispy for when you have time to pursue that chicken dinner.


