While having an optimized game won’t necessarily make you a pro, it is a step in the right direction. If you want a smooth-running game with high FPS you need to optimize your CS2 Settings. You don’t want your ranked climb to be halted by something as basic as poor settings.
But, with so many options and settings, how do you find the correct one that will boost your game’s performance? The CS2 settings tab can be a bit technical for some people and finding the optimal settings would take time. To avoid this tedious loop of trial and error, we have made this CS2 settings guide.
We will cover everything from resolution, HUD, graphics, crosshair, and much more. We have a lot of information to cover so let's get right into it.
Best CS2 Video Settings
You will need to optimize the Video Settings in CS2 to improve your FPS.
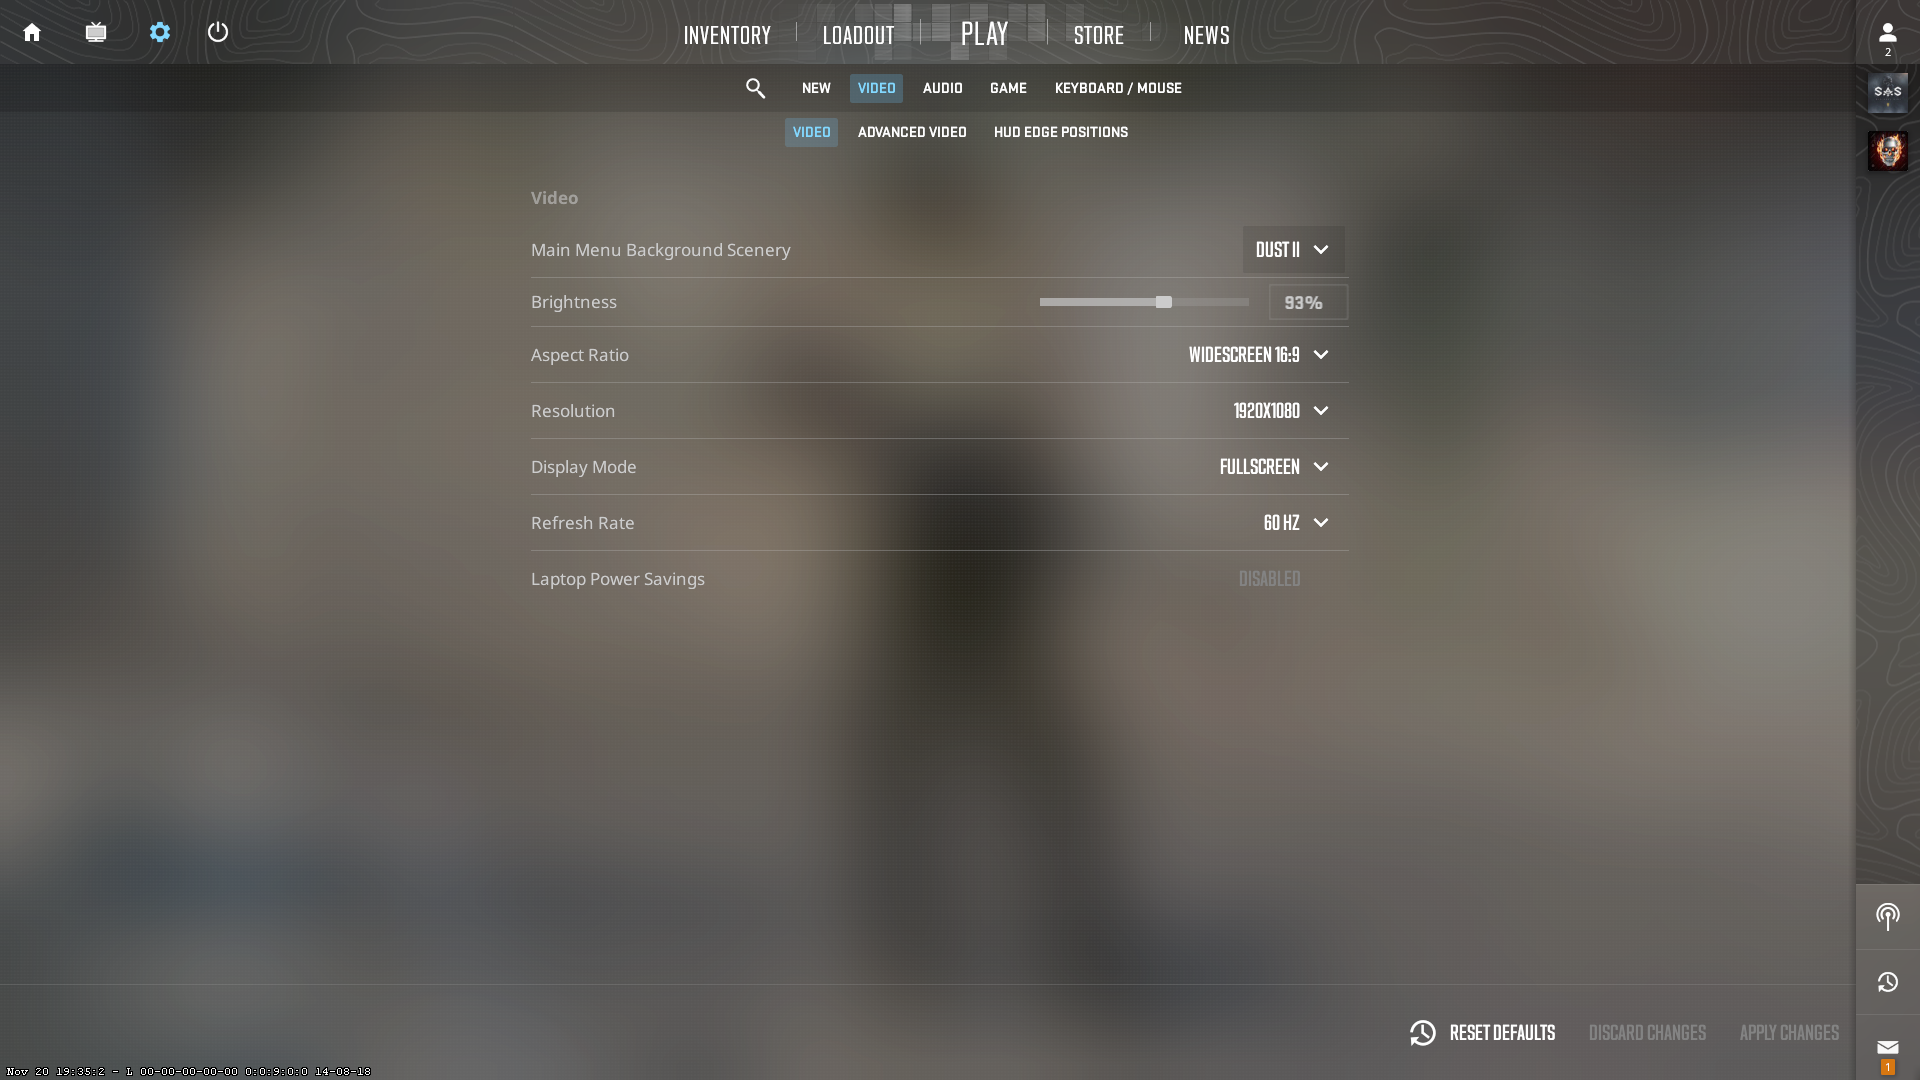
Video
- Main Menu Background Scenery: Personal preference
- Color Mode: Computer Monitor
- Brightness: 95 - 105%
- Aspect Ratio: 16:9 (You can also go for 4:3 if you prefer stretched)
- Resolution: Set it to your monitor’s native resolution. This gives the least input lag.
- Display Mode: Fullscreen
- Refresh Rate: Maximum
- Laptop Power Savings: Disabled
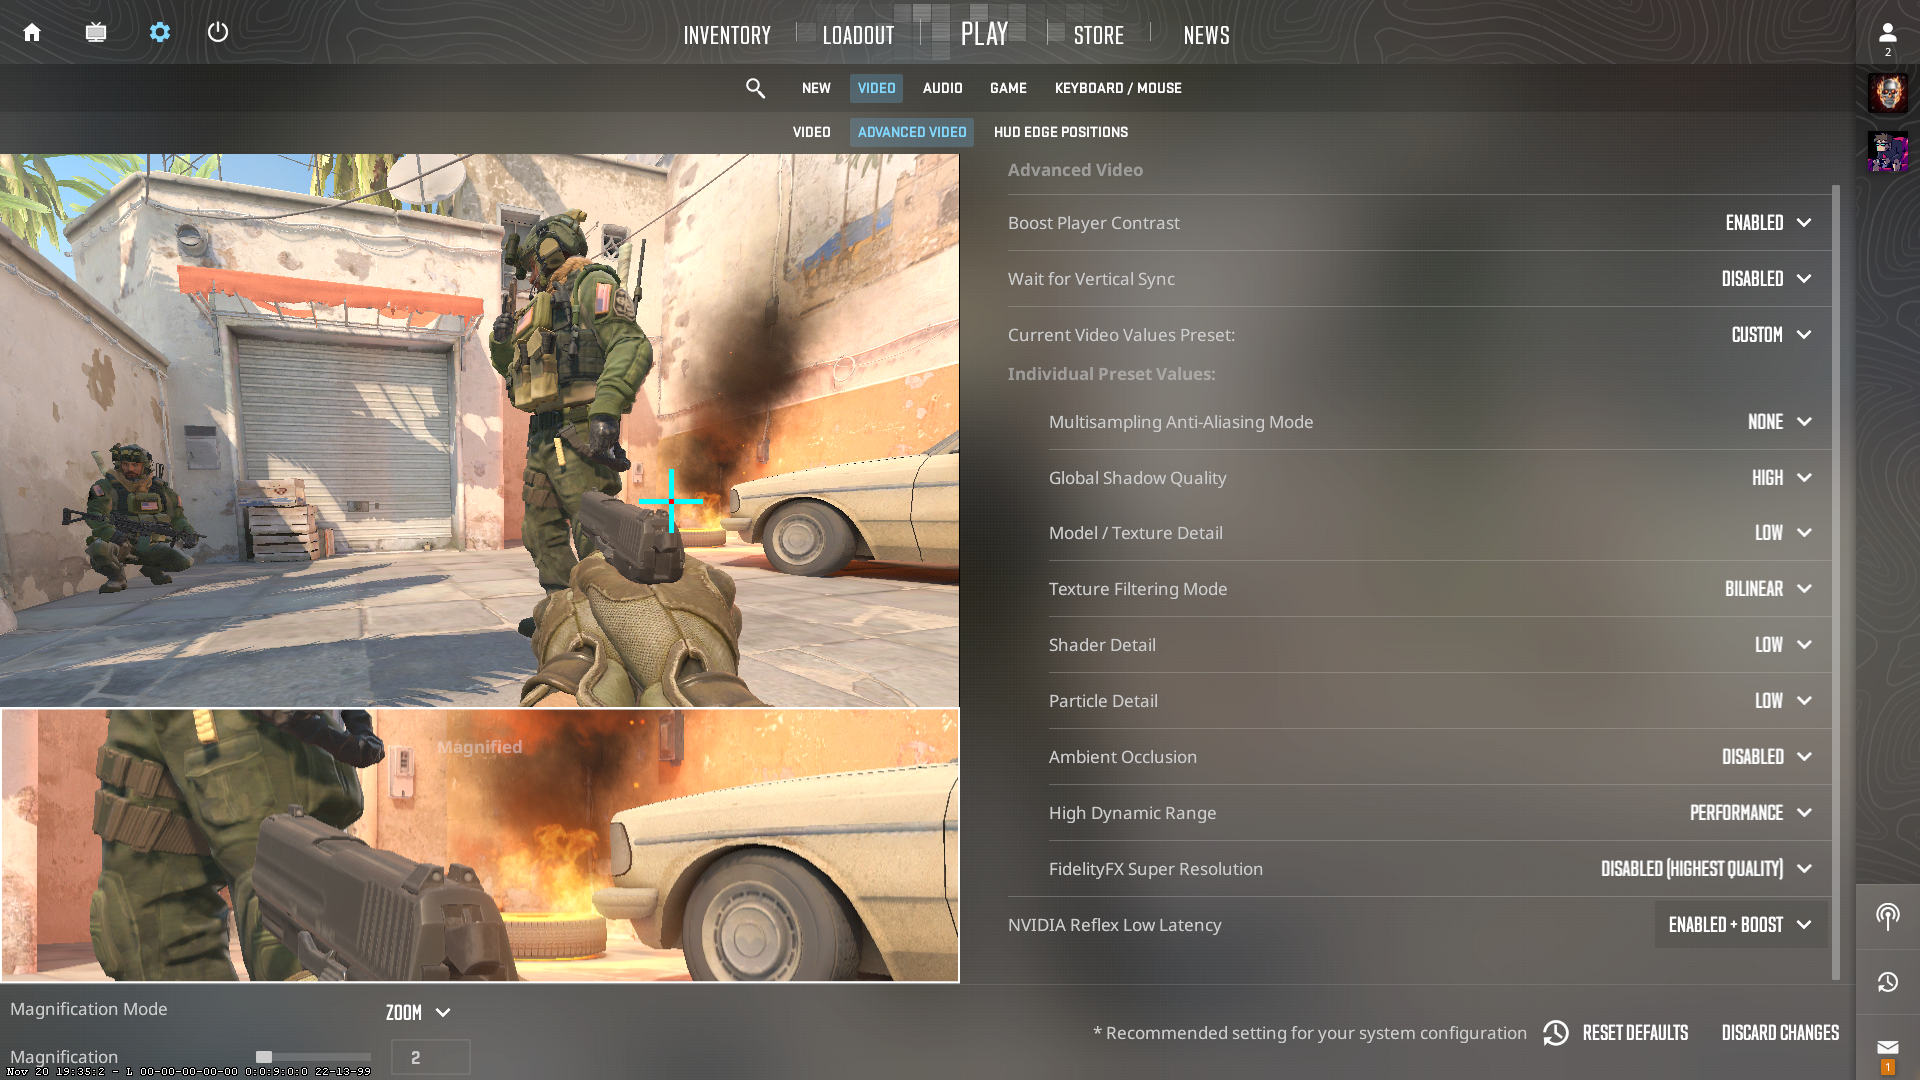
Advanced Video

- Boost Player Contrast: Enabled - Allows you to see enemies more clearly
- Wait For Vertical Sync: Disabled - Increases input lag
- Current Video Values Preset: Custom
- Multisampling Anti-Aliasing Mode: None - Improves the graphic fidelity of edges, increasing it can cause low FPS. However, if you see a lot of shimmering you can set it to CMAA or 2x MSAA.
- Global Shadow Quality: High - You can also go for Very High if it doesn’t affect your FPS much. This makes shadows sharper which helps you spot the enemy's shadows more easily.
- Model / Texture Quality: Low - Controls the resolution of textures and models in the game.
- Texture Filtering Mode: Bilinear - Controls the appearance of textures, higher means more detailed.
- Shader Detail: Low - Controls how realistic the shadows look in your game, increasing it affects game performance.
- Particle Detail: Low - Controls how realistic and detailed particles look, like smoke from the molly, etc.
- Ambient Occlusion: Disabled - Eye-candy setting, keep it disabled for better FPS.
- High Dynamic Range: Performance
- Fidelity FX Super Resolution: Disabled
- NVIDIA Reflex Low Latency: Enabled + Boost
The HUD Edge positions tab is entirely personal preference, leaving it at default is fine as well. With these settings, you should see a significant improvement in your framerate and input delay.
Resolution - Stretched or Normal?
A good amount of pros opt for stretched resolution rather than normal. There are pros and cons of using both. Stretch res improves FPS since you are playing on a lower resolution (GPU has to render fewer pixels, hence more FPS). But the biggest reason pros opt for stretched res is because it makes enemies look wider making them easy to shoot. Stretched res doesn't widen the hitbox it just stretches the screen giving the effect of wide enemies.
However, there are also disadvantages to using stretched res. Firstly, the graphic fidelity is awful, the visuals of the games get very ugly. The other big con is your FOV (field of view) is decreased. The reason the pros still choose stretched res is because you can get used to the cons. You’ll get used to the bad graphics and the lower FOV. In return, you get more FPS and slightly easier-to-hit enemies.
The decision ultimately comes down to personal preference. It should take a bit of trial and error to see what you are comfortable with.
Best CS2 Audio Settings
Now that we have optimized your game to produce more FPS, let’s move on to the audio section. Most of the audio settings are personal preference. However, CS2 introduced three new settings, EQ Profile, L/R Isolation, and Perspective Correction. We recommend you set them to these for the best spatial audio.
- EQ Profile: entirety personal preference, play around with all.
- L/R Isolation: Keep it at 0%
- Perspective Correction: Yes
For the other settings use these,
- Master Volume: Preference
- Audio Device: Default Device
- Enable Voice: Press to use mic
- Streamlined Push to talk: Yes
We also recommend turning all the music off except the Bomb/Hostage and Ten Seconds Warning. This makes sure you don’t get distracted by loud music playing in the background.
Best CS2 Game Settings
These settings won’t make your game feel smoother or give you more FPS. However, they are quality-of-life improvements and might make the game experience better.
Game
- Max Acceptable Matchmaking Ping: 60 (Increase it if you can’t find a match)
- Display Network Connection Issues: Automatically
- Max Acceptable Game Traffic Bandwidth: Unrestricted
- Enable Developer Console (~):Yes
- Install Counter-Strike Workshop tools: No
HUD
- HUD Scale: 0.90 (Minimum size so it doesn't block your FOV)
- HUD Color: Preference
- Large Player Count: No
- Community Notification Location: Top Right
- Community Notification Horizontal Offset: 0
- Community Notification Vertical Offset: 0
Team
- Show Team Positions in HUD: Show location and equipment
- Show Player Colors in Competitive: Show colors
- Use Player Colors on Team ID: No
- Friends Lobby Default Permissions: Personal Preference
- Looking to Play when Counter-Strike Starts: Remember last state
Communication
- Player pings: Display and sound
- Mute Enemy Team: No
- Mute All but Friends: No
- Allow Animated Avatars: Yes
- Hide Avatar Images - Preference
- Clean Player Names - Preference
Item
- Quick Graffiti (Apply With Key Release) - Yes
- Delay Sniper Rifle Un-Scope After Shot - No
- Auto Re-Zoom Sniper Rifle After Shot - Personal preference
- Detach Silencer On M4A1-S And USP-S - Disabled
- Viewmodel Position - Personal preference
- Always Show Inventory - Yes
- Open Buy Menu With Use Key - Yes
- Buy Menu Number Keys - Number Keys Buy Items
- Buy Menu Donation Key - Personal preference
- Last Weapon On Radial Weapon Tap - Yes
Radar/Tablet
- Radar Centers the Player: Yes
- Radar Is Rotating: Yes
- Radar HUD Size: 1
- Radar Map Zoom: 0.60
- Toggle Shape with Scoreboard: Yes
Crosshair
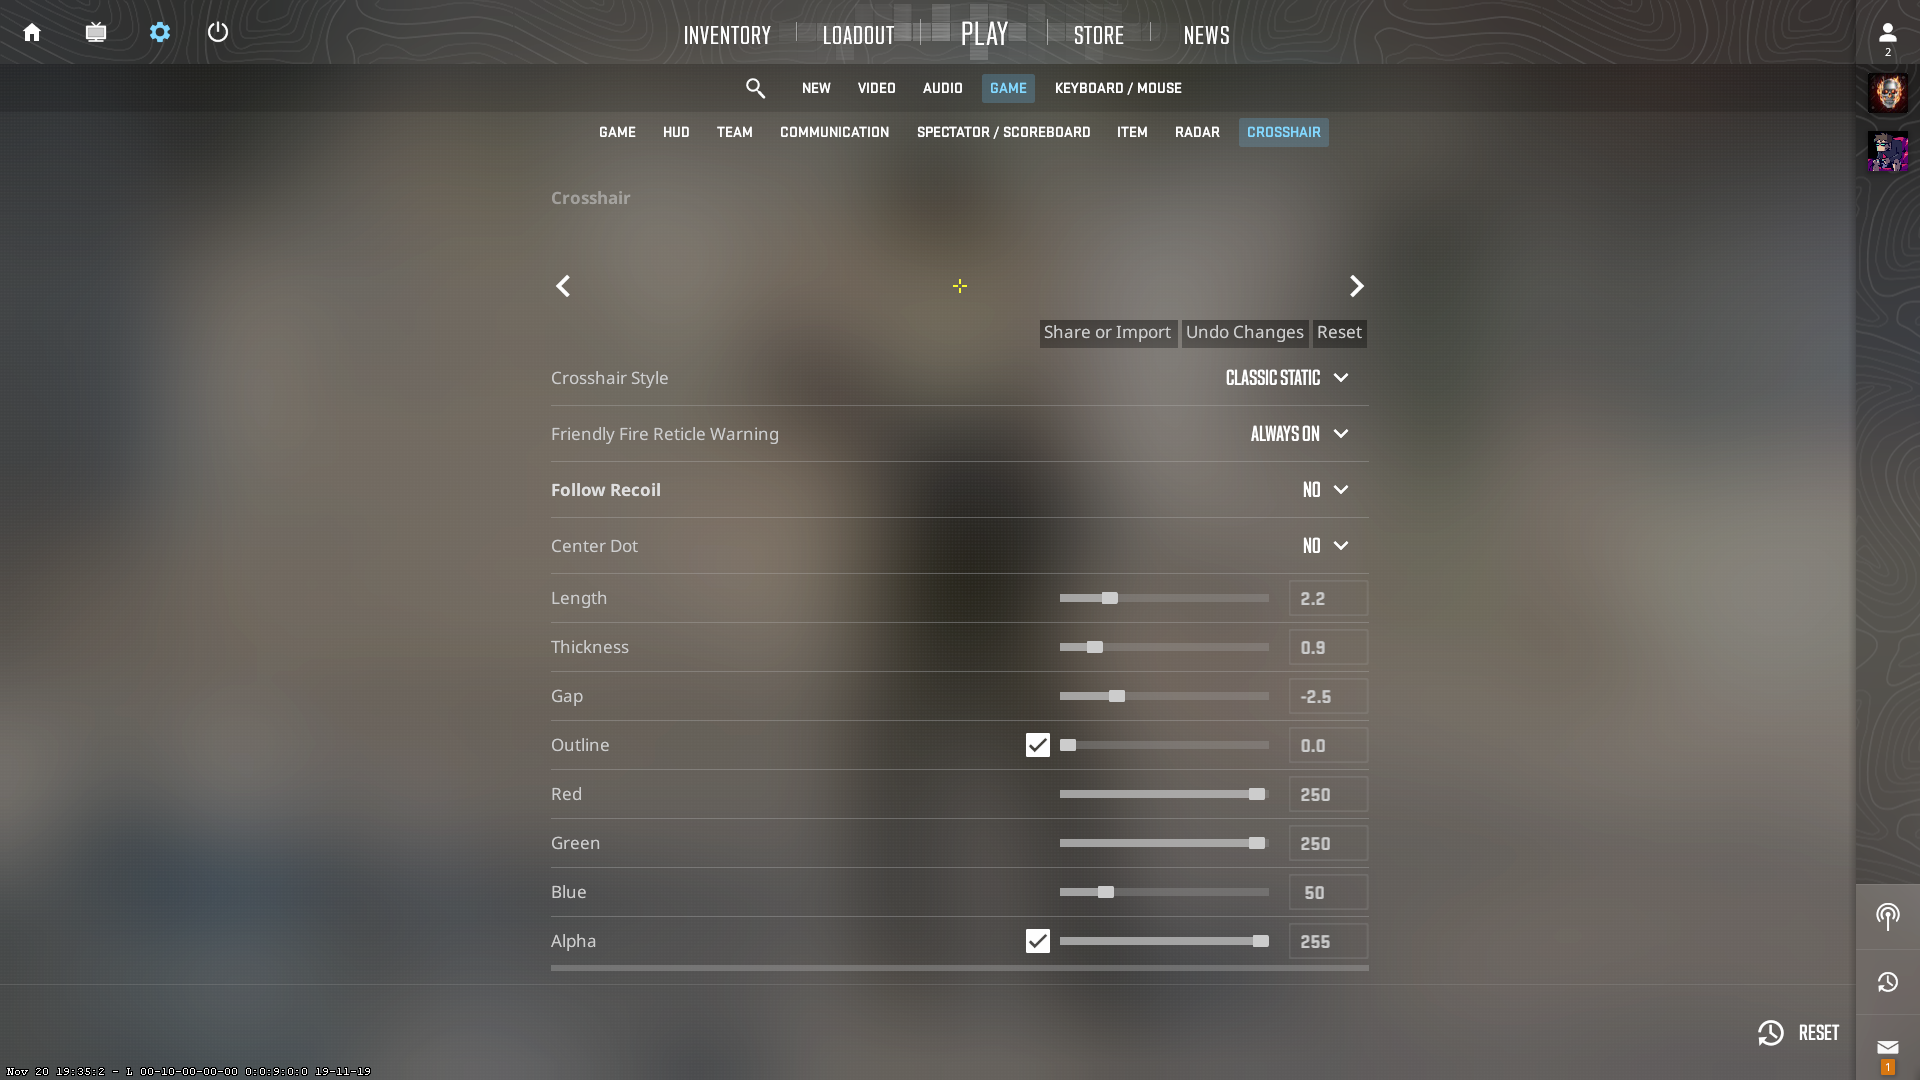
Crosshairs play an important role in helping you aim which is why you spend a good amount of time creating and fine-tuning your crosshair. You need to make a crosshair that is easily visible and comfortable to play with.
You can try to create one from scratch and then improve it with trial and error OR you can try using a pro’s crosshair. You can then fine-tune that pro’s crosshairs to your liking.
Here are some pro crosshairs you can try out.
s1mple - CSGO-OCskf-qjunY-FE6T6-rsTR9-7SVvD
broky - CSGO-mbppN-WGdqq-XeBH8-bmdyV-fxwPB
rain - CSGO-mbppN-WGdqq-XeBH8-bmdyV-fxwPB
Spinx - CSGO-HsTKJ-UzdPk-qvWjm-Y2FDE-eJH8D
electroNic - CSGO-RF8AU-LQcx8-erXvR-V45TS-Rx6KQ
XANTARES - CSGO-UOrzd-vO3VJ-d9GDb-f96Sj-K564E
Zywoo - CSGO-Qzpx5-BRLw8-xFPCS-hTns4-GHDhP
mONESY - CSGO-9DiTj-65KbT-sfshG-qB5ce-mRFuA
Niko - CSGO-UwUWf-AScRw-fmW79-woFNe-wLsuL
Sh1ro - CSGO-6eZMU-Ajpmt-2e57w-QaBao-3kYbD
To load these crosshairs click the import button in the crosshair then paste one of these codes. You should now have these crosshairs equipped. Play around to see if you are comfortable with them and then fine-tune them accordingly.
Keyboard/Mouse Settings
For the keyboard binds, most of it is a personal preference. The only thing that you might need to do is to bind jump to the Mouse wheel up or down to allow for bunny hopping.
Next up is the mouse sensitivity, this is also entirely personal preference. This is the most tedious part of figuring out your settings, finding the perfect sens requires a lot of trial and error. Once you do find a sens you are comfortable with then stick to it - Consistent sensitivity results in consistent aim.
Also, disable mouse acceleration in Windows settings. To do this follow these steps.
Click the Windows Icon then the Settings Cog
From there navigate to Device > Mouse.
At the top right, click on Additional Mouse Options.
Under the Pointer Options tab, untick Enhance Pointer Precision.
Conclusion - Best CS2 Settings Guide
Well there you have it, your CS2 is now tuned and ready. You should be getting better FPS now and the game should feel smooth and more responsive. The journey to Global Elite is a long one and having the optimal settings is a nudge in the right direction. Of course, you have to improve other aspects of your gameplay.


