


Understanding Early and Late Positioning in TFT
Positioning your units is key to climbing the TFT ladder. Learn how to effectively position and adapt to any board. Take advantage of key unit abilities and how they change where you place your units.
Positioning your units is key to climbing the TFT ladder. Learn how to effectively position and adapt to any board. Take advantage of key unit abilities and how they change where you place your units.
You’re down to single digit health, you have no gold to reroll or level up, and you scream to nobody in particular about Mortdog, yelling “Please Riot!”. The only thing you have left to save your board is how you position your carries and tanks. We’ve all been there, even the most competitive TFT players find themselves in this predicament. People will tell you to simply play the strongest board at all times, and yet the question remains: What is the strongest board?
In this guide, we’ll go through how to understand and use strong positioning to play better boards in the early game. We also consider transitioning from the early to mid-game, and considering special quirks with units.
The moment you begin your game, you should be thinking about your optimal position, especially in the early game. Many players often handshake on how they play their board in the early-game, placing their carries in the far left corner, and centering their tank.
One of the most common early game boards revolves around two front-line units, and cornering their carries. Here is an example with the fairly common Kog’Maw reroll comp.
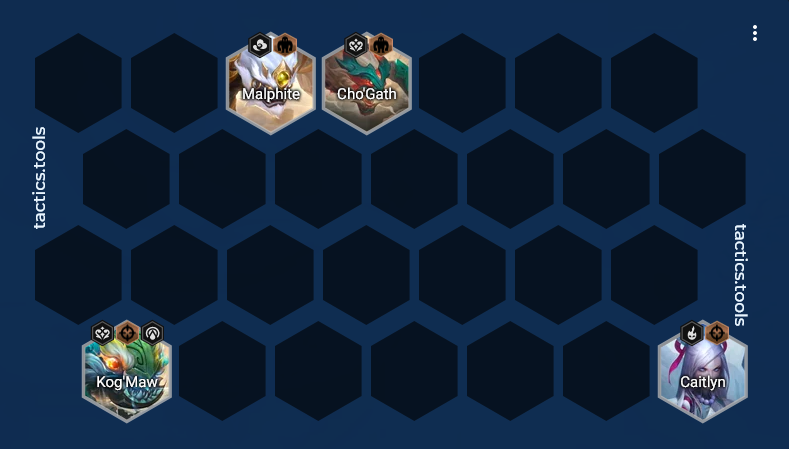
Example boards created using tactics.tools
At first, you may see it as a normal board and will mostly build up from there. It has all the right ideas in maximizing the Sniper trait’s damage for Kog'Maw and allows your Caitlyn to snipe the carries in the back. It is a versatile and flexible position. But there are different ways to play this board.
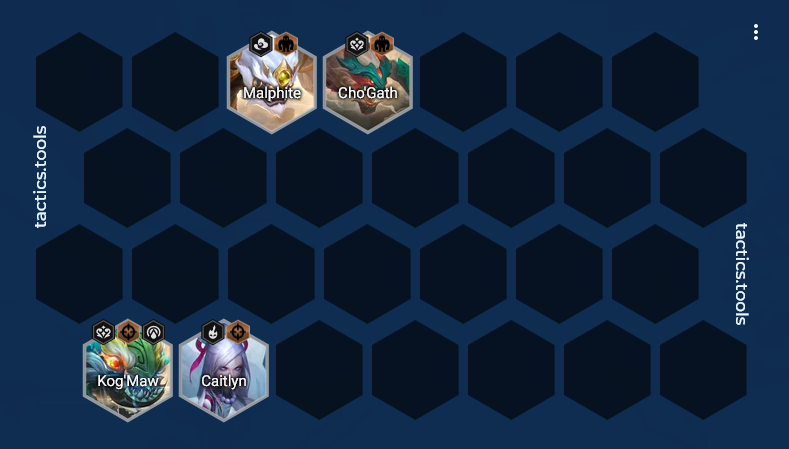
Consider this variation, where Caitlyn now sits beside Kog’Maw. What changes now is that both Kog’Maw and Caitlyn will more likely hit the same target, allowing them to break through the frontline together faster. It also makes Caitlyn more likely to use her skill on the opposing tank, letting you reach the carries in the back faster. It even gives your Kog’Maw some form of protection against certain team comps, where Caitlyn will likely be targeted first before Kog’Maw.
You play the first example if you think that Caitlyn sniping the back row carries is more important, especially if you think she can one-shot them. Playing the second line lets you focus-fire your damage output onto a single tank and eliminate their front line faster. These kinds of decisions for how you place your units depend on your board, augments, items, and how your opponent plays the game. Here is a key example of playing around the most common board.
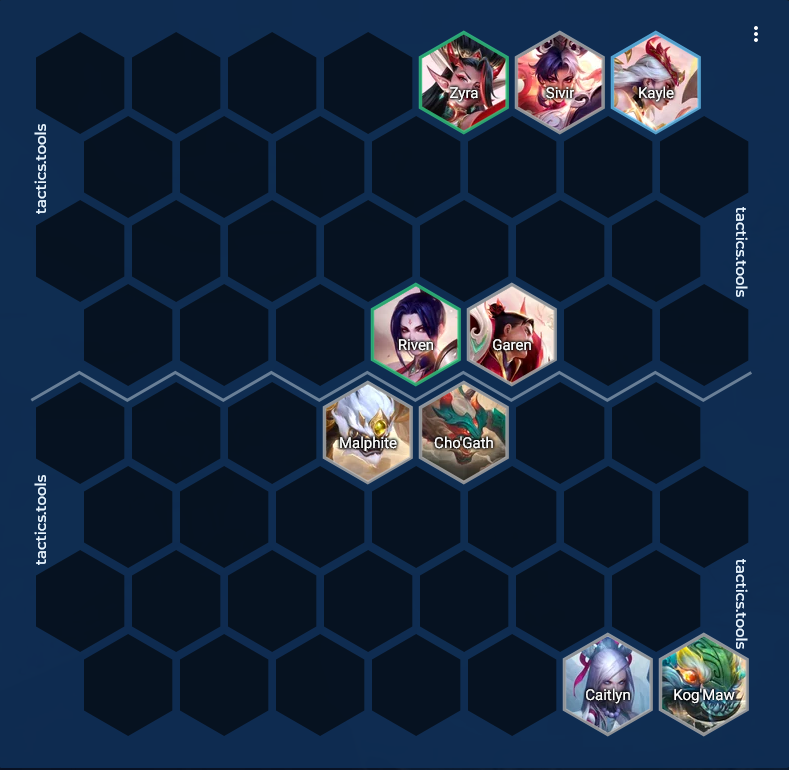
Consider Kog’Maw’s ability that gives him bonus range every time he casts, and the common early game Storyweaver line that plays their carries close together to benefit from Sivir’s buff. This is where you take advantage of your knowledge of how other team compositions line up their units, and the habits of players who auto-pilot their boards. Ideally, both Caitlyn and Kog’Maw will auto the same target, and Kog’Maw builds his range long enough to be able to snipe the backline from his position.
This kind of play also varies, where you can slightly shift Caitlyn to the left in order to make her target a different unit with her ability. This all depends on what your board is capable of, and what will grant you the best possible way of winning the fight. If many players are playing similarly with their carries on the left-side, this is where Kog’Maw’s positioning matters the most to enable him.
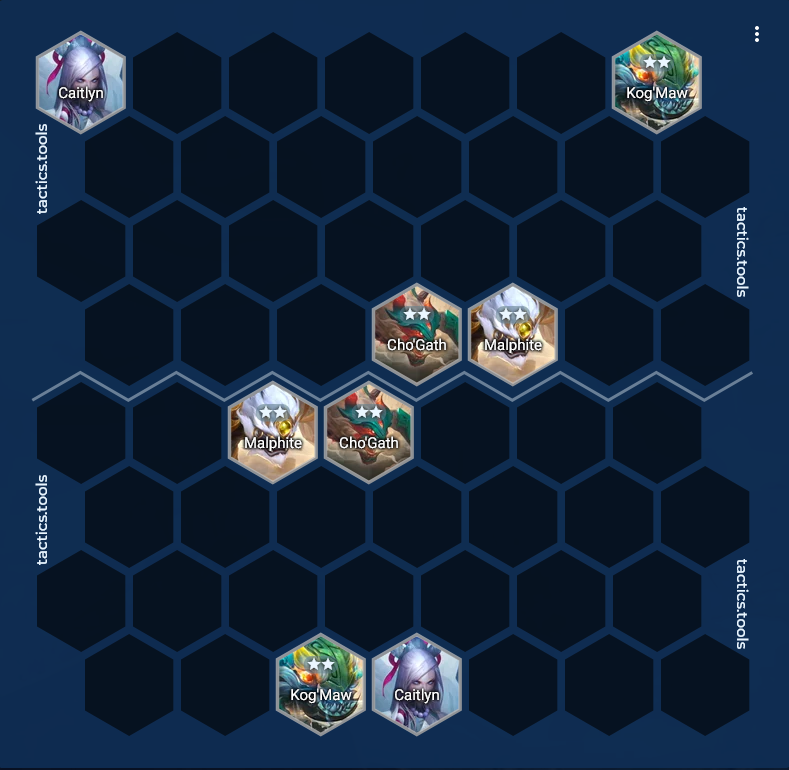
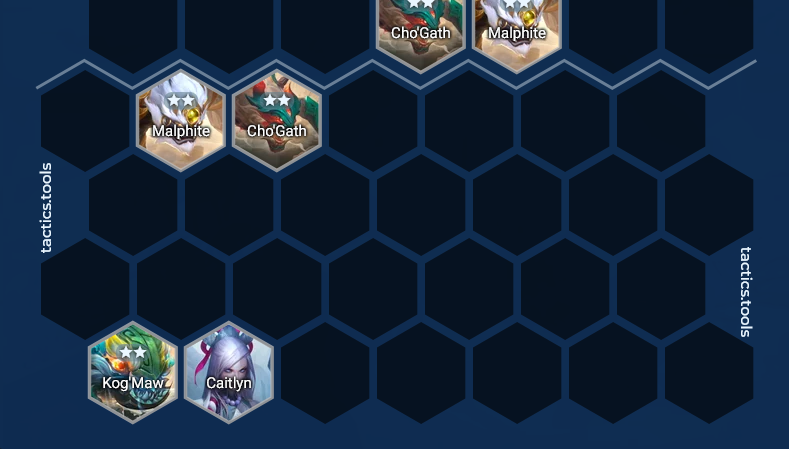
Here is a final early-game board example of Kog’Maw, featuring the ever-dreaded mirror where you find yourself cursing the other player for contesting. The only way out is by demoralizing them to pivot by winning and having better econ to roll down.
At first, this kind of board looks quite weak for the player-side. A centered Sniper like Kog’Maw and Caitlyn lose a bit of damage against tanks. Their Kog’Maw and Caitlyn have a slight advantage assuming itemization and board strength is equal (it almost never is but hear me out.). However, we are positioning this board for a different purpose than maximizing damage. We are trying to both protect our carry from Caitlyn while hitting the same target.
The last time Snipers were valuable as a centered carry was with Set 9 Akshan, where centering him allowed him to find more favourable spots to snipe the backline with his carry. Caitlyn is played in a similar fashion, except we are trying to snipe the weaker carry in the opposing Caitlyn. Our goal here is that Caitlyn removes the more vulnerable enemy Caitlyn with her ability, while both our snipers hit the same tank. It has Malphite in a position to tank the enemy Caitlyn's ability to let the carries continue to do more damage.
Yet even then, this positioning may be inferior for numerous reasons. Your Caitlyn may not have the damage to remove the other Caitlyn, or their Caitlyn bursting down your tank first is the winning position. In this case, you may try a variation like this.
Here, Caitlyn now likely hits the enemy Malphite and eventually Kog’Maw, while maintaining the positioning of making your carries hit the same target. Your Malphite protects your backline to some degree, and Cho’Gath continues as the primary tank.
Our goal with all of these variations shown is that the early-game board has many nuances to take advantage of. Playing the right boards at the right time allows you to save health in the early game, letting you play more greedily with more gold than other players. There are also times where you play weaker boards intentionally to lose and pick items for the carousel. In all of these situations, it is about optimizing your early game positioning to your benefit.
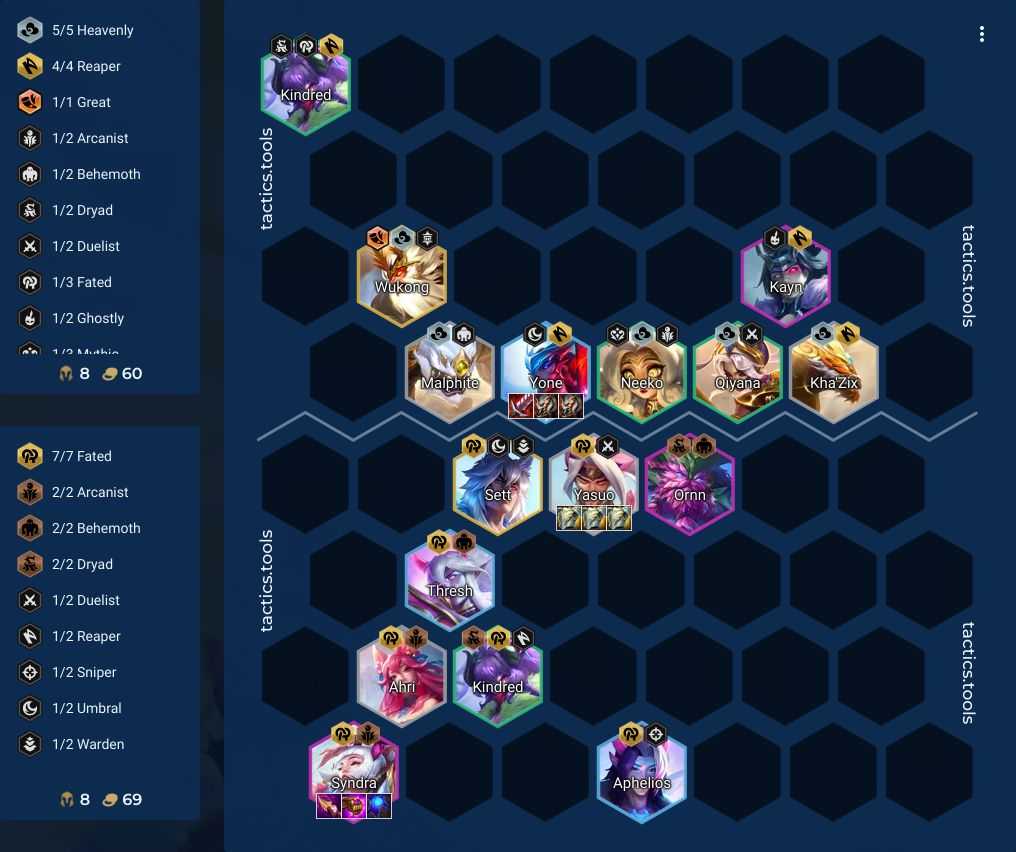
At first, this is quite a disastrous board state. Both players have their pieces and carries, and we can safely assume the Yone player is trying to position to eliminate Syndra as fast as possible. Many players will often play the scouting game with the opponent, trying to position Syndra on the opposite side of Yone to avoid contact with him for as long as possible. However, in times where you have the appropriate pieces, you can also play to eliminate the threat.
The idea of this board is that Yone is going to cast, and either target Ornn, Thresh, or Kindred/Ahri. Kindred is ideal as she can cast as Yone focuses her, potentially making him change his target to a tank. Our goal is that we swiftly remove the Malphite at the time of Yone casting, and let Syndra aggro on to Yone. As a back-up plan, we have Sett to try to stun him or position him awkwardly in a way that prevents him from focusing on the carry.
This is not a mathematically correct board, but a board with a strategy. We are not taking advantage of Sett’s stacking with AD. We are trying to use Yasuo to eventually take all the aggro and use his Gargoyle plate stack. Aphelios would much rather be positioned away in normal cases, but he has a different purpose. Our goal is that Yone has so many potential targets in close proximity that he will hopefully either receive Syndra’s aggro, or at least not reach Syndra before she can decimate the board.
Under normal circumstances, Ornn’s positioning could be behind the Yasuo to let the Gargoyle stack do its work. But here, we’re trying to give Yone another potential target to give Syndra another potential way of winning through letting her stack longer. It also comes with the benefit of letting Ornn cast immediately from having faster mana generation. It is not the most focused board, but it has multiple facets that make it more difficult for the Yone player to simply position close to your primary carry.

Consider the more traditional counter, where Syndra is tucked far away from Yone until he gets to his third or fourth cast. The board is more optimal in letting Sett stack while Yasuo retains most of the aggro. In an ideal circumstance, it is not the wrong play to make. But this kind of positioning requires the player to constantly scout the other player, while constantly shifting their board. It becomes a mind game rather than giving you control over what will happen. These kinds of situations are especially where players make the wrong unit move at the worst moment and throw the game entirely.
The most ideal position is where you can safely play a board while forcing your opponent to find an answer to it. Often the other player simply plays the reverse board.
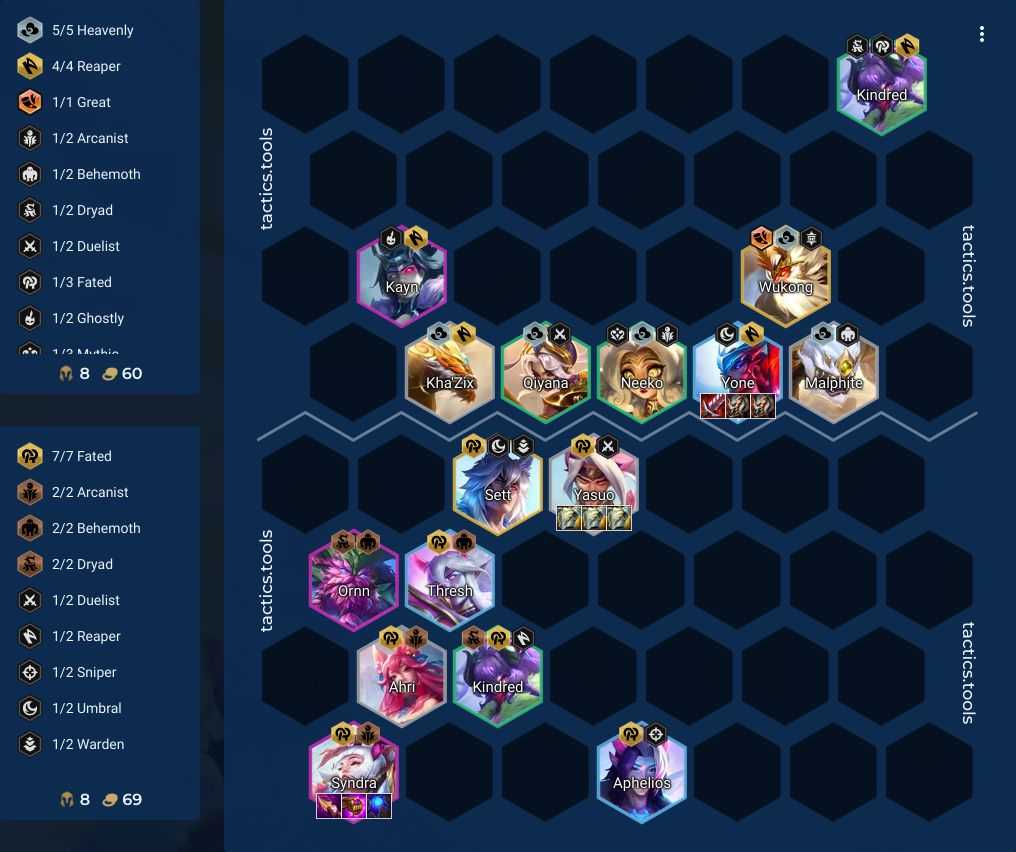
Notice here that you have multiple units distracting Yone, regardless of Sett now mostly wasting his cast on a weaker unit. This makes it much easier for you, as you now only really need to move Sett or your backup tanks. Your opponent is making many moves in a short period of time, often shifting positions erratically to find the answer. The goal in the end is to force your opponents to make decisions that lead them to making more mistakes, and making your own line difficult to solve.
A typical level 8 vertical Storyweaver line often relies on placing their primary carries like Kayle, Irelia, and occasionally Zoe/Sivir in the backline. A standard line tends to look like the following.
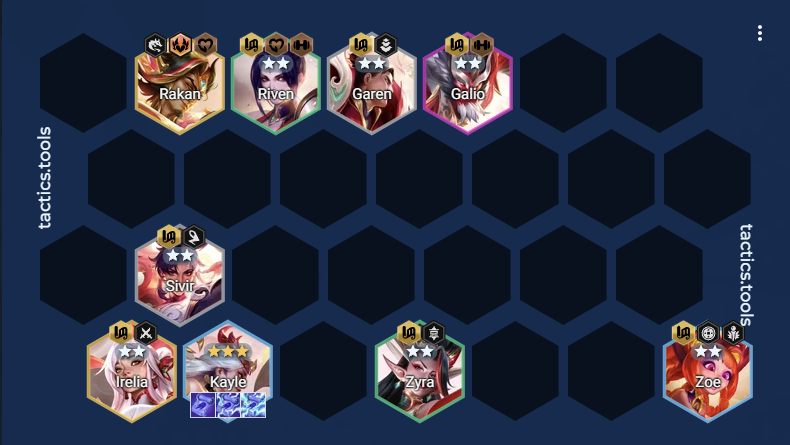
In most circumstances, this kind of board is the correct play. Your backline ends up being the last one to be targeted under ideal circumstances in a front to back fight.
However, there may be a different scenario, where your opponent has backline access or your Kayle is not generating enough mana to hit the board. There are some cases where you can play Kayle directly behind the tanks.

The idea behind this is that Kayle casts faster because she takes stray hits from random abilities, at the cost of being more vulnerable. It also places her in a much more aggressive position for her cast, where she’ll cast faster to let her potentially one-hit the frontliners before they can threaten the board. This is particularly an odd potential solution to Titans Resolve stackers like Yone & Volibear, where it is possible to cast before they hit their full stacks. Of course, it also has the potential to waste Kayle’s damage output if Kayle is eliminated early from being in a vulnerable position.
These kinds of tactics can win you matchups where you control when your units cast by taking advantage of mana generation mechanics.
Take any board positioning shown here with a grain of salt. Patches are frequently changing how effective units are in their roles, as well as what threats you may encounter. It can change even what units are aggroing because they have less damage, range, or even a different targeting AI. The positions shown above are mostly hypothetical, and may differ depending on augments, items, and if you even hit the pieces you wanted.
The key takeaway is that the optimal board constantly changes. The guides that show you what the best boards look like are often the same ones that other players look to counter. Your best bet to win as a TFT player is mastering positions that give you better options and more difficult counterplay for your opponent. The more you understand how units interact on the board, the stronger your ability to consistently win.


