It feels like eons now since Rocket League went Free-to-Play, as we find ourselves well into Season 3 for ranked competitive play. You may have just picked up the game since it was free to download, or you have been a no-lifer like me and have played the game continuously since its inception. In either case, ranking up in competitive play can be a challenge for all players. We hit certain plateaus and have a difficult time trying to ascend into higher tiers of play. For Platinum players, this can be especially difficult. In Season 2 for competitive play, Platinum players made up nearly 29% of the player base in standard mode. Once you get into Diamond however, that percentage rapidly shrinks from 29% down to 11%. The purpose of this comprehensive guide is to help get you out of that 29% and into the 11%. We will cover tactical and mechanical facets of the game, as well as concrete and tangible exercises you can do to achieve that next step in your gameplay.
Play Time
We will get the most obvious and obnoxious piece of advice out of the way first. You need to play the game more. That might even sound redundant to say at this point, but playing the game in-frequently, with large breaks in between sessions, will have a detrimental effect on your growth as a player. Any development or growth you may see will start to dwindle when you are not actively applying those new skills. Think of it as a muscle. If you do not work out or use that muscle, any gains you previously had will start to fade, and you will need to work harder to bring that muscle back to its previous state. Even if you are only able to play for shorter amounts (an hour or so), playing every day will have a greater impact on your development, rather than grinding for several hours one day, then stopping for several days before playing the game again.
Kick-Off
Improving your kickoff will add an immediate benefit to your game. Reaching the ball quicker off the draw is a prerequisite at this point into achieving higher ranks. Lower ranked players and a plethora of Platinum players that I have seen, have not yet integrated a flip into their kickoff when approaching the ball. They will drive and boost towards the ball and will only flip once after reaching the ball, dodging either forward or sideways in hopes of a favorable 50/50. Implementing a forward or diagonal flip midway through your kickoff will assure you reaching the ball quicker, increasing your odds of winning the kickoff and collecting possession.
Adding the diagonal flip versus a front flip on your approach to the ball is technically more difficult. I advise to start with the front flip and if that is feeling comfortable, add in the diagonal flip. With either flip, you will want to start the flip sooner rather than later in your kickoff, so you have time to land your car and dodge a second time into the ball. If you do it too late, your second dodge will be too late and most likely, the ball will pinch over your head and you will lose the kickoff decisively. Once you have the timing down, you will need to be mindful of when you boost. You can boost continuously through a diagonal flip, which makes it the quicker option, but more technically difficult. With the front flip, there is a moment in time where the end of your car is facing forward, so boosting then will slow you down. You will need to watch when you are boosting when practicing the front flip in your kickoff. Lastly, you will want to make sure you are striking the center of the ball on your second dodge. If you are losing the kickoff and the ball is flying into your back corner or side wall, you most likely did not strike the center of the ball. Being off centered to either the left or the right of the ball leaves an opening for your opponent to push the ball the other way, resulting in a lost 50/50.
A wonderful way to practice your kickoffs is in free play and casual 1s. With free play, when you reset the ball, your car automatically appears in the several kickoff spawn locations. This means, you can easily practice integrating flips repeatedly, in a new location each time you reset. With casual 1s, you now have an opponent to practice against hitting the ball centered and with speed. Ones also guarantees you having the kickoff every time (obviously), which means more repetitions. Lastly, if you find yourself losing the kickoff over and over again, save the replay and look back. In replay analysis, you can slow the play way down, and you can see exactly how you are striking the ball on the kickoff. This feedback is invaluable in diagnosing your kickoff and making the necessary adjustments.
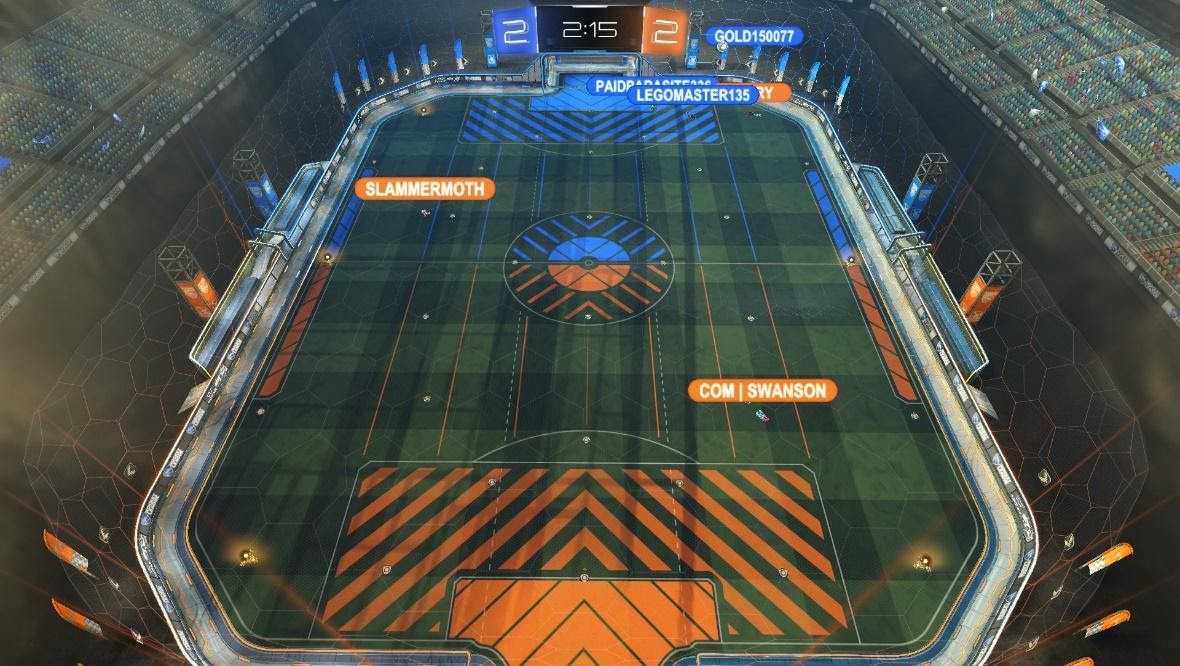
Spacing/Positioning
Many Platinum players that I have seen are starting to develop a sense of positioning. They are starting to understand a more rudimentary conception of rotations and where they need to be on the pitch at any given moment. However, proper positioning usually collapses among Platinum players during the transition out of the defensive end. Let us take a close look at the example below.
Effective spacing requires a first man (player/layer), second man, and third man. The first player either has possession and is advancing the ball down the pitch, or is the one immediately challenging, fake-challenging or provoking the opponent to recollect possession. Second man provides support to the first man, who can recollect the ball if the first player loses possession or is a pass option for the first man. Lastly, the third man is the player providing coverage behind the first and second and is ready to slot into the second layer as the play develops.
Now back to the picture. Here we have a couple of friends of mine in the Platinum ranks, playing some threes. We have the first man on the ball, ‘Swanson’, pushing down field and into the opponent’s defensive third. Notice that Swanson has no support on the ball i.e. there is no effective second man. ‘Slammermoth’ and ‘Scruffylobo’ have vacated the midfield and there is no one transitioning downfield with Swanson. In this instance, there is no second man, which means if Swanson loses possession the opponent can transition back down field with relative ease. Furthermore, Swanson has no pass options, which forces him into the solo play. The simple solution to the example above is having either Slammermoth or Scruffylobo transition downfield with Swanson as that second layer and occupying that open space in the midfield.
We have a simple understanding of what it means to have a first man, second man, and third man on the ball. However, in terms of spacing, where should the second man and third man be? That is a bit of a loaded question, for Rocket League is a fluid and chaotic game, but hopefully the following example can provide us some insights.
In this example, we have Slammermoth as second man, with Swanson as third man providing depth/coverage, and Clory attempting to regain possession in the corner. Simply put, Slammermoth is too far wide in this play to be an effective second man. A general principle is that if your team does not have possession, or more specifically, does not have the free ball, being wide results in you taking yourself out of the play rather than providing support. Moreover, being far wide in this instance limits your options. The only ball that Slammermoth can effectively play here, is if the ball switches the field and ends up on the left side. Rather, if Slammermoth plays more inside and closer to Clory, they are now able to adapt to a variety of outcomes. If the ball switches the field, they can still cut that ball down, or let Swanson collect possession and rotate behind them. The ball could come out at the top of the box and then Slammermoth could shoot or challenge. The ball could also squeeze out along the side wall on the right side and Slammermoth could meet that as well. Being an effective second player means you can provide support and are able to adapt to however the play develops in front of you. The last thing you want to do is pigeon-hole yourself into a singular outcome that may or may not occur.
Mechanics
Mechanics are arguably the most talked about aspect of Rocket League. From professional play, down to the casual bronze player, everyone talks about mechanics. Questions around who has the best mechanics, which mechanics have the most utility, which mechanics should I develop first, so on and so forth. For now, in one’s progression from Platinum to Diamond, we are going to focus on mechanics that will give us the greatest returns and that is striking the ball with power and accuracy on a consistent basis. Now this is not to say that your ceiling shots and pre-flips are not useful, but at this point in the game, you are much better off honing-in and developing aspects of your game that are utterly crucial to your success and development. Being able to put the ball exactly where you want to consistently will result in massive dividends for you.
Improving your mechanics, and specifically your striking ability, requires only one thing: repetition. Repetition, repetition, repetition. There is no other way out in improving your mechanics. You must repeat the mechanic over and over again, to train your brain and improve that muscle memory. You could simply go into free-play and shoot the ball repeatedly on net. This will be beneficial, and it will expose you to a variety of different shots and bounces from a variety of angles. However, to improve at a quicker rate, you will want more concentrated and specific training. Custom training is your friend, in which you can see the exact same shot repeatedly and learn to make the necessary adjustments. Below I am going to give you a list of striking training packs that will hopefully aid you in your jump from Platinum to Diamond. Some of the shots in these packs will be quite difficult initially. If that is the case, simply skip them and move onto the next shot. Do challenge yourself though. Training is a wonderful opportunity to push yourself beyond your means and to go for shots that you would not attempt in ranked.
Air Roll Aerials: 30EF-9E98-C844-E83D
Striking 1: 55C9-36FE-613D-7F12
Striking 2: 27FE-E3D7-7FB5-7F43
Striking Progression: 7E96-B9C7-3AC0-9B70
Hopefully the mechanical and tactical analysis and advice will aid you in your jump into the Diamond ranks! Remember to play the game consistently and frequently, to challenge yourself in developing your kickoff and striking ability, and to watch your spacing and positioning with your teammates. Everyone goes through plateaus in their development. If you are experiencing such a plateau, be patient with yourself, and continue to push yourself to become the player you know you can be.


