


A Support's Guide to Warding For Everyone
Warding requires a team effort and although it seems simple, there are general rules to follow that every role should know.
Warding requires a team effort and although it seems simple, there are general rules to follow that every role should know.
Warding. It seems simple enough and can have a huge impact on the game. Yet, many playing League of Legends fail to properly ward or blame their Support for not warding more. "Jungle not warded" might be one of the top in-game flame chats along with "Jungle no gank" and "this (insert random Champion here)." Warding is not the job of the Support; it is a job that belongs to everyone. Knowing how to ward from your role is just as important as your Support warding, and using that information gathered from warding is just as important as warding itself.
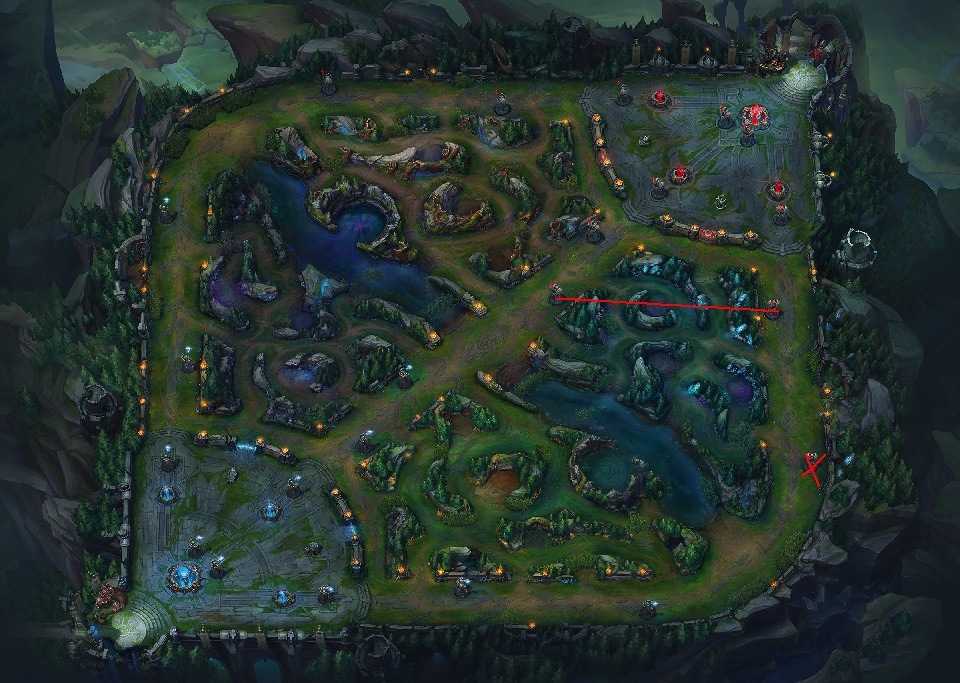
Turret Line
Let's start with a general rule of thumb: the turret line. The turret line is an imaginary line that runs from the outermost standing Mid turret to the outermost Bot/Top standing turret. If a turret falls, the line shifts to the next turret in line. This line is your ideal warding line (pictures shown are if you are blue side team).

Again, as your team takes turrets, the warding line moves.

First, you need to know where the enemy Champions are before you try to go ward. Do not face check a bush to ward when the majority of enemies are not shown on your minimap. When you know it is safe to ward, try to ward in the optimal locations below. Further, there are optimal warding locations in specific bushes. For example, in the Tri-bush, ward closer to your jungle. This makes the ward "safe" and causes the enemy team to have to go a little deeper if they want to destroy it.
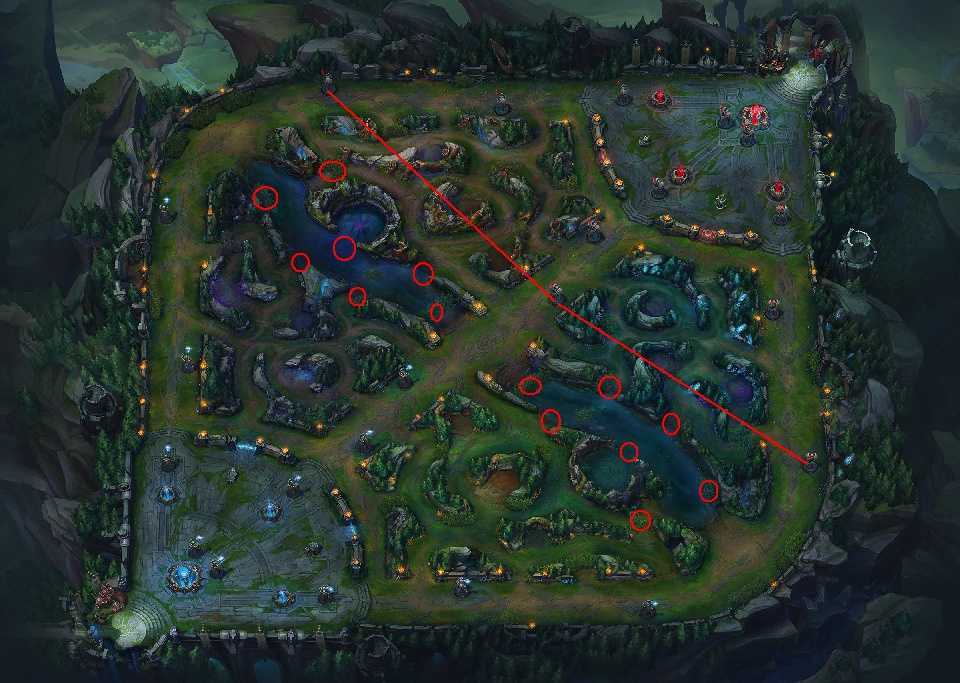
These locations cover the nearest lane bushes, as well as jungle entrances for both sides. Which jungle side you ward depends on how the game is flowing. As said, the line shown is the optimal warding line and you might not be in an optimal game all the time. If you are playing defense and being pushed in, your warding line might change to your turrets, to avoid going too far out. This would then cover your Jungle entrances, instead of the enemy teams. This line might also be used to help your Jungler keep track of a counterjungling enemy Nunu. Your warding line changes with your fallen turrets as well. If you lose Bot tower, most times, it might be not safe to venture past the river. Dragon pit provides an excellent example of this line change. If possible, you want to ward the opening of Dragon pit, however, if having to play defensive, warding just over the wall still provides useful information. If your team does have the advantage or it is safe to travel farther from lane, both Jungle and Support can place deeper wards along the optimal turret line near Jungle camps to track the enemy Jungler.
Control Wards
Control Wards are a must buy for every role. They only cost 75g, yet many times only a Support will buy them, as, again, many falsely view warding as a Support only job. Account for a Control Ward purchase in your back! Control Wards should be placed in optimal positions with different locations covered by specific roles. These locations will not always be possible to get to however, and placing them closer to your lane might be optimal in different situations.

Both Baron pit and Dragon pit should be covered. It does not matter that these wards will not be placed in bushes and easily seen by enemy Champions. These locations are must wards. They not only can give excellent vision of Mid roams or Jungle ganks, but they cover important objectives. Dragon pit should be covered by a Support control ward while Baron pit should be covered by Top preferably or Jungle if necessary. Mid should place their Control Ward farther out than their immediate lane bushes, with Jungle covering the other river side. The ADC should cover their nearest lane bush on their turret side. A Control Ward, ideally, is going to last longer than a Trinket. For this reason, Control Wards should be placed farther out in river from your lane, while Trinket Wards being used closer to your lane. This allows less time roaming to place vision along the map and thus, more CS time. It also allows Mid to cover the river entrance bushes with Trinket Wards, while having better vision of the river. This way, if a Shaco goes invisible prior to entering the nearest Mid lane bush to gank, you likely saw him coming to your lane with the Control Ward and can move accordingly. At times playing Mid, this might not be possible and placing a Control Ward closest to you might be best.
A very common Control Ward location in the Bot lane is the river bush closest to your turret. Usually, the Support will throw down their Control Ward in that location. As I said, this should be an ADC's location. It allows the ADC to stay in lane to farm without missing CS, while providing vision. It also allows the Support to Control Ward farther up the river, gaining vision of Dragon pit and Mid roams/Jungle ganks sooner, giving more time to back if pushing into the enemy turret. This combination then allows more freedom for placing Sightstone wards, such as an enemy Jungle entrance, a deep Jungle ward, or trying to see that Blitzcrank hiding in the lane bush. Furthermore, with the ADC warding the "safer" location, it allows the ADC to only have to buy one, maybe two, the whole game, while the Support can roam around with a couple Control Wards in their items.
Split Pushing
Split pushing is another important aspect of the game. Many times, however, you will see your teammate pushing without any vision in the Jungle or of the enemy team's location. This is a cardinal sin of League of Legends. If the enemy team is missing, you need to assume you will get clapped. Place wards along the current turret line. This allows you to split push/farm with time to back if the enemy team does come to stop you. Without vision, it might be best to freeze the wave and farm or start a slow push wave and go elsewhere. If you and your team have been keeping up with warding, you should already know if it is a good idea to split push.
Conclusion/Other Remarks
Do not forget to update your trinkets and do not die for a ward. As a Support, drop what wards you have left down before you back. Last, remember who the enemy jungler is. Champions like Zac, Rek'Sai, or Evelynn might require different warding locations than a Nunu or Ivern. There are also plenty of warding tricks to ward over walls. Be sure to look these up!
Remember, vision does not belong to the Support alone. One can only place three wards at a time on the map. This leaves much of the map uncovered if only a Support was warding, so it needs to be a team effort.
Like our content? Support us by getting our merchandise in our shop.


