Have you ever wondered why the pros seem to always have boost and are able to make flashy, mechanical solo plays? Aside from their skill and talent, these all stem from their magnified boost management. Let’s get started.
So why should you manage your boost in Rocket League? Players specifically in the lower ranks have definitely heard the phrase “I didn’t have boost!” or “I was getting boost!” moments after getting scored on. Boost is one of the most important factors which determine your decision-making in-game. Boost, along with positioning is what teams use to determine who goes for the ball.
Boost Values and Statistics
Let’s start with the technicals. There are 4 ways to get boost in this game: Big boost pads, small pads, spawning for kickoff, and spawning after being demolished.
Boost for Kick-Offs and After Being Demoed
In every game, all players are given the same amount of boost for every kickoff and for spawning after being demoed. This boost amount is 33.
Big Boost Pads
There are a total of six big boost pads scattered evenly along the edge of every standard soccar map. Each big boost gives a 100% Refill to your boost meter. This has a 10 second respawn time after being picked up.
Small Boost Pads
Small boost pads have numerous names within the Rocket League community. Some may call them pennies, dimes, orbs, or just pads. There are a total of 28 small pads scattered across every standard soccar map. Each small pad adds 12 boost to the boost tank. They have a 5 second spawn time after being picked up. With some simple math: there is a total of 336 boost scattered across the map just from small pads. That is definitely enough boost to save a shot, go for a clear, or even miss an open net!
Important Notes
The maximum amount of boost you can have in the tank is 100, excess boost will not be saved.
Each type of boost pad has its own unique hitbox, boost amount, placement, and spawn time.
Boost Hitboxes
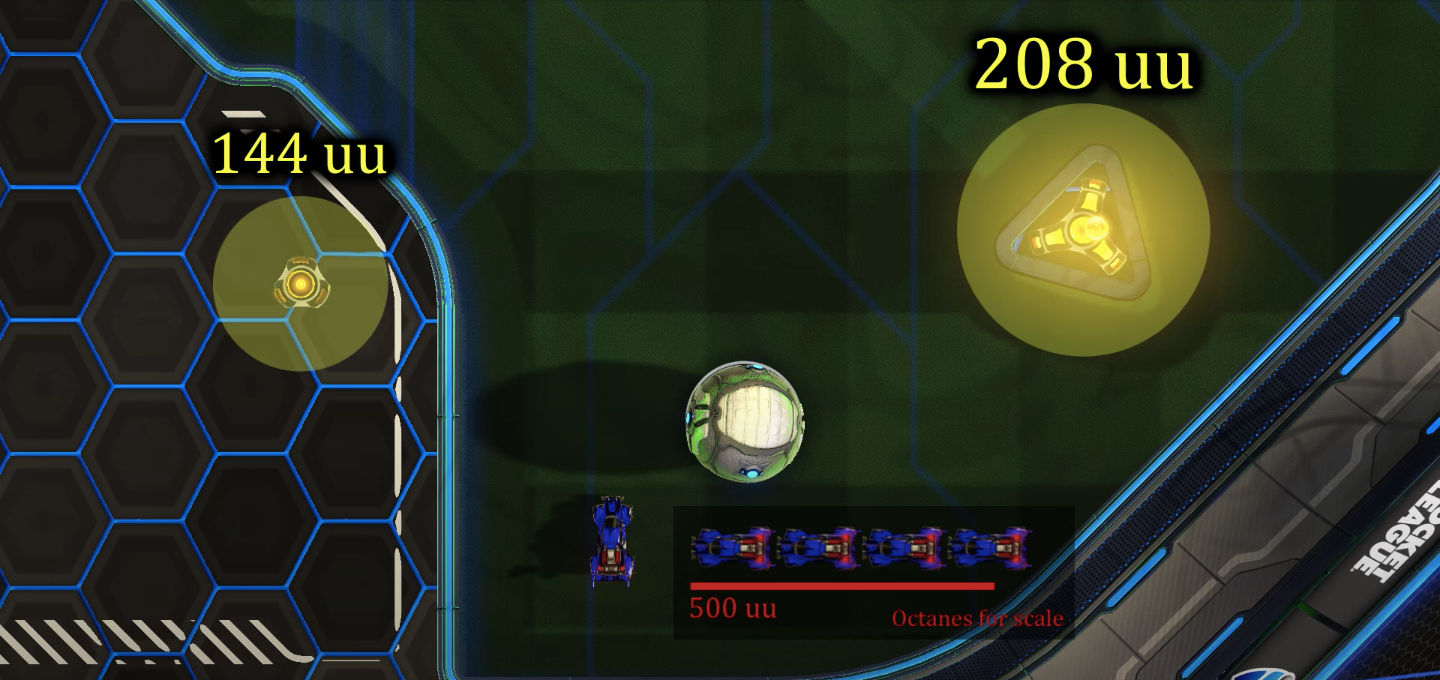
Just like the ball and cars of this game, there is a specific hitbox (or rather cylinder, to be more specific) that the players can enter to get each boost pad. According to Wiltshire (2020), “Hitboxes are the invisible geometry that tells a game when and how things collide.” The small boost pad has a ground radius of 144 Unreal Units, and the big boost pad has a radius of 208 Unreal Units (Rocket Science, 2017). See the reference image below:
(Image Source: Rocket Science - Boostpad Hitoboxes: Rocket Science Mini #2)
Along with this, boost pads also have a hitbox vertically, allowing players to jump over them and still obtain the boost. According to Rocket Science (2017), the small pads have a vertical hitbox of 165 Unreal Units, while the big pads have a vertical hitbox of 168 Unreal Units. Please refer to the image below:
(Image Source: Rocket Science - Boostpad Hitoboxes: Rocket Science Mini #2)
Boost Pathings
In the top percentage of Rocket League competitive play, being efficient in picking up boost while still being relevant to the play is of utmost importance. Throughout the many years Rocket League has been out, players have developed specific booth paths to maximize efficiency without sacrificing positioning. In this section, you will see examples of specific boost paths to take, what I call/nickname them, how much boost it provides, and the viable uses for each.
The curved boost path is doable for both sides of the map. This type of boost path is ideal for offensive pushes as it keeps players relevant to the play while at the same time giving a substantial amount of boost to maintain pressure, go for an aerial, or even score a goal. It is also ideal for rotating to the far post when transitioning from offense to defense.
The straight boost path is a very versatile, yet simple way to get from end to end. It is primarily used to quickly get back on defense. A simple front-flip or speed-flip can get you all of these boost pads without ever needing to turn off the ball-cam.
Similar to the Straight path, Diagonal Straight Paths also exist across the map. There are a total of four of these paths in every standard map. It includes a direct path to one of the big boost pads while still picking up small pads along the way to gain speed. This is ideal for far-post defensive rotations.
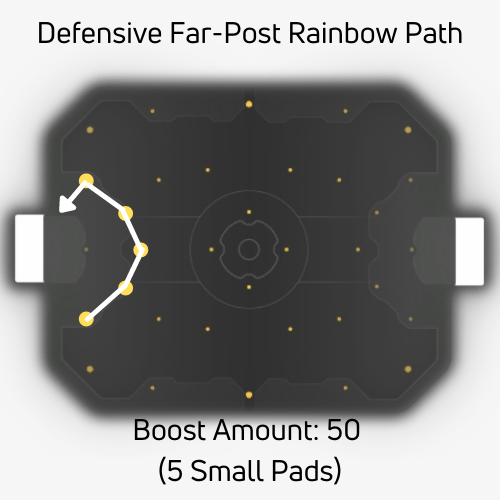
This is the Defensive Far-Post Rainbow Path. I call this a rainbow path for the rainbow-like arc it forms on the map. This is primarily used for defensive rotations, specifically when there is too much pressure made by the enemy team or there is no big boost available at the current time.
In most standard games within the mid to high level ranks, there is most likely a designated player who goes straight for the big boost on kickoff. The callout “Back Left” or “Back Right” means that one will go to the back left or back right boost. This strategy is primarily used in standard 3v3 games but may also be viable for 2v2 games. Having the ball roll to one of the big boosts of your team will instantaneously create a potential offensive play.
I call this the Sustained Pressure “Hook” path. This boost path starts from the opponent’s side and is shaped like a hook. Maintaining pressure on the opponent’s side eventually opens a window for goal scoring opportunities. This type of boost pad provides the aggressors a substantial amount of boost while staying close enough to score a goal or keep the ball in the opponent’s half.
Being able to manage your own boost while making sure your opponent can’t is one of the ways to loosen up the defence and potentially score a goal. The boost steal path is a good way to make sure the opponent stays uncomfortable in defence. Stealing their boost makes it less likely for the defender to make a clear or a save.
When and When Not to Use Boost
In a game like Rocket League where even the slightest mistakes can cause you the entire game, knowing the proper time to boost in a match is crucial for the next seconds of the play. Proper rotations and positioning are directly related to how much boost you save, it is important to know the 1st, 2nd, and 3rd man roles and positioning. The 1st man is the one in charge of challenging or baiting the ball in defense; while bringing the ball forward for a pass or goal in offense. The 2nd man is primarily in charge of receiving the pass from the 1st man or the mistouch of the enemy. Lastly, the third man is in charge of receiving or making big clears in defense while supporting the 1st or 2nd man on offense positioned furthest back. Now that you know the very basics of player roles at given times, it will be easier to know where to position yourself, what balls you should go for, and when to use your boost. Here are some general rules:
- Ideally, keeping as much boost as possible in the tank is the best option when you do not need to go for the ball.
- The players as third man must save their boost the most because they have no possession of the ball and are not waiting for a pass.
- When going for an aerial, do not hold your boost button when you can no longer hit the ball.
- After hitting the ball hard, do not waste your boost trying to follow it up unless you are going for a double touch or a dunk on the opponent.
- Do not hold boost when supersonic on the ground, taping the boost once in supersonic mode is the maximum speed your car could reach.
Small Adjustments that Make a Big Difference
The finest details in Rocket League could be the difference in a win or a loss. Here is a broad list of tips and tricks that help manage your boost in every match:
Use wave dashes: Wave dashing as mentioned earlier gives you the speed of a flip without fully going the distance needed for a normal one. You can use wave dashes in all kinds of scenarios. This includes recovering from being bumped, gaining speed as third man while saving boost, using a chain-dash to get back on defense quickly, or even wavedashing on the wall to gain speed or fake the opponent. A more in-depth explanation and usage of wave dashes will be made in a future article.
Use flip-resets: Flip-resets are considered a flashy mechanic in-game, but it definitely has viable usage when done correctly. Aside from being unpredictable in the air, using a flip-reset is a good way to extend your aerial play when you are low on boost.
Use powerslide: While it is tempting to make donuts on the ground using the powerslide button, using it to maintain your speed while making sharp turns is crucial in the mid-high ranks. It is also good to use powerslide when getting off a wall quickly or recovering from a bump.
Conclusion
Boost management in Rocket League is what separates a good player from a great one. In summary, I’ve covered the important aspects of boost management such as the technical information about boost, boost pathings, decision making, and important tips to improve your game. I’ve taught you the fundamentals of boost management, now it’s your turn to apply what you have learned.