In my opinion, when looking to improve in a game, the most important thing, especially if you are going to play it for a long period of time, is to make sure that you are comfortable when you are playing that game. This means tailoring the settings of the game to suit how you play.
Before you even attempt to hit a ball in a game, there are some important settings that require attention if you are looking to improve your game and, for the lower ranked player, your next rank could come from something as simple as changing some of the settings in-game.
Camera Settings:
To start off, we are going to go through the most important settings to change in the game and that is of course the camera settings. The general consensus among the Rocket League community is that the default camera settings in the game are pretty terrible, so let’s go through the individual settings here and tell you what they’re all about and what a good guide value should be to make the most of your gameplay.
Camera settings are typically a personal preference thing, but there are some settings that are generally more useful than others.
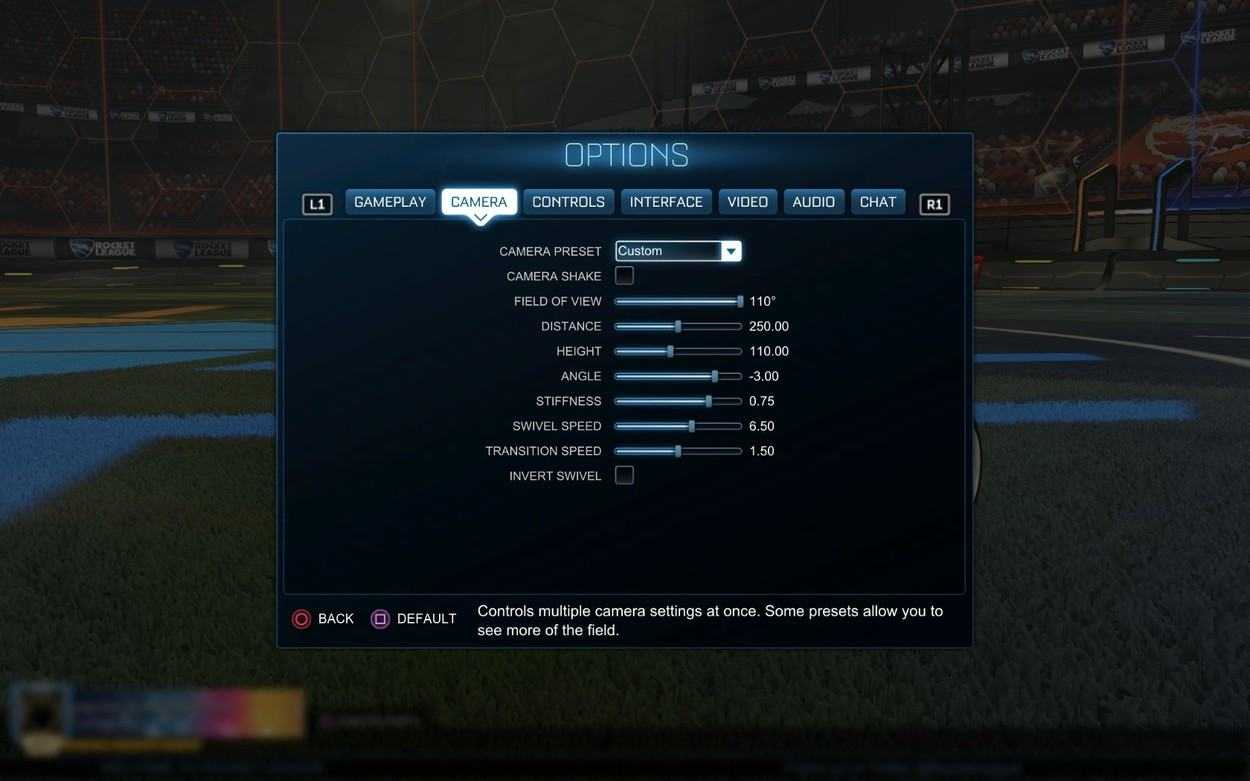
- Camera Shake - Turn this off immediately. This is the awkward shaking that you get when you jump, hit the ball, land, get bumped. It’s very distracting and really unhelpful so if you still have this on, switch it off.
- Field of View - The default value of this is 90 which means you barely see any of the field in front of you. Personally, I like to max this at 110 but anything above 100 should be suitable. Pick what is comfortable for you but 110 will allow you to see as much of the game as possible.
- Distance - This is how far away from your car the camera will sit. The further to the right you slide the slider, the further away the camera will be from your car. Putting the camera too far away will make everything on the screen look a lot smaller which can be awkward. A good guide for this slider would be somewhere between 250-300.
- Height - This is how high above the car the camera sits. Some 1v1 players like to have a higher camera as it allows them to see over the ball when dribbling. However, this makes aerials a bit more difficult. Most people tend to set this one at approximately 110.
- Angle - Pretty self-explanatory, the angle of which the camera looks at your car. -3 is what I have and seems to be the most popular amongst the professionals too.
- Stiffness - This setting is how much the camera sticks to your car. A lower setting will see the car pull away from the camera slightly and a higher setting will keep the car where it is at all times. I like to put this around the middle at 0.5, but it’s mostly personal preference.
- Swivel Speed - This is how fast your camera moves when you move the right analogue stick. It’s entirely personal preference.
- Transition Speed - This is how fast it switches ball cam on/off. I like to keep this in the middle ground as it allows me to take in a view of everything as I’m transitioning.
- Invert Swivel - This means you can switch your axis on the analogue stick so that up goes down and down goes up. This is really a personal preference thing again.
A list of the camera settings used by the professionals can be seen here: https://prosettings.net/rocket-league-pro-camera-settings-controller-list/
Video Settings:
Video settings often slide by under the radar in things that most people talk about when trying to improve, but a good setup of your Video Settings really does make a difference in your ability to play this game well and can really be the difference between Gold and Platinum ranks for example.
What you will definitely want to do is get the absolute maximum frame-rate available to you, even if you only have a 60Hz refresh rate on your monitor then you’ll still want more FPS available, this is because you want your monitor to display the very most recent frame available. So if you have a game running at 120 FPS, you’re getting two frames for each time your monitor refreshes, one of these will be wasted but if your game was running at 60fps, you could be seeing the earlier of the two frames you would be getting at 120 FPS.
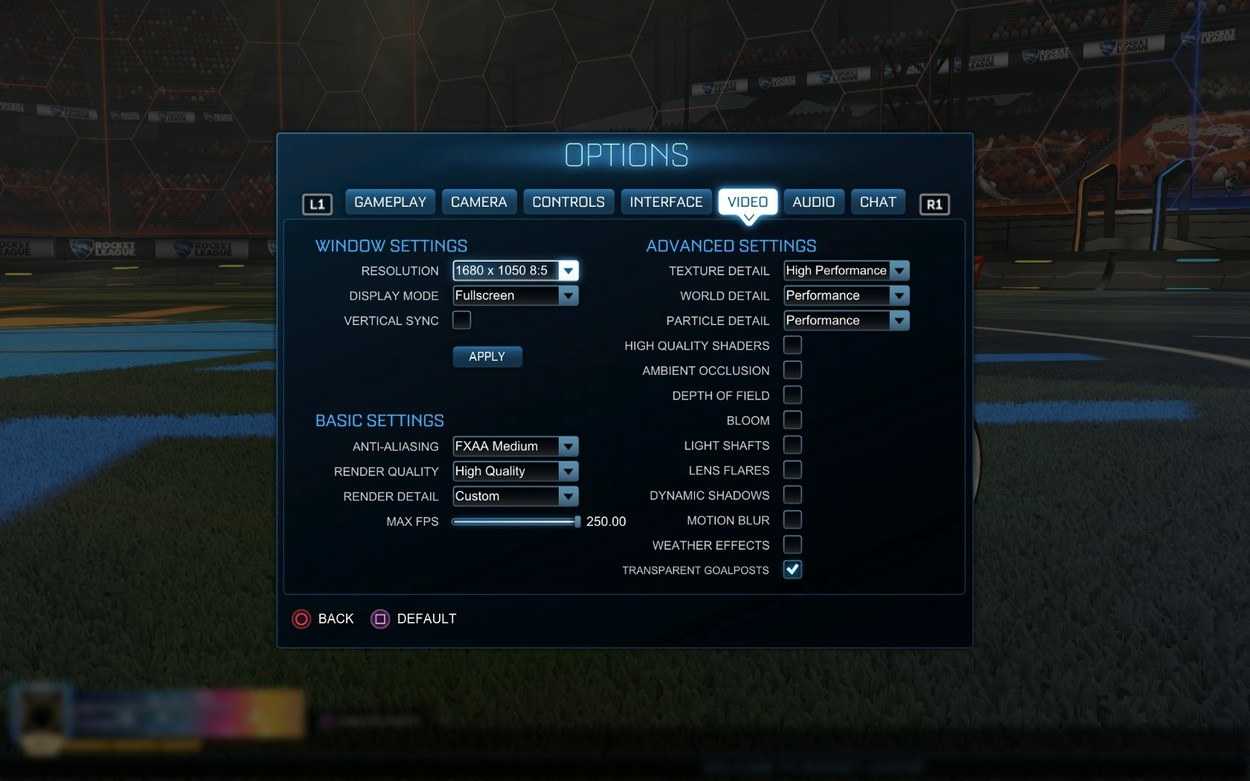
In the image below, you’ll see the video settings screen and when you are playing this game, you ideally want to get as many frames as possible per second as in a competitive game, frame-rate is much more valuable than how pretty things look on the screen. You also want to limit any distractions that might impede your vision of the ball and other gameplay aspects.
Window Settings
- Resolution - You should be setting this to your monitor’s native resolution.
- Display Mode - Fullscreen. Other modes have been reported to give occasional frame drops, particularly if you have a dual-monitor setup.
- Vertical Sync - This is one of the most important things to turn off, V-Sync corrects screen tearing but increases input lag and screen-tearing is much more bearable than input lag.
Basic Settings
- Anti-Aliasing - This option is to smooth the edges of things and the higher you put it, the bigger the hit on your framerate is. Personally, I find that FXAA Low is absolutely fine. Everything seems to be smooth to my eyes. Turning it off definitely makes the game look terrible, but you will notice quite the frame-rate drop between FXAA Low MLAA for example.
- Render Quality - This is the only thing that I like to set to High Quality as this is how all the objects on screen appear. Putting this lower, really does make the game look poor and, in my opinion, it’s just less fun to play with graphics settings that bad.
- Render Detail - This is a result of whatever checkboxes you have selected on the right, so we can ignore that for now.
- Max FPS - Max it out all the way to 250 even if your monitor doesn’t support it as advised earlier.
Advanced Settings
- Texture Detail - I run this at High, I’ve heard it doesn’t have a huge impact on frame-rate but I personally prefer the clean look of some of the arenas on the high performance setting and even if it gives you just a few extra frames then it’s helpful in my opinion.
- World Detail - This option is for all the grass/trees etc. around the arena. If you’re actually looking at what the grass looks like or what’s going on outside the arena, then you’re probably playing the game wrong. This should definitely be set to Performance as it means you’re loading less which means less strain on your GPU, meaning more FPS for you.
- High Quality Shaders - Some people claim that the game looks bad with this switched off, I personally think it looks cleaner and it does have a pretty hefty hit on frame-rate if you leave it on.
- Ambient Occlusion - This makes lighting more realistic but lowers frame-rate, so turn this off because it’s not necessary.
- Depth of Field - Turn this one off. It blurs things in the distance but you’ll want everything to be clearly visible.
- Bloom - This is what makes all the lights glow and pop out, such as luminescence the Season 6 Diamond Reward Wheels. Not really necessary and will impact your frame-rate. Also on maps like Neo Tokyo where the lights are very vibrant, it can be distracting.
- Light Shafts - Turn it off. The light shafts can be distracting
- Lens Flare - Definitely turn it off or it’ll blind your view of the ball on maps where the sun is shining through the ceiling.
- Dynamic Shadows - Shows shadows of opposing cars, etc. It’s not necessary and is a massive FPS eater, turn it off.
- Motion Blur - Definitely switch this off, distracting and will make your game harder to play.
- Weather Effects -This is very distracting too and impacts your FPS. Best switching this off.
- Transparent Goalposts - Definitely keep this switched on unless you enjoy not being able to see the ball in the corner when you’re in goal.
Control Settings:
Some people use Keyboard/Mouse for this game and there’s nothing wrong with that. In fact, some of the world’s leading players play with Keyboard/Mouse. However, I know nothing of keyboard/mouse bindings but in terms of controller bindings, I can recommend a few things.
The default controller layout can be quite awkward once you get higher ranked and start to incorporate additional skills into your repertoire are there are occasions where you will need to use two buttons which would be quite difficult to reach with your thumb. Some people have adapted to this by implementing the “claw” grip but instead of this, we have the ability to just remap the buttons used by using the “View/Change Bindings” button.
In my opinion, the most important control to change is your Air Roll button. This is the feature that allows you to make adjustments in the air to get a better angle on the ball. As you rank up, you will often be using boost and air roll at the same time so with the default controls of B/Circle and X/Square (Xbox/PS4 respectively) then these are difficult to perform together with your thumb.
One very popular choice is to move both Boost and Air Roll to R1 and L1 respectively. When doing this, it means you need to train your middle finger to use the accelerator and brake/reverse. Doing this means you can also move your Powerslide button to L1 as well. This works well for a lot of people, personally for me, I have kept things mostly default except Air Roll on L1 and Air Roll Left on L3, the reason for Air Roll Left on L3 is that it makes half-flips easier and I covered this in my previous article.
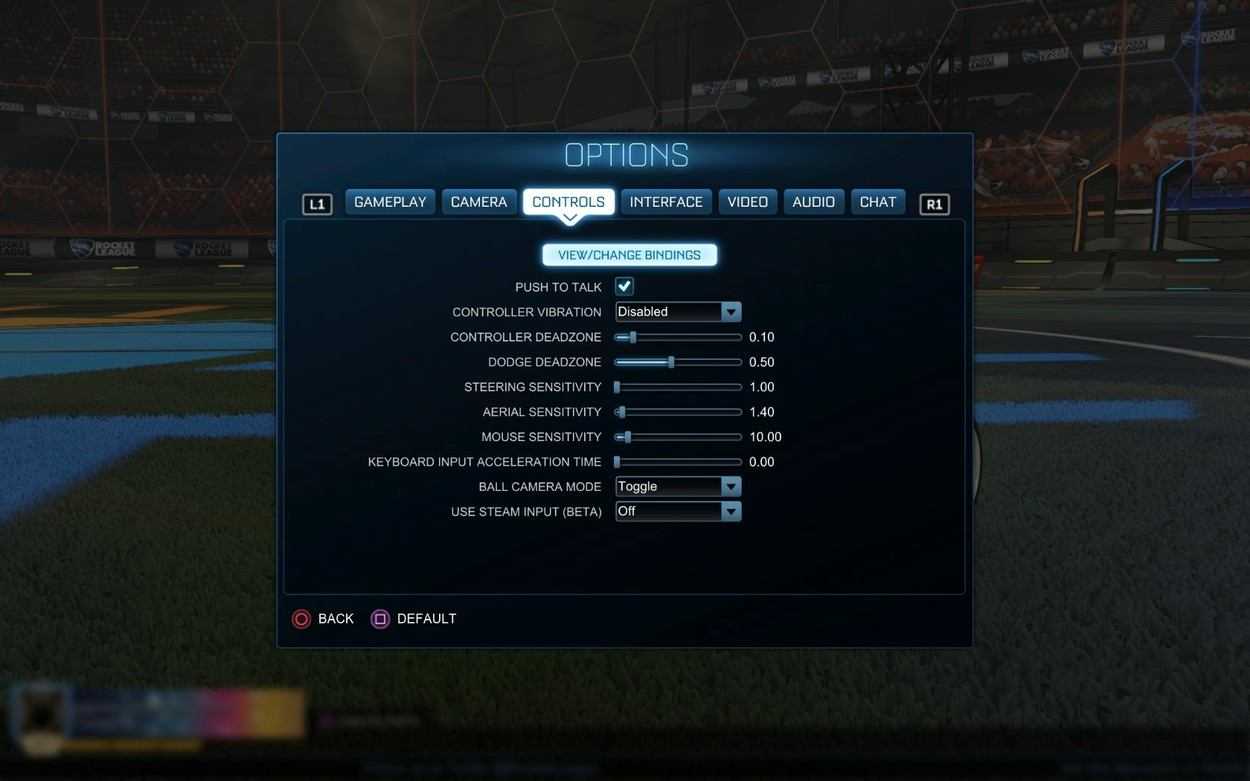
- Push to Talk - Voice chat does not work in this game, so you might as well uncheck this box
- Controller Vibration - This is really a personal preference thing but personally, I like to have it switched off as I find it uncomfortable.
- Controller Deadzone - This is how much you have to move your analogue stick before your car will start to turn. If you have this at the maximum value, you will need to push your analogue stick all the way to the left in order to start turning left for example. If you have it all the way to the minimum value, it will start to turn the moment your analogue stick is not central. This really comes to a personal preference thing. It’s whatever you’re comfortable with. You can see my setting in the image above.
- Dodge Deadzone - This is similar to the controller deadzone but it’s how far you need to push the analogue stick when trying to flip your car in a certain direction, a lot of people have this setting higher to prevent unwanted backflips when aerialing. If you have this maxed and you try to flip while your analogue stick is not pulled/pushed all the way where you want, you will just double-jump. You just need to find a good middle-ground that suits you.
- Steering Sensitivity - This is how sensitive your analogue stick is to steering so the slightest movement of your analogue stick will turn your car. Personally, I do not like to set this very high at all because it means your car can turn very sharp when you’re not particularly wanting to.
- Aerial Sensitivity - This is like the steering sensitivity but the difference is that it only applies to when you’re in the air. Most people have this slightly higher than the steering sensitivity as it means they can make faster adjustments in the air. I have mine set to 1.4
- Mouse Sensitivity - This is how fast your mouse moves in-game. I don’t think it’s particularly useful unless you have remapped your camera swivel or maybe steering to the mouse movement. But as someone who has very limited experience using the mouse, there may be a benefit that I am not aware of.
- Keyboard Input Acceleration Time - This option is specifically for Keyboard/Mouse players at 0, it means that when you press a key, it is immediately at its maximum speed/power, increasing this makes it feel more like a joystick. Useful for dribbling and looking around the pitch.
- Ball Camera Mode - This is how you switch between Toggle and Hold Ball Cam modes. 99% of people will want to use Toggle. Hold Ball Cam is really only used by people who are used to it from the old Supersonic Acrobatic Rocket Powered Battle Cars days (this was the game’s predecessor).
- Use Steam Input (Beta) - This allows you to remap key bindings to a button on your controller which is very useful if you would like to learn some particular mechanics. However, as it is still in Beta mode, it has been reported to throw up some bugs.
Other Useful Settings:
The next section is going to be a list of useful changes you can make to settings.
- Chat Settings - In the Gameplay tab, you are able to set your Text Chat to “Quick Chat Only”, “Team Only”, and “Team Quick Chat Only” or you can disable it all together. This change can be useful for people who are easily tilted by toxic teammates. You should also probably Disable the Voice Chat in here, as it doesn’t work anyway.
- Network Settings - Also in the Gameplay tab, there are three network settings. “Client Send Rate”, “Server Send Rate”, and “Bandwidth Limit”. These should all be set to High to ensure you get the best possible performance.
- Rank Information Settings - Again in the gameplay tab, you can choose to hide your divisions if you are someone who gets into a bit of a panic when you think you’re in a rank up game. You can also hide your rank in the Extra Mode playlists such as Rumble, Hoops, etc.
- Nameplate Mode - This setting is in the Interface tab and you should set this to Always Visible so that you can definitely see every player on the field easily. The cars can be difficult to see in the distance.
- Match Notifications - Also in the Interface tab, I like to set this to “Time Updates Only” so that I don’t get all the distracting notifications every time I make a save/shot etc.
Like our content? Support us by getting our merchandise in our shop.